Hey hey friends! I’m so excited for today’s podcast episode because we have someone on the show who is a personal friend and someone I admire deeply: Lesley Logan. She is an amazing person, a powerhouse instructor, and has inspired thousands of people all over the world to live healthier, happier lives.
Here’s what we talk about in today’s episode:
– Pilates chat: what is it, myth busting, what’s the difference between Lagree and classical Pilates, why you shouldn’t be intimidated by it
– Why self care isn’t selfish case
– Strategies for maintaining a self care routine during a busy season
– Her tips for being “Healthy in Real Life”
and so.much.more.
Here’s a bit more about Lesley and her background:
Lesley Logan, a certified Pilates teacher, breathwork, habits and mindset coach, is the founder of OnlinePilatesClasses.com, the first free online catalogue of Pilates exercise tutorials, where you can also find weekly Pilates classes and workshops. Teaching Pilates since 2008, she has run multiple studios, has trained hundreds of people to become teachers themselves and has taught thousands of students. When not teaching from her studio in Las Vegas, Lesley she’s hosting her podcast Be It Till You See it or traveling the world leading Pilates retreats.
The weather is cooling down, and I’m still obsessed with my sauna blanket. It feels even BETTER when it’s chilly outside and you can use the code FITNESSISTA15 for 15% off! This is one of my favorite ways to relax and sweat it out. I find that it energizes me, helps with aches and pains, I sleep better on the days I use this, and it makes my skin glow. Link to check it out here. You can also use my discount for the PEMF Go Mat, which I use every day!
I love love love the meals from Sakara Life! Use this link and the code XOGINAH for 20% off their meal delivery and clean boutique items. This is something I do once a month as a lil treat to myself and the meals are always showstoppers. I’m enjoying a delivery this week and it’s been an easy way to check the boxes above.
Get 15% off Organifi with the code FITNESSISTA. I drink the green juice, red juice, gold, and Harmony! (Each day I might have something different, or have two different things. Everything I’ve tried is amazing.)
If any of my fellow health professional friends are looking for another way to help their clients, I highly recommend IHP. You can also use this information to heal yourself and then go one to heal others, which I think is a beautiful mission.
Thank you so much for listening and for all of your support with the podcast! Please be sure to subscribe, and leave a rating or review if you enjoyed this episode. If you leave a rating, head to this page and you’ll get a little “thank you” gift from me to you.
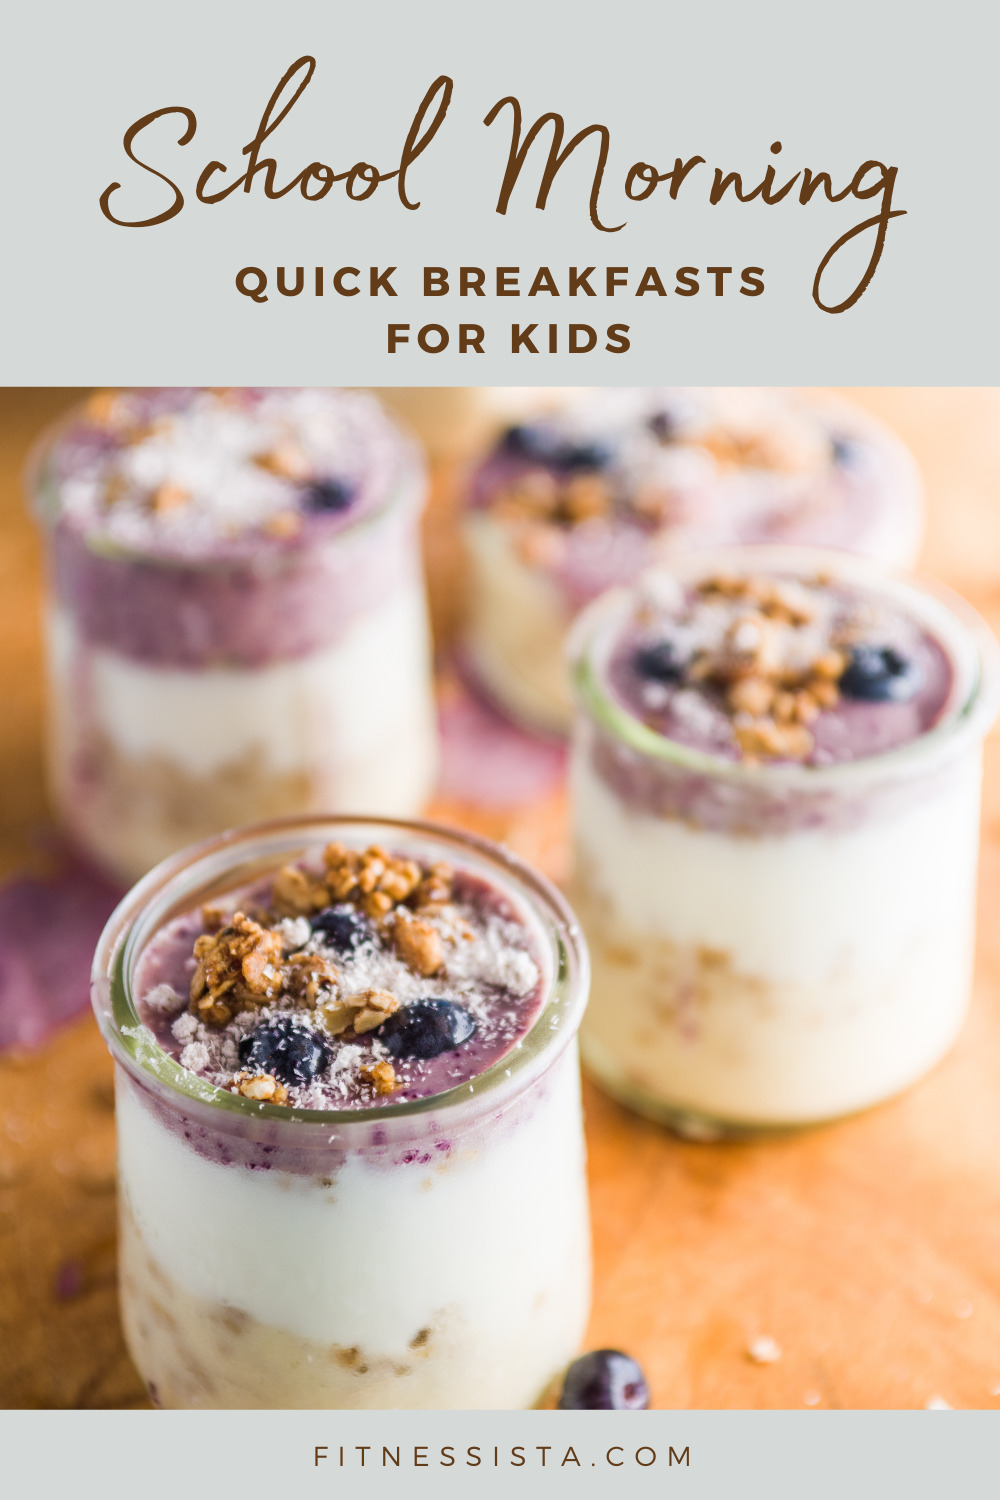
Sharing a roundup of some of my favorite options for QUICK breakfasts for the kids on busy school mornings. Please please please share your favorite in the comments section below!
Hi hi! How are you? I hope you’re having a lovely morning! I’m off to the chiropractor (bless it) and then spending the rest of the day working on some posts for the new year. How the heck is it December this week?!
For today’s post, I wanted to chat about breakfast ideas for busy weekdays! We have absolutely gotten into a rut with the school morning breakfasts. I went through an entire week making them the same thing, and after throwing away many cold egg burritos, I realized I needed to up my game a little.
Whenever I feel like I’m in a rut with anything food-wise, I take some time to sit down a brainstorm. For example, if I feel blah about vegetables and don’t want to cook anything, I quickly make a list of all of the vegetables we love. It’s an easy way to remember old favorites and switch up the routine a bit! The brainstorm session can work with anything: proteins (list ALL the proteins you love; you’ll remember some familiar faves), greens, snack ideas, dinner recipes, etc. I’ll also usually get out a cookbook and that gives me some new inspiration!
This post is serving as a brainstorm session for me right now, and I figured I’d make a list of all of the quick weekday breakfasts the kids love. Feel free to pin this for when you’re looking for new ideas! Please share your go-tos in the comments section below so this can be an amazing resource for everyone!
– Avocado toast: sourdough with smashed avocado, lemon, Everything but the Bagel seasoning, and a sliced hard-boiled egg on top
– Breakfast smoothie: 1 cup almond milk, Greek yogurt, 1 banana, frozen berries, peanut butter, spinach, ice, and cinnamon (sometimes I add chia seeds or MCT oil to this too)
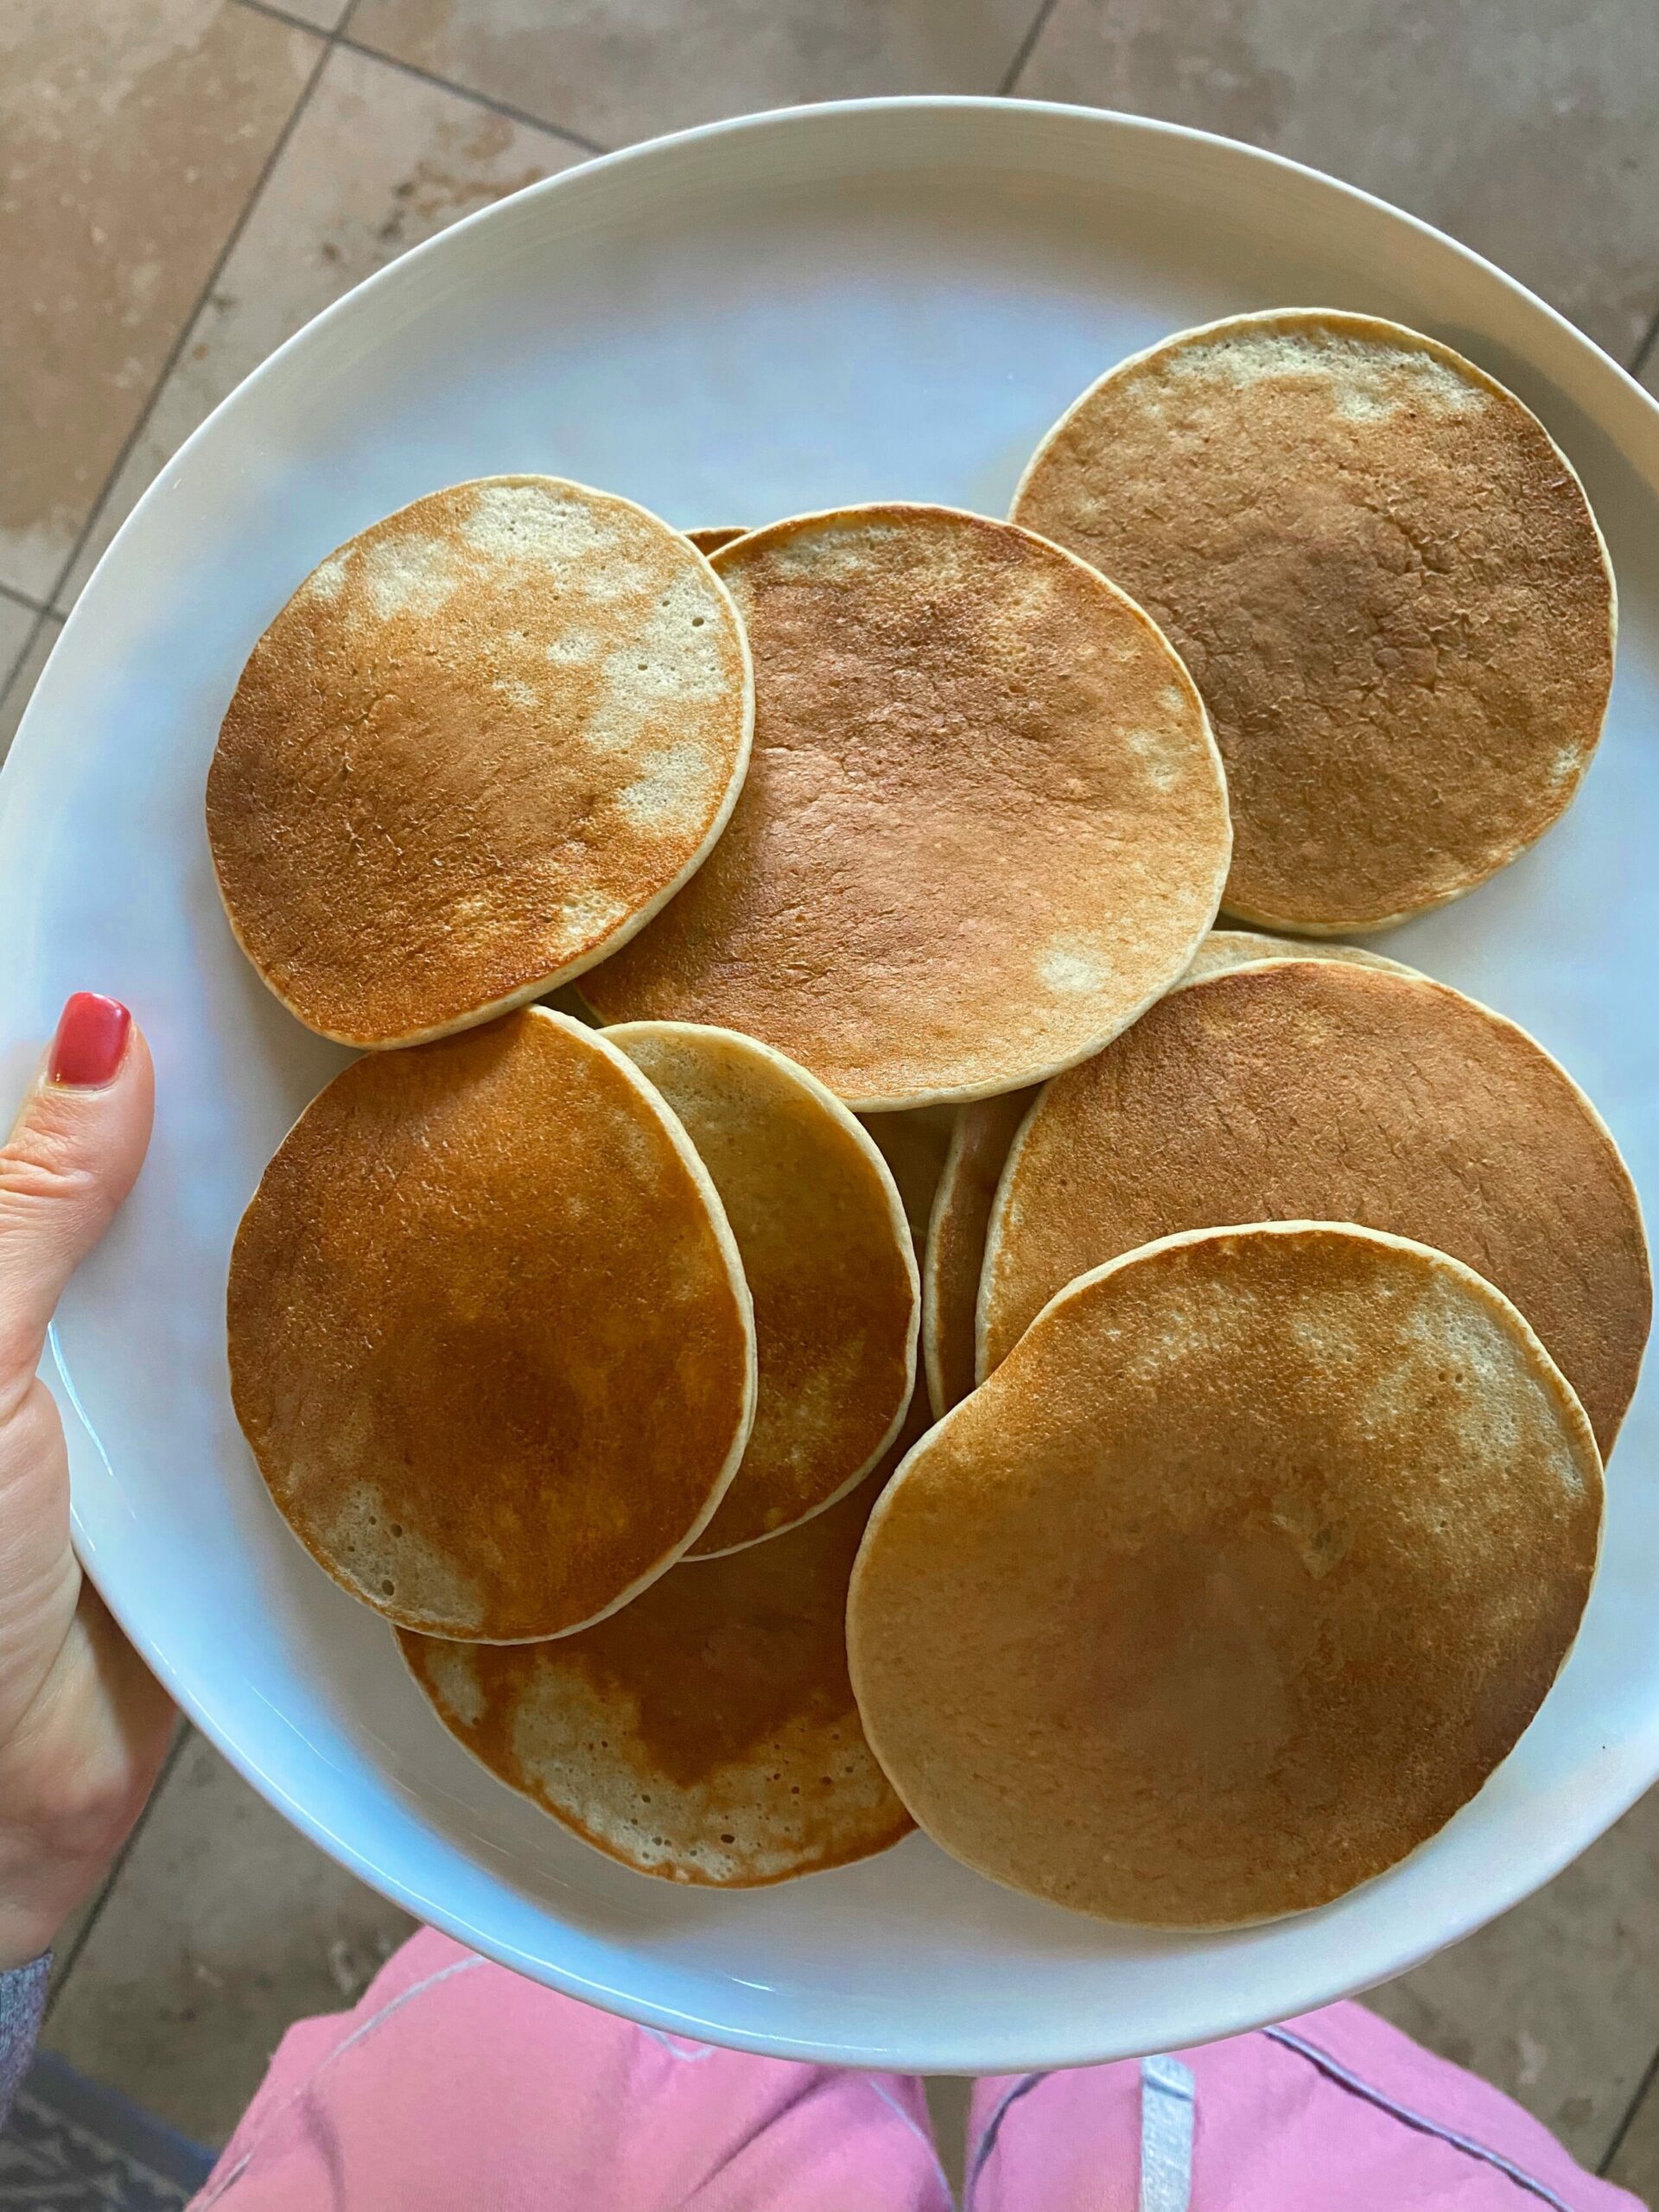
– *Their favorite pancakes in the world. I make huge batches of these over the weekend and freeze. I just heat them up, cut into bites, and put into a coffee mug to take in the car, and drizzle with maple syrup.
– Egg burritos: I scramble two eggs in a little butter, salt, and add to two tortillas before rolling up. They take these to-go, too
– A Go Macro bar and a hard-boiled egg (this is when we need something super fast and it does the trick!)
– *Chia pudding: 1/4 cup chia seeds into a Mason jar, and I add about 1 cup of almond milk, a drizzle of maple syrup, cinnamon, vanilla, and a pinch of salt. *Set in the fridge overnight to set. In the morning, I top with sliced berries and take it to go.
–*Nana’s egg casserole. This freezes beautifully and last a few days in the fridge. I give this to the girls with a tortilla or piece of toast.
– *French toast. This is another one of the girls’ favorites. I make this over the weekend and freeze. I just heat them up, cut into bites, and put into a coffee mug to take in the car, and drizzle with maple syrup. They also love the brioche French toast from Trader Joe’s.
– Hard-boiled egg (top with EBTB seasoning and sriracha), piece of sourdough (heated from the freezer), and some fruit (whatever we have on hand: usually berries and sliced banana)
– *Overnight oats: in a jar, I add about 1/3 cup of oatmeal and about a cup of almond milk. I add cinnamon, vanilla, a pinch of salt, and berries. I’ll sometimes add chia seeds, too. In the morning, I top with honey and serve it with a hard-boiled egg or breakfast sausage.
– *Yogurt parfait: Layer Greek yogurt with granola and fruit in a mason jar and keep it covered in the fridge overnight. The next morning, grab and go!
– Breakfast sandwich: I spray a bowl with avocado oil and crack an egg into the bowl. Microwave for about 1 minute until set and top with a slice of cheddar (so the hot egg melts the cheese). I put the egg between two pieces of bread with a little Primal Kitchen Ranch. SO fast and easy.
– Acai bowl: I use the frozen acai packs from Trader Joe’s with almond milk and honey in the Vitamix. I pout it into a bowl, top with granola, sliced fruit, and a drizzle of honey
– Peanut butter toast: I top a piece of toast with peanut butter, sliced banana, cinnamon, and drizzle with honey
– Peanut butter banana oatmeal: I use the Trader Joe’s oatmeal packs (the one with chia and amaranth), add hot water, and get dressed while it sets. I top with sliced banana, a bit of maple syrup, and a scoop of peanut butter. They love it!
* = pre-made at least one day in advance and waiting in the fridge or freezer
I also asked my Instagram friends for their favorite suggestions and here’s what they had to say:
– Premade breakfast sandiwhces
– Oatmeal, waffles, muffins!
– Make your own yogurt bowl. Grab a yogurt from the fridge and add jars of toppings from pantry
– Simple Mills muffins
– Oatmeal with power seeds: chia, flax, hemp, bee pollen
– Banana baked oats
Some of my favorite tips for making breakfast quickly during the week:
– Freeze anything you can.
When I make batches of pancakes, French toast, or muffins over the weekend, I double the bath and put extras in the freezer in a Ziploc bag. This way, they’re already ready to go during the week! You can also make a huge batch of breakfast burritos and freeze, baked oatmeal, or an egg casserole.
– Make breakfast the night before.
Things like overnight oats, chia pudding, and breakfast cookies are huge hits and are ready to grab and go in the morning.
– Splurge for convince when it makes sense.
Things like yogurt, hardboiled and peeled eggs, Mush overnight oats, store-bought chia pudding, bars, oatmeal cups, frozen waffles, frozen breakfast sausage, smoothie mixes, are all things that can just make life a bit easier. Not everything has to be homemade 😉
So, please share the goods! What are some of your go-to quick breakfast ideas that kids love?
For years I had dull, tired-looking skin that I spent so much time and money maintaining. And even then, I was never quite happy with the options out there – harsh ingredients, expensive treatments, 12-step routines… none of it was for me. Nobody’s got time to do that stuff every night! Since I’m all about efficiency, I wanted a product that would give me great skin without all the hassle. With that, I’m about to reveal my biggest secret so YOU TOO can clear your skin effortlessly!
SO what’s the solution?
I’ve been researching and working with our lab to formulate the perfect blend! We invented something that’s different than anything else on the market…Introducing the brand new, Natural Beauty! It features all of the hard-working, brightening, plumping, wrinkle-reducing skincare ingredients I love in a deliciously drinkable solution. (plus, it has the delicious dragonfruit flavor!)
The beauty benefits
Reduce wrinkles
Increase firmness & radiance
Improved hydration
Regulates good gut bacteria
Limit breakouts
Created with some of your favorite topical skincare products, our highly effective ingredients make Natural Beauty more than just a pretty face, it is also more than just a collagen blend.
I’ve tested and I’ve seen major results.
My skin has been significantly different the past year testing this product. Like I said, Natural Beauty is so much more than just a collagen supplement. So let’s dive into the top ingredients in this magical bottle to help you understand why:
WTF is Naticol®?: Not your average marine collagen. Widely recognized as one of the purest formulas on the market, Naticol® is made from sustainably-sourced fish collagen peptides. It’s been clinically tested to reduce the appearance of wrinkles and improve skin elasticity.
Hydrate with Hyaluronic: Chances are, you’ve probably seen or heard of Hyaluronic Acid from your favorite topical skincare brands. Hyaluronic acid in the skin binds to water to help increase moisture and reduce dryness.
PreticX®: The Gut-Glow Connection If something is off-balance in your gut, your skin is usually one of the first places you’ll see it. PreticX® is a stable prebiotic that helps nourish friendly bacteria in your gut and is clinically shown to increase bifidobacteria – responsible for helping to reduce inflammation and skin sensitivity.
Have you ever seen any collagen powder with these powerful ingredients? I sure haven’t! I’ve waited so long for you to try it yourself and now it’s finally here. Enjoy just one scoop a day for your best skin ever!
If you’ve ever asked yourself “Am I doing toolittleor toomanyreps and sets?” then this guide is for you.
This article is part of our Strength 101 series, and we’ll show you exactly how to determine the number of repetitions and sets for specific exercises, so you can build your own workout routine.
It sounds easy, but depending on your goals, the answer to “How many reps and sets should I do?” can vary greatly.
We work hand-in-hand with our Online Coaching Clients to create the correct workout program that suits their goals, needs, and available equipment
In today’s guide on workout programing, we’ll cover (click each to get right to that answer):
As Coach Jim mentions above, “Rep” stands for “repetition” and defines one complete motion of an exercise.
And one “set” is a consecutive number of reps without stopping.
And one “smorgasbord” is a buffet of food.
(This has nothing to do with this article, but it’s a fun word to say.)
As we mentioned throughout our Strength Training 101 series, how many reps and sets you should do is really going to be dependent on your goals.
For example, is your goal to improve:
Muscular endurance
Muscular hypertrophy
Muscular strength
Muscular power
Depending on what your goal is, the sets, reps, and rest intervals will change.
Oh, you’re just starting your strength training journey?
Well, make sure you grab our free guide, Strength Training 101: Everything You Need to Know. I’ll send it to you for free when you join the Rebellion (that’s us!).
Download our comprehensive guideSTRENGTH TRAINING 101!
Everything you need to know about getting strong.
Workout routines for bodyweight AND weight training.
How to find the right gym and train properly in one.
Alright, let’s break down reps and sets for you, because I can see you still have questions.
How Many Reps Should I Do?
Remember, “Rep” stands for “repetition” and is more or less one complete exercise.
The scientific term here is “sarcoplasmic hypertrophy,” as it focuses on increasing the amount of sarcoplasm, the non-contractile fluid found in your muscle.
Up to 30% of your muscle’s size is attributed to the sarcoplasm, so focusing on this type of hypertrophy helps build overall size (i.e., increased cross-sectional area of the muscle).
If you’re training for specific sports and just want to get stronger with more power – but not necessarily get bigger, this is the strategy for you.
This type of training focuses on strengthening the myofibril, the contractile part of the muscle, hence the name “myofibril hypertrophy.”
For this, target reps in the 1-5 range. And yep, that means you’re going to be picking up heavy weights, focusing all that concentrated effort into just one or a few reps.[4]
Something to note when lifting for strength and power: not only are you shocking your muscles, but you’re also putting a lot of pressure on your body’s central nervous system (CNS).
So what does this mean?
In a way, it means your body’s ability to communicate with its muscles has grown fatigued, and performance may suffer.
That’s why you may want to rest between 2-5 minutes in this range.
Oh, and your CNS will adapt and become stronger, which will be critical for building strength and power.[5]
Since powerlifting really taxes the central nervous system, you may be waiting 3-5 minutes between sets when training in this fashion.
TO RECAP, these are the rep ranges you should be considering:
Reps in the 1-5 range build super dense muscle and strength.
Reps in the 6-12 range build equal amounts of muscular power, strength, and size.
Reps in the 12+ range primarily build muscular endurance and size and also cardiovascular health.
I realize this is a lot to figure out, so if you are somebody – like me – who just wants to be told what to do and outsource all the worry of “am I doing the right workout for my goals?” I got you covered!
I’d love to learn your story, and then build a custom program that fits your goals. We’ll help you with your nutrition, your workouts, and even check in regularly to keep you accountable!
How Many Sets Should I Do?
As explained above, a “set” describes a group of repetitions performed for an exercise without stopping.
For example, if you do 10 squats right now, you just did 1 SET of 10 reps of squats.
So let’s talk about the “correct” number of sets per exercise.
The simple answer: “Do 3-5 work sets of a given exercise.”[6]
Just make sure you’re not compromising your form.
At least he’s trying!
The National Strength and Conditioning Association (NSCA) will break this down, suggesting the following set ranges:[7]
2-3 will help build muscular endurance (12 to 20+ reps)
3-6 build muscular hypertrophy (6 to 12 reps)
3-5 build muscular power (3 to 5 reps)
2-6 build muscular strength (less than 6 reps)
“STEVE, JUST TELL ME WHAT TO DO.”
FINE! Pick a weight that feels light to you, and then do 3 sets of 10 reps.
If you’re not sure if “3 sets of 10” or “5 sets of 5” is right for you, we got you covered.
We’ll build a program that fits your goals, and then adjust it each month based on your progress. Never guess or wonder what you should be doing again.
How to Build a Workout Routine!
Now that you have “edumacated” yourself on how your specific goals influence the number of reps per set, and what sets actually are, you can build your workout program around this info.
TO RECAP, aim for 3-5 sets in the following rep rangers per exercise based on your goals:
Endurance: 12+ reps per set.
Hypertrophy (bigger muscles): 6-12 reps per set.
Strength (dense, powerful muscle): 1-5 reps per set.
Two points worth mentioning:
A recent study showed that heavier weight for low reps created more muscle mass than a higher volume (lower weight for more reps).[8]
Studies show that bodyweight training exercises can build muscle, but require a LARGE number of sets per rep, and pushing oneself to absolute failure.[9]
What this means: studies suggest targeting heavier weight with fewer reps for big lifts like squats and deadlifts to build muscle, while targeting high reps to absolute failure with bodyweight exercises for muscle building.
Just remember to rest enough between sets so you don’t fatigue your central nervous system too bad.[10]
One last point: Nutrition is still 90% of the equation!
Your rep range doesn’t matter nearly as much as you think, so don’t overthunk it!
It doesn’t matter if you train like a bodybuilder, you ALSO need to eat enough food to provide your muscles with enough calories to rebuild themselves bigger and stronger! This is the biggest mistake I see skinny people make when trying to bulk.
This brings me to my final point: because nutrition is 90% of the equation, your sets and reps don’t matter nearly as much as you think they do!
All that matters? Doing MORE this workout than the last workout.
Remember, how you build muscle and strength and burn fat: “progressive overload.”
One more rep than last time.
Doing one more set than last time.
Picking up a weight that’s 5 lbs. heavier than last week.
So get out of your own head, and START TODAY:
1) GET HELP: If you want expert guidance and accountability so you don’t have to figure out all of this stuff on your own, I got you.
Click the red button below to get the details about our amazing online coaching program:
2) FIGURING IT OUT OUT ON YOUR OWN!
Download our free Strength Training 101 Guide! You get it free when you join our Rebellion (the name of our awesome free online community). Sign up in the box below:
Download our comprehensive guideSTRENGTH TRAINING 101!
Everything you need to know about getting strong.
Workout routines for bodyweight AND weight training.
How to find the right gym and train properly in one.
BRAND new to any training? Start with this bodyweight routine, and aim for 3 sets of 10. Work on your form!
Remember: the goal should be to get stronger each workout.
Write down what you did last time, and then do MORE this time.
By continually challenging your muscles to do more, they’ll have to adapt by getting bigger, stronger, burning more calories, etc.
There are a lot of different truths and fallacies on plateaus and how your muscles can get “used” to working out and stop growing.
If that’s something you’re battling, here’s a way to continue making progress:
Spend a week in a different rep range with different amounts of weight.
This will introduce a little chaos into the system, which could be a good thing…unless you’re Batman.
What we’re talking about is muscle confusion theory, which is a preplanned period of variation.[13] Not, you know, wandering into the gym with no plan and just doing something different every time (whatever you feel like doing at that moment).
That won’t help.
But spend a week deliberating mixing it up. Then go back to your regularly scheduled routine and you’ll be right back on track.
Make sure you know what you want, and then design a plan to get there.
-Steve
PS: If you want a nice shiny app to tell you EXACTLY how many seps and reps to do, our shiny new app will do just that!
You can sign-up for a free 7-day trial to Nerd Fitness Journey, which will build a workout around your experience level!
More specifically, the National Strength and Conditioning Association (NSCA) recommends executing more than 12 reps and having a rest interval in-between sets of 30-seconds or less for muscular endurance. Additionally, you want to focus on a load of 67% or less of your one-rep max (1RM). For example, if you squat 225 pounds for 1 rep, then 67% of that is ~150 pounds. (Haff G, Triplett NT. (2016). Essentials of strength training and conditioning. Fourth edition. Champaign, IL: Human Kinetics)
In one of the earliest studies examining the effects of concurrent strength and endurance training, Hickson and colleaguesdemonstrated that moderately trained runners and cyclists had improvements in treadmill running (13% improvement) and ergometer biking (11% improvement) to exhaustion at maximal work rates. In a more recent investigation by Aagaard and colleagues, highly trained national team cyclists improved their average power output and total distance covered in a 45-minute cycling test (8% improvement). Strength training has been reported to increase musculotendinous unit stiffness his results in an enhanced ability to store elastic energy during eccentric muscle actions (i.e., muscle lengthening), which in turn increases concentric muscle force (i.e., muscle shortening). This is thought to be one of the reasons why improvements in running economy, cycling economy, and cross-country skiing economy have been observed after a period of combined strength and endurance training.
More specifically, the NSCA recommends executing 6-12 reps and having a rest interval in-between sets of 30-seconds to 1.5-minutes for muscular hypertrophy. Additionally, you want to focus on a load of 67-85% of your one-rep max or 1RM. (Haff G, Triplett NT. (2016). Essentials of strength training and conditioning. Fourth edition. Champaign, IL: Human Kinetics).
Again, we can provide some specifics from the NSCA. They recommend executing 6 or less reps and having a rest interval in-between sets of 2-5 minutes for muscular strength. Additionally, you want to focus on a load of 85% or more of your one-rep max (1RM). The NSCA also recommends executing 3-5 reps and having a rest interval in-between sets of 2-5 minutes for muscular power (multiple-effort event). Additionally, you want to focus on a load of 75-85% of your one-rep max (1RM).
If you’re interested, check out this article from Science Daily on the role the central nervous system plays in strength training.
A work set just means a set where you’re training with your heaviest weight. This doesn’t include any warm-up sets.
Haff G, Triplett NT. (2016). Essentials of strength training and conditioning. Fourth edition. Champaign, IL: Human Kinetics.
The effect of training volume and intensity on improvements in muscular strength and size in resistance-trained men: study
Effects of Low- vs. High-Load Resistance Training on Muscle Strength and Hypertrophy in Well-Trained Men: analysis
Other ways to mitigate wearing down your CNS include prioritizing the most important exercises by placing them first in a workout, use moderate-to-heavy loads, since these involve performing fewer total reps to achieve the hypertrophic stimulus, and be aware that adding extra volume of work (e.g., adding extra exercises, sets, and/or reps) to a workout may not necessarily produce superior effects, and dividing a single workout into more frequent workouts over the week may sometimes lead to better results.
To gain muscle mass it is recommended that you seek a calorie surplus (i.e., hypercaloric diet). This can be achieved by consuming an additional 250-500 kcal/day or 10-20% above your typical diet. You may also need to increase your protein intake to 1.6-2.2 g/kg of bodyweight spread evenly throughout the day. And finally, carbohydrates should be the focus of the remaining calorie surplus demands when considering fat intake levels should remain at 20-35% of kcals. This will result in a realistic gain in lean muscle mass of about 0.5 pounds per week.
If you’re trying to lose weight it is recommended that you seek a calorie deficit by consuming 250-500 less kcal/day or 10-20% below your typical calorie intake. Your protein intake should be 1.2-1.6 g/kg of bodyweight spread evenly throughout the day. And finally, carbohydrates and fat should be reduced from baseline to satisfy the needed caloric deficit at the expense of protein. However, enough carbohydrate should still be consumed to maintain performance because carbohydrates (muscle and liver glycogen) are the primary energy sources for higher-intensity exercise. This will result in a realistic weight loss goal of 1-2 pounds per week.
Numerous studies published in various exercise science, sports conditioning, and physiology journals have found that the pre-planned variation of acute program variables (changes in exercises, sets, reps, rest intervals, percent 1RM) is more effective at producing strength and lean body mass improvements than non-periodized programs.
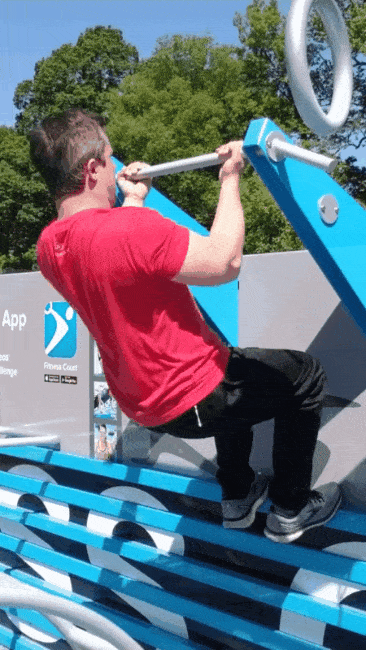
If you can already do a pull-up (woot!), you might want to check out our article on proper pull-up form, although we’ll cover a lot of the same material here.
Let’s do this thang.
Tips on How to Start Doing Pull-Ups
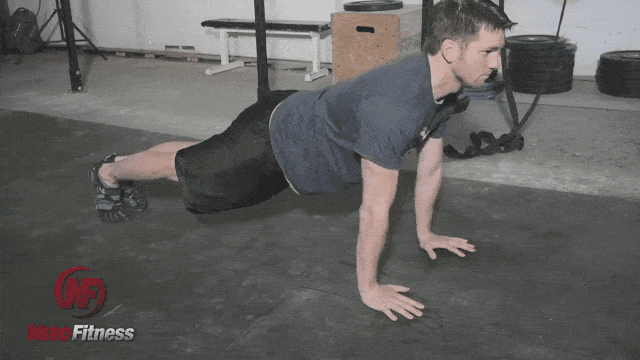
In the video above, Coach Jim walks you through the exact progression system we use with our coaching clients who want to get their first pull-up (or chin-up).
Before we get into exercises to progress into a pull-up, let’s chat about some general strategies.
Consider the following three points when attempting to get your first chin-up or pull-up:
#1) This should hopefully be obvious, but the more you weigh, the more you have to lift in order to complete a pull-up.
If you’re truly serious about completing a pull-up, start by getting your diet under control.
Here are someresources to help you with weight loss:
Tried to lose weight in the past without success?I hear you, weight loss is super tough. Learn why in our article “Why Can’t I Lose Weight?” for a deep dive into the subject. We also have the 5 Rules of Weight Loss to help you get going.
Not sure what a proper diet looks like?Check out our Guide on Healthy Eating for a full lesson on nutrition.
In the above guides, you’ll find me stating that losing weight comes down to eating fewer calories than you burn. Not sure how many calories you need? Check out our guide on calculating your daily caloric requirements.
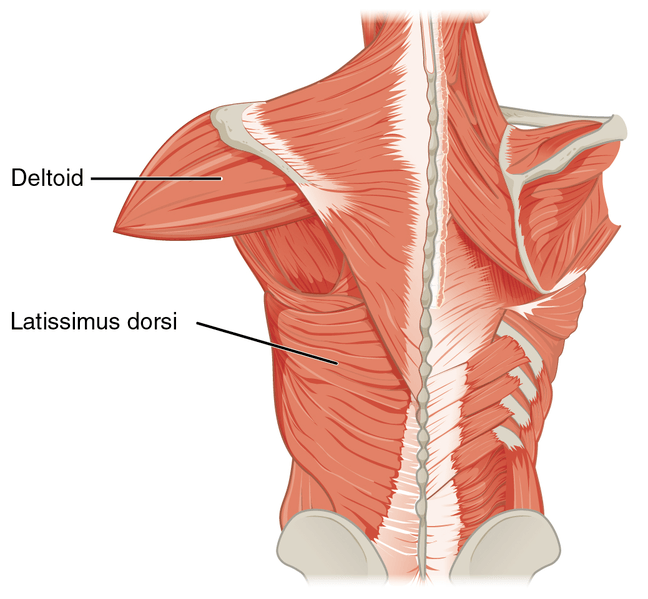
#2) MAKE YOUR “PULL” EXERCISES A PRIORITY. A lot of people do every other exercise before doing any back-related exercises, if they do any at all.
After warming up properly, your first exercise should always be the stuff that you want to work on the most – in this case, it’ll be your back muscles.
Until you get your first pull-up done, focus on the back exercises detailed in the levels and workouts in this guide.
#3) The progression we outline is a path that works for most people, but does NOT need to be followed to a T.
We give sample sets and reps and when to move up, but if you feel like you can progress sooner or want to try doing full pull-ups sooner than we recommend, that’s OKAY.
This is the slower progression method, where some people will want to do fewer reps and progress to the next levels sooner – that’s okay.
We recommend moving up to the next level when you can do 3 sets of 8 reps of a particular exercise. If you want the accelerated path, move on up as faster as you can do 3 sets of 5 reps. You do you boo.
Want someone to build you a custom-made progression plan for doing your first pull-up?Our 1-on-1 Online Coaching Program will do just that, plus your coach can review your movements through our app so you’ll know your training correctly and safely.
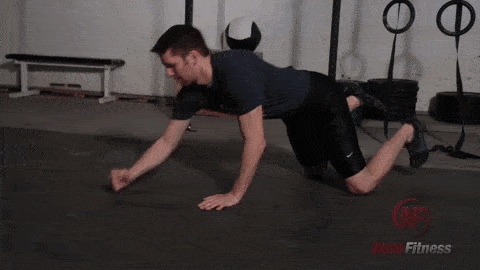
Level 1 Pull-up Workout: Bent Over Dumbbell Rows
We’re going to start with bent-over dumbbell rows, the most basic of back exercises, in case you’re starting from ABSOLUTELY square one.
Level 1 Pull-up Workout:
Bent-over dumbbell rows: 8 reps for each arm (or as many as you can do)
Whatever allows you to get to at least 5 reps a set.
Once you can do 3 sets of 8 reps (each arm), it’s time to pick up a heavier dumbbell.
This will allow you to get stronger and stronger.
Make sure you give yourself at least 48 hours until you do the Level 1 Dumbbell Rows again, so you can include these dumbbell rows for your workouts on:
Monday
Wednesday
Friday
As soon as you can do 3 sets of 8 reps, it’s time to move up to a heavier dumbbell.
Once you can lift a 25-pound (10kg) dumbbell or heavier, consider moving up to the next level.
If you are a little bit bigger than the average bear, you might want to stick with this step until you lose a little bit more weight and get stronger – maybe go to 35 or 40-pound (18kg) dumbbells.
Want help designing your own workout routine? I’ve got two options for you.
The first is to head over to “Build Your Own Workout Routine” and get your hands dirty. Our guide will walk you through building a full-body exercise program in 10 simple steps.
The second is to have a Nerd Fitness Coach do all the heavy lifting for you (not really, you still have to lift stuff),by having them build you a tailor-made workout routine:
Level 2 Pull-Up Workout: Inverted Bodyweight Rows
Bodyweight rows are the PERFECT precursor to pull-ups – they work the same muscles, and have you lifting your own bodyweight, just at a different angle.
For this level, we’ll provide you with two options: You can also make adjustments.
OPTION A:IF YOU HAVE ACCESS TO A GYM OR WANT TO JOIN A GYM:
You can follow the rest of this workout as part of our 6-Level Gym workout guide, which will help you go from total gym newbie to pull-up progressing badass!
At your gym, find your Smith Machine and set the bar at about chest height.
A higher bar makes the exercise easier to start:
And as you get stronger, you can set the bar lower:
4) Move up to Level 3 and progress with caution there.
If you are struggling with rows, you’re not sure you’re doing them correctly, or you’re not sure how to progress to the next level, check out our 1-on-1 coaching program.
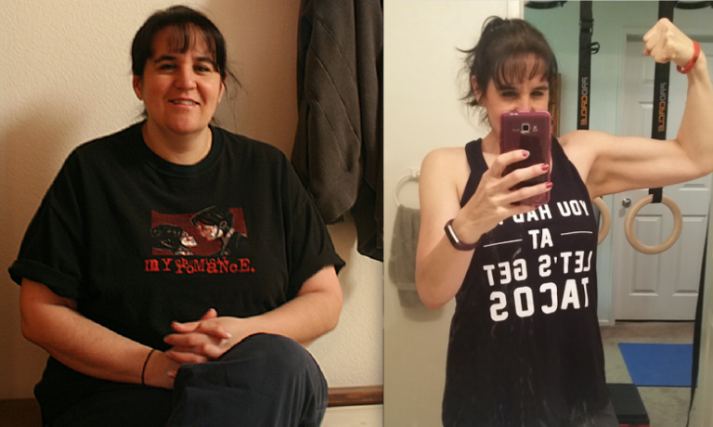
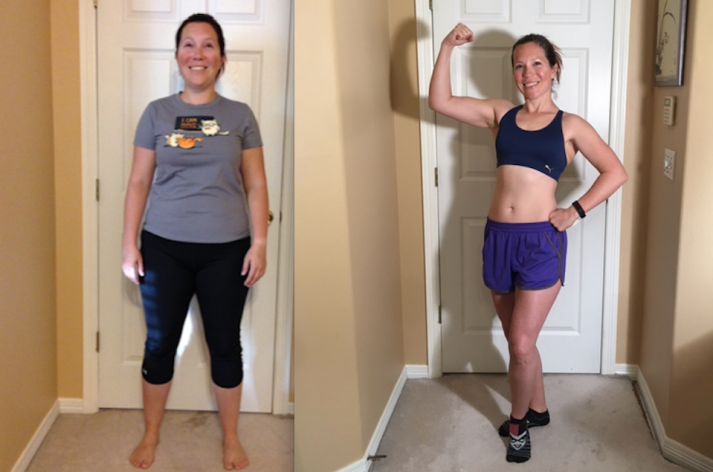
It’s the type of program that helped single mom Leslie lose 100+ pounds and start training with gymnastic rings and handstands!
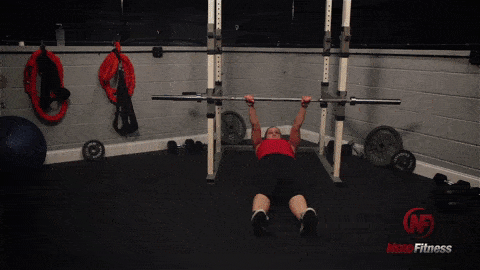
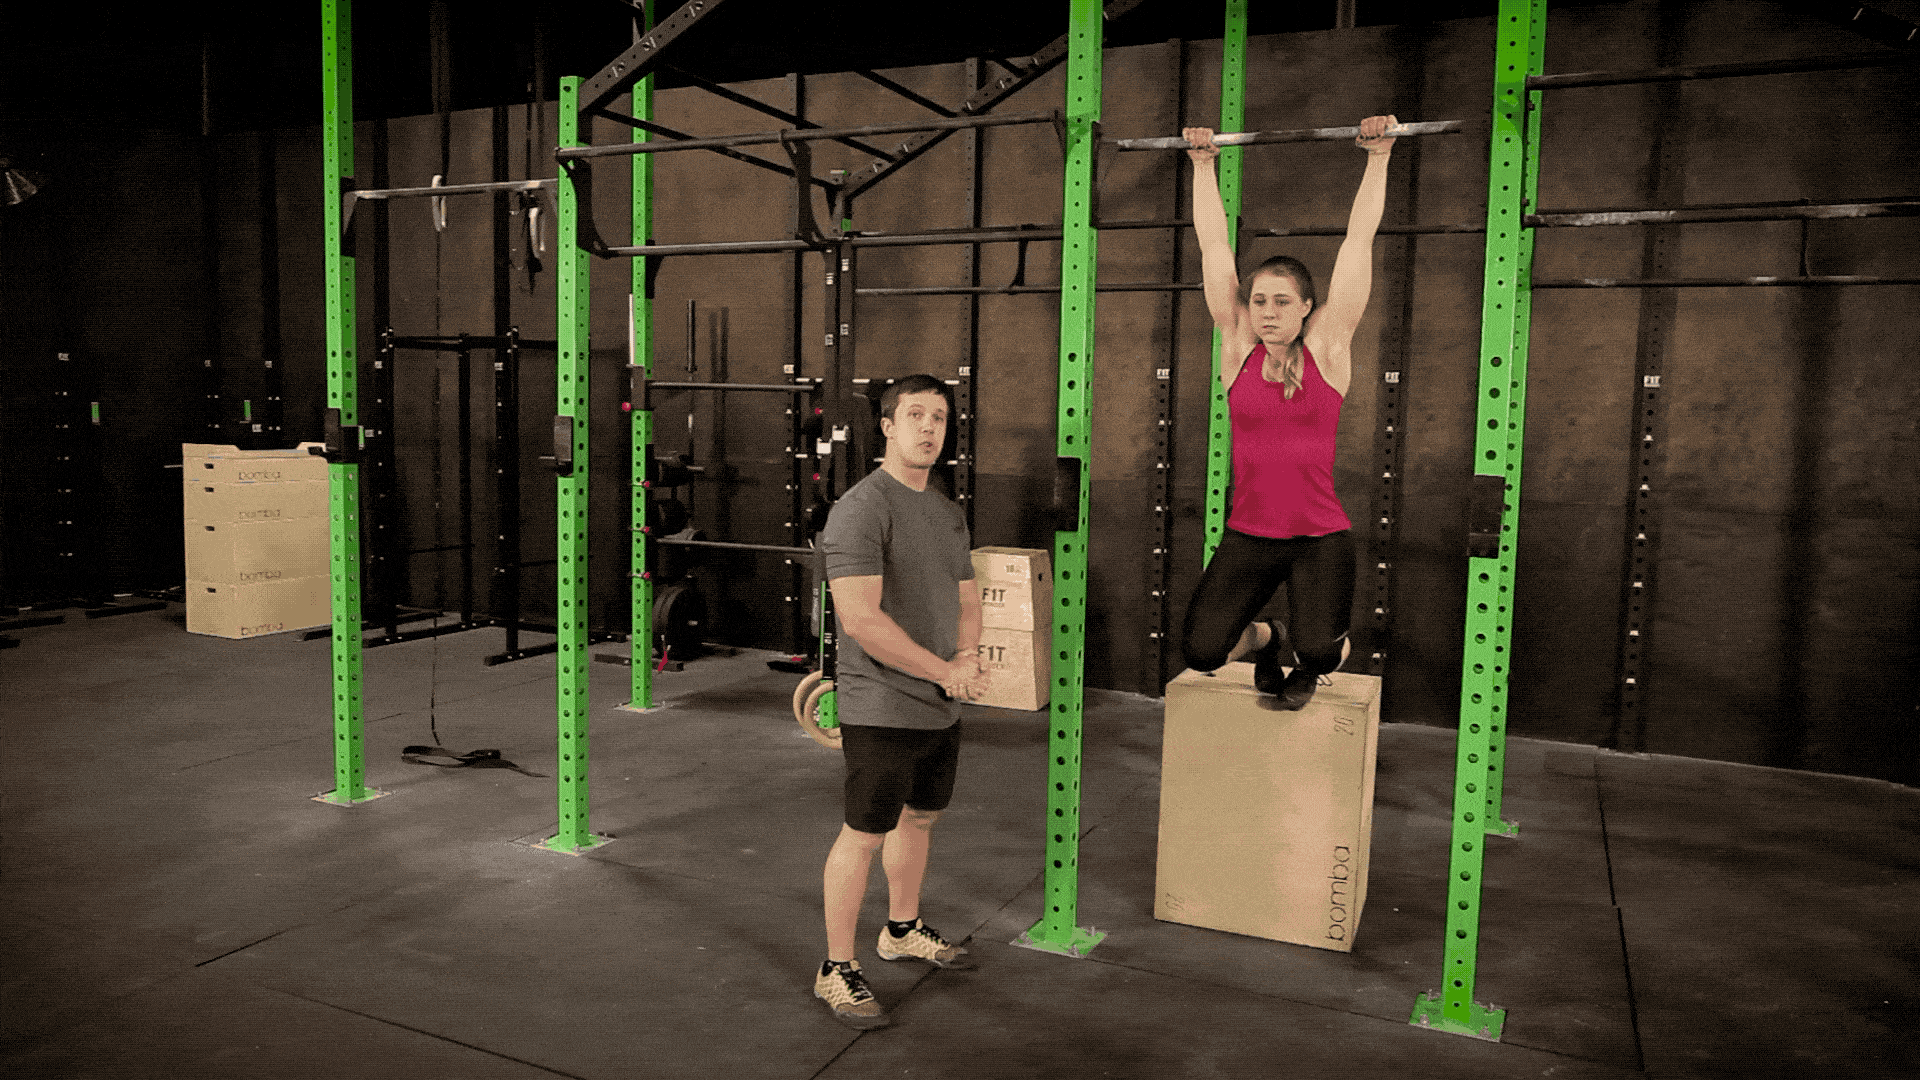
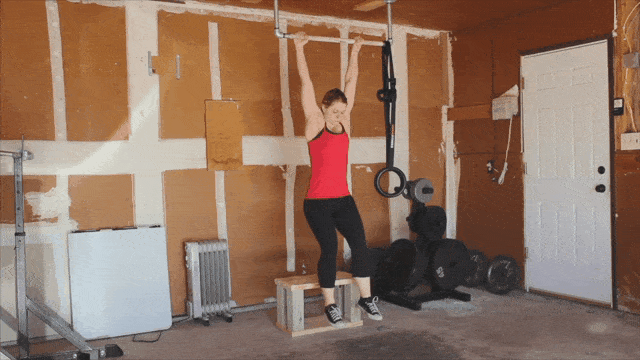
Level 3 Pull-Up Workout: Assisted Pull-Ups
Okay! It’s time to get to ACTUAL pull-ups here!Personally, I don’t like using the assisted pull-up machine in a gym as it doesn’t give you the full feeling of a pull-up, but it’s certainly better than nothing.
Instead, I recommend doing one of these alternatives:
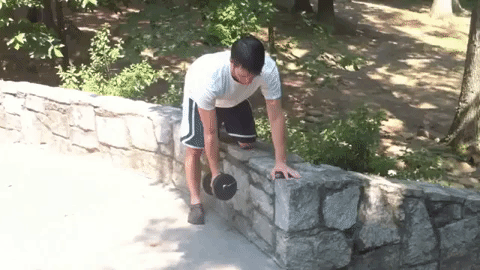
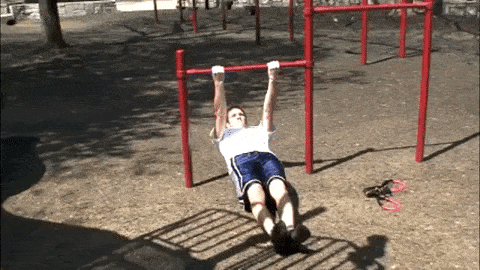
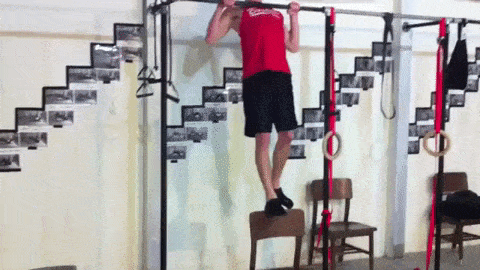
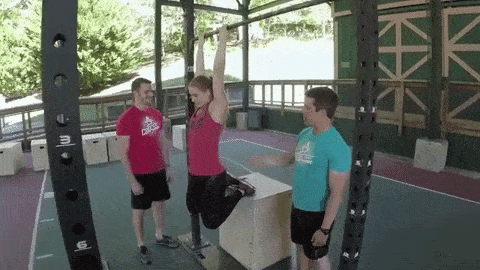
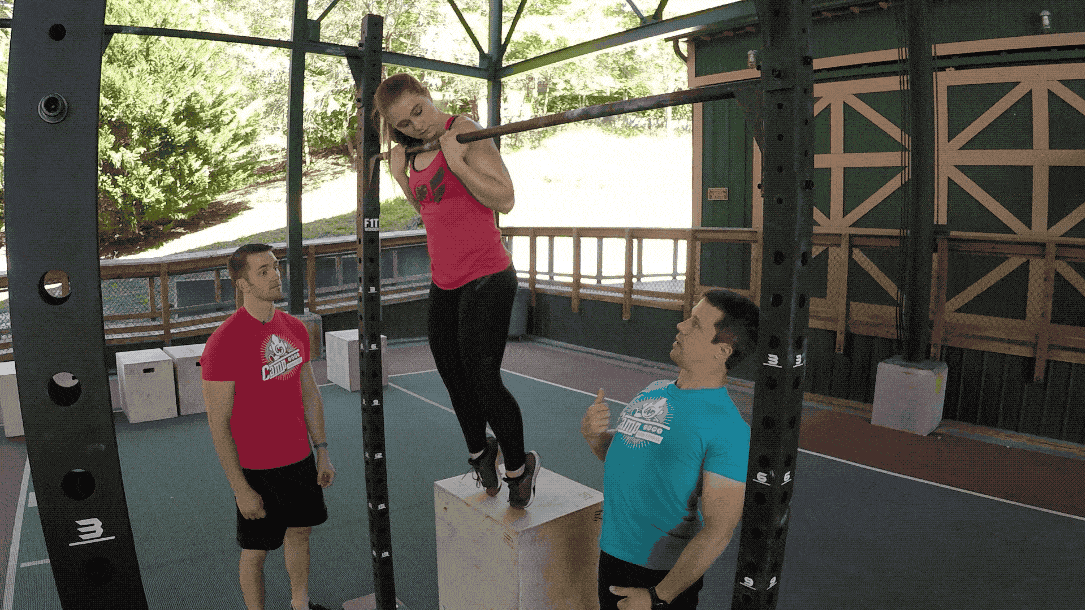
#1) Assisted Pull-ups with a chair
Either one foot or two on the chair, depending on your needs. Your feet are ONLY there for support, use your upper body as much as possible.
You can also use a box or similar-sized object for the same result:
#2)Assisted Pull-ups with exercise band:
You can get different types of exercise bands with different levels of strength, or a variety pack for easy progression.
Put your foot in the exercise band and pull yourself up.
#3) Assisted pull-ups with a partner:
Have a friend hold your feet behind you and help you complete each rep. Have them use the least amount of help possible to get you through your workouts.
Here’s how to do an assisted pull-up:
Clench your butt and keep your abs tight throughout the exercise – try not to swing like crazy.
Keep your shoulder blades pinched behind you throughout the movement and focus on PULLING the bar down with your arms.
Use the least amount of assistance that you can handle – as soon as you can do multiple pull-ups with both feet on the chair, switch to just one foot.
If you’re using an exercise band, try to get a few bands of varying tension so you can decrease the resistance as you get stronger.
As soon as you can do 3 sets of 8 with assistance, it’s time to move on to Level 4.
For another reference, Coach Jim and Staci show you how to do a variation of assisted chin-up right here:
This is probably the TOUGHEST level before getting your pull-ups.If you get stuck on “assisted pull-ups” and “assisted chin-ups”, you’re not alone. This is where most people get stuck.
We work hand-in-hand with people like you to get them their first pull-up in our Online Coaching Program. If you don’t know how to fit these movements into your workouts, or you just want somebody to give you the exact workout to follow every day, we got you!
Finally, a workout that includes Level 3 pull-up exercises
Alright, so we’ve started off great! We’re working those pulling muscles and assisted variations – but an actual chin-up might feel miles (or kilometers) away. Heck, just even holding onto the bar may be a challenge without some assistance.
What should we do now?
How about we work on holding onto the bar!?!
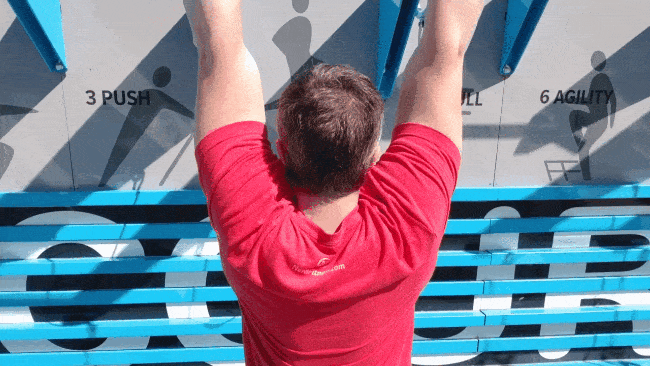
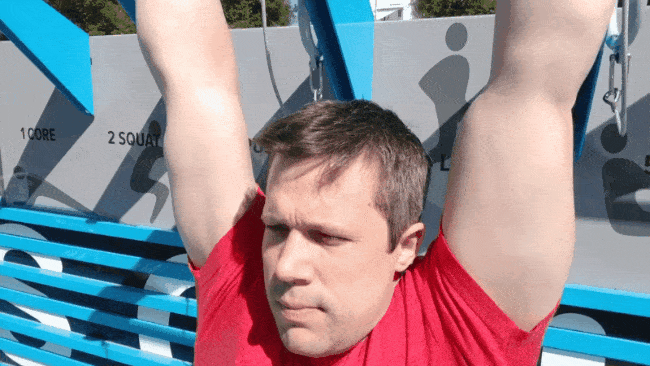
Before we work on doing full range, unassisted chin-ups or pull-ups, it’s really helpful to be strong and confident in holding unassisted parts of the movement. This is where Top Holds and Bar Hangs come in! #1) A Top Hold is exactly what it sounds like – we hold the top position of the chin-up or pull-up for several seconds (5 to 10). You’ll likely find holding the top of the chin-up (palms facing you) easier than the pull-up.
This is definitely something that you want to first do assisted. We’ll then work to transfer more weight – bit by bit over several workouts – off our feet and onto our arms until we’re holding ourselves unassisted at the top.
Using a band is a good option for assisted chin-ups, but using a box, bench, or another sturdy object will be a better option here.
It will allow you to shift that weight onto your arms a little easier.
That said, if all you have is a band for this exercise then that’s ok! Look to use thinner and thinner bands, while lifting the feet and knees up a bit to further reduce assistance (as the band won’t be stretched as far).
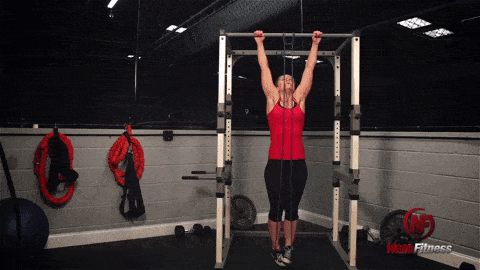
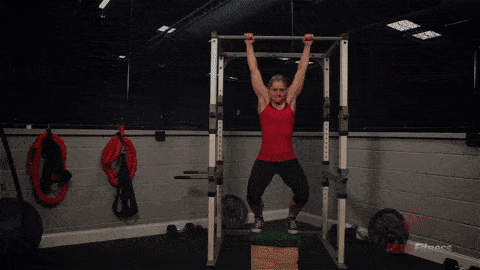
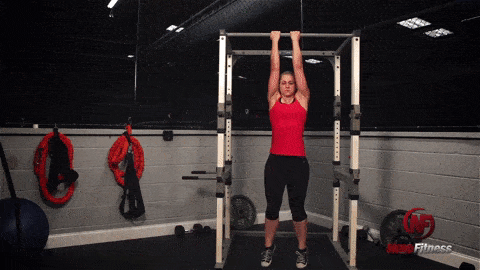
#2) On the other side of the movement, we have the Bar Hang…which is pretty much what it sounds like too!
To perform a bar hang:
Grab the bar with palms facing towards you or away from you. You’ll likely find hanging with palms facing away from you to be a bit more comfortable. Either direction will help strengthen up your grip.
Just like with the top hold, you’ll want to start assisted then work to shift your weight from your feet onto your arms until you’re hanging unassisted.
To further supercharge this exercise: once you are hanging unassisted, work on retracting your shoulders down away from your ears.
Like so:
And so:
This small movement is TOUGH (and you can even practice it assisted) but getting strong here will set your shoulders in an even better position for your first chin-up/pull-up.
We’ll look to hang from the bar (assisted or unassisted) for a total time of 30 seconds to 1 minute. At first this time may be broken up into several sets (e.g., 10 seconds, 10 seconds, 10 seconds), but you should eventually work up to one full set.
So how should we integrate either of these into our training?
#1) For the Top Holds, do this at the start of your workout (after your warm-up) for 3 sets of 5 seconds. Make sure you give it your all! Really squeeze the muscles tight and put as much weight on the arms as possible!
With all that effort, you’ll want to give yourself 30 seconds to a minute rest in-between. I know that sounds like a lot for just 5 seconds of work – but if you were working hard enough, you’ll need it!
#2) For the Bar Hang, do this at the end of your workout for 30 seconds to a minute.Again, look to complete this in as few sets as possible, while making the exercise as challenging as possible. Move from assisted to unassisted, with the shoulders retracted downwards.
If you have to take a break during the bar hang time, then take enough rest so that the next hold is productive.
Here Are the Exercises You Can Include for Your Level 4 Workout Routine:
Monday:
Top Hold (Assisted or Unassisted) – 4 sets of 5 seconds
Assisted Pull-ups – 3 sets of 8 repetitions
Bar Hang (Assisted or Unassisted) – 30 seconds total time
Wednesday:
Top hold (Assisted or Unassisted) – 4 sets of 5-10 seconds
Bodyweight Rows – 3 sets of 8 reps
Bar Hang (Assisted or Unassisted) – 30 to 60 seconds total time
Friday –
Top Hold (Assisted or Unassisted) – 4 sets of 5 seconds
Assisted Chin-ups – 3 sets of 8 reps
Bar Hang (Assisted or Unassisted) – 30 seconds total time
When you’re able to perform the Top Holds and Bar Hangs unassisted, then it’s time to move to the next level!!!
LEVEL 4.5 PULL-UP WORKOUT: (THE HIDDEN LEVEL)
What’s this??? Secret hidden exercises?
I just wanted to bring your attention to a great addition to any of these workouts – especially as things really ramp up.
Ready for it?
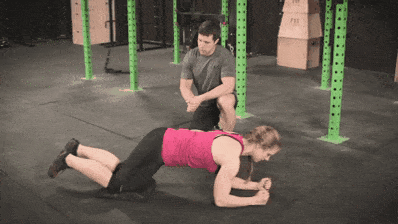
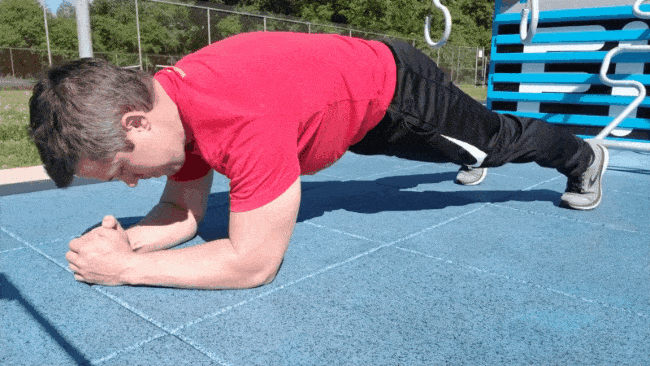
It’s . . . the front plank!
The front plank (or any of your favorite midsection stabilization exercises) is a great exercise to do, should holding a Top Hold or a Bar Hang prove tough.
If you haven’t already felt it during the previous pull-up workouts – your middle needs to be involved too!
During a pull-up or chin-up, if we squeeze through the midsection and glutes, the nearby muscles are able to contract stronger through a phenomenon known as muscle irradiation.
Besides sounding like something the Fantastic Four encountered in space, this cool “trick” can help engaged nearby muscles in the midsection, including those big back muscles that pull us up!
You can see muscle irradiation for yourself if you’ve ever been asked to flex your biceps for someone. You’ll instinctually squeeze your hand tight, because it helps the biceps engage stronger!
If needed, throw in some front planks work near the end of your workout.
You can even start on your knees:
Look to hold 30 seconds to one minute of total time.
Alright, back to our regular scheduled programming!
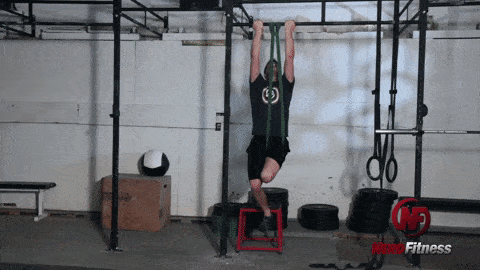
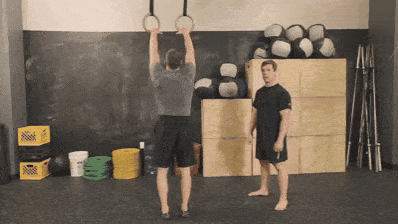
Level 5 Pull-Up Workout: Negative Pull-Ups
Okay! We are now DANGEROUSLY close to getting our first pull-up!
The big step at this level is doing a negative pull-up:
Grab onto the bar with an overhand grip
Jump so your chest is touching
Slowly lower yourself under control until you’re at the bottom of the movement.
WARNING: This can be very dangerous if you’re very overweight, which is why I’d recommend moving slowly through steps 1-3 first.
However, once you have a decent amount of back strength (which you got from Levels 1, 2, and 3), doing negatives is a great way to build arm and back strength.
You have two options for negative pull-ups:
Hop up on a chair to get above the bar and then lower yourself back down. The name of the game is “in control.”
Jump above the pull-up bar, and then begin to lower yourself back down IN CONTROL.
You don’t need to lower yourself so slowly that one repetition destroys you…lower yourself at a controlled speed – Counting to “three Mississippi” during the movement is a good tempo.
Here are the exercises you can include for your Level 5 Workout Routine:
Alternatively, we can do all of the heavy lifting for you (well, not ALL the heavy lifting) – we’ll create a specific workout so all you have to do is log into your NF Coaching App each morning and do the workout your coach prescribed!
Level 6 – Doing Your First Pull-up or Chin-up
OH BOY! My dear Rebel, it’s time for a…
At this point you have two options:
A chin-upis when you grab the bar with an underhand grip with your palms facing towards you.
Many find chin-ups slightly easier than…
A pull-upis when you grab the bar with your palms facing away from you.Seeing as this is a pull-up guide…
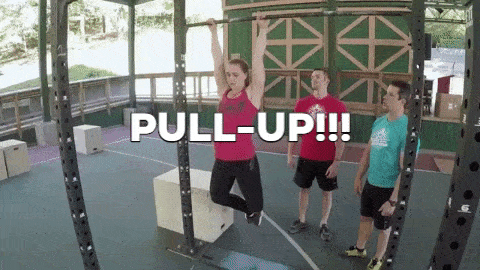
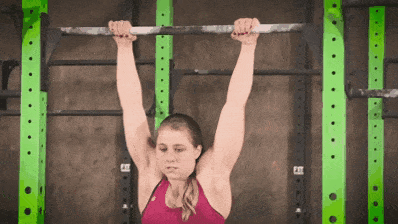
HOW TO DO A PULL-UP, STEP-BY-STEP:
Grab the bar with a grip slightly wider than shoulder-width, with your hands facing away from you.
Start from a dead hang.
Engage your shoulders, pull them down and back towards each other (like you are pinching a pencil between your shoulder blades!)
Flex your stomach, pull your body until your chest touches the bar.
Slight pause, yell out “I’m a champion!”
Lower yourself all the way back down to a dead hang.
We cover all of this and more in our post “How to Do a Proper Pull-Up,” but the above will get you started
Depending on your weight, your level of fitness and strength, and how far along you are in these progressions, you might be able to start with even more than one pull-up.
At this point, you can be a full Gym Class Hero by following a Gym Workout with these movements in there for your “pull” exercises:
Level 6 routine weekly schedule:
Monday:
Pull-ups – 4 sets of 1-2 reps (move onto the next exercise if you can’t perform a rep)
Assisted Pull-ups – 3 sets of 8 reps
Bar Hang (Unassisted) – 60 seconds total time
Wednesday:
Negative Chin-ups – 4 sets of 1 rep
Bodyweight Rows – 3 sets of 8 reps
Bar Hang (Unassisted) – 60 seconds total time
Friday:
Chin-ups – 4 sets of 1-2 reps (move onto the next exercise if you can’t perform a rep)
Assisted Chin-ups – 3 sets of 8 reps
Bar Hang (Unassisted) – 60 seconds total time
Congratulations!You’re now doing pull-ups. Make sure you watch that video above to make sure you’re doing pull-ups with proper form. Nearly everybody does them incorrectly, with bad form.
Want to make sure you have proper form with your pull-ups? Check out our 1-on-1 Coaching program! Our spiffy mobile app lets you send video of your pull-ups directly to your coach, who will provide feedback so you can perfect your technique.
They’ll also build a workout program that’s custom to your situation, which will have you doing sets of 10 pull-ups in NO time!
Level 7 – Advanced Pull-up Moves
Once you’re able to do 3 sets of 10 pull-ups or chin-ups, you have a few options:
OPTION #A: Continue to get better at doing more reps – 3 sets of 12, 3 sets of 15, 4 sets of 20, etc.
OPTION #B: Start doing other types of pull-ups.
Here are some advanced pull-ups you can try:
#1) WIDE GRIP PULL-UPS(grab the bar WAY out with both hands):
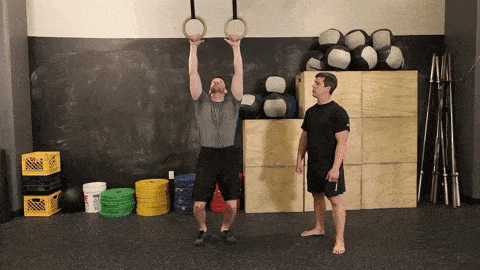
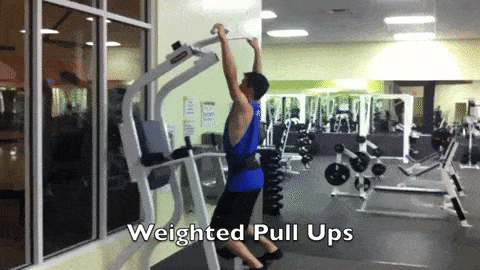
OPTION #C) Add weight with a weight belt and doweighted pull-upsor weighted chin-ups:
Personally, my favorite thing to do in a gym is weighted pull-ups; if you’re at this level and interested in doing so, here’s what you need to do:
Get a weight belt. I bought this one on Amazon and it’s worked out incredibly well for me. I’ve tried doing the whole “put weights in a backpack” and it certainly works, but the angle of the weights hanging off your back is weird. With a weight belt, the weight hangs down between your legs (not a euphemism) so it feels more natural.
Add small amounts at a time. Most gyms will have 2.5 lb (roughly 1kg) weights; you might feel stupid putting on a big weight belt and only hanging a tiny weight off it, but you need to start somewhere.
Consistently add more weight. I’ll warm up with two sets of 5 pull-ups with no extra weight, and then do 3 sets of 5 weighted pull-ups. If I can complete all 3 sets of 5 reps (with my chin over the bar for every rep), I’ll make a note to add 2.5 or 5lbs (1 or 2kg) to my weight belt for the next time.
Here’s how to incorporate these Level 6 exercises into your gym workout routine:
Friday – Wide Grip Pull-ups – 3 sets of maximum repetition
(The following week, I’d alternate by doing the chin-ups without weight, and then doing weighted pull-ups
Where do you go from here? How about working towards one of the most impressive exercises of all time? The MUSCLE UP (warning: uber advanced)!
Our new app, Nerd Fitness Journey, not only has an adventure to get you your first pull-up, but we’ll also show you exactly how to do cool bodyweight tricks like the muscle-up too. No guesswork needed here, just jump into the app and follow the missions and workouts for the day.
You can try your free trial TODAY, right here:
Lift Yourself Up (A Life With Pull-Ups)
No matter your starting point, you CAN do pull-ups.
And you WILL do pull-ups with this guide.
You don’t need to follow the progression above exactly – it’s merely one path that you can take in order to reach the promised land…where the pull-ups flow like wine and the women instinctively flock like the Salmon of Capistrano.
Or Bronwyn, who lost 50+ lbs and now does chin-ups with her daughter on her back!
For people looking for the next step, we’ve built 3 options that might float your boat:
1) If you are somebody that wants to get results like the women above and follow a tailor-made pull-up strength program designed around their life and goals,check out our popular 1-on-1 Online Coaching Program.
You’ll work with our certified NF instructors who will get to know you better than you know yourself, check your form, and program your workouts and nutrition for you.
#2) Exercising at home and need a plan to follow? Check out Nerd Fitness Journey!
Our fun habit-building app helps you exercise more frequently, eat healthier, and level up your life (literally). We even have an awesome adventure to help you get your first pull-up!
Try your free trial right here:
3) Join our free community, the Nerd Fitness Rebellion, and we’ll send you our free Strength 101 Guide, which you can get when you sign up in the box below:
Download our comprehensive guideSTRENGTH TRAINING 101!
Everything you need to know about getting strong.
Workout routines for bodyweight AND weight training.
How to find the right gym and train properly in one.
Follow the path that works for your schedule, your experience, and your level of comfort with this movement – there’s no shame in going slowly and progressing safely.
And if you’re gung ho about pull-ups, ready for negatives and trying to squirm for that first rep, feel free to go for it. Just be safe.
When you DO finally do a pull-up, I want to be the first to know – email me at steve@nerdfitness.com and tell me about it!
For the Rebellion,
-Steve
PS: Check out our other three articles on pull-ups:


 Pull-ups are my favorite exercise of all time.