Uh, everything you could possibly need to celebrate your transformation and continue that momentum into Summer!
$500 gift card to Amazon Fresh… for making those delicious, nourishing recipes!
$300Onzie Gift Card: hellloooo new wordrobe!!
1-year subscription in the LSF App: because you’re going to want to keep up on your workouts allll year long!
LSF Plant Protein FOR THE REST OF THE YEAR. YES, PLEASE!
Prize pack valued over $1, 250
How do I win?
Take your “before” photos on day 1, so you’ll have some CRAZY transformation stories to share with us at the end! Find all the pro tips here.
Follow @LoveSweatFitness + @TeamLSF on Instagram and make sure you’re tagging us in your daily #LSFRollCall! Pssst, don’t forget to use #LSFSpringSlimDown as well!
Our Grand Prize Winner will be the babe with the ultimate transformation who showed us how to slim down and be their best, most confident self.
I legitimately get more proud of our LSF community all the time — and that’s especially true of this LSF 30 Challenge. What a way to start the year! You gals came out of the gate swinging and I’m floored by how much everyone changed not just their bodies, but their entire lives in just 30 days’ time!
If you finished the challenge, you should feel SO proud of yourself. By the end of January, you created habits that will help you be, look, and feel your best all year long. And that’s what LSF is all about! Thank you for showing up for yourself and our community. It’s so inspiring to see how many of us stuck with it through the entire month.
Speaking of inspo, we’ve got to talk about your challenge winners! These women are seriously incredible! Not only do their before and after pics speak for themselves, but they’re also the sweetest, coolest people. I’d like to introduce you:
Melissa joined Team LSF in the summer of 2019. She’s got two beautiful gifts and an amazing husband. She works in HR, loves coffee and football, and is always down to try new things.
“After the LSF 30 Challenge, I finally felt happy, confident, and in control of my health habits again,” she says. Melissa also says she’s going to stick with her HMBP and working out 4-5 days each week. Not only is she dedicated to taking care of herself physically, but she says she’s also going to keep journaling and doing her daily affirmations.
To keep herself on track, she’s got a plan: “Checking in with team LSF and keeping my goals in mind — knowing that when I take care of myself I feel good!”
Like Melissa, Toni keeps busy with her two kids — boys this time! — and husband. She loves going on adventures with her sons and walks on the beach with her husband. On top of that, she runs her own business. She started it in 2016 after getting let go of her job of a decade, and if that’s not a testament to resilience, I don’t know what is!
The LSF 30 challenge was Toni’s intro to our LSF community — and what a way to start! She says, “I can’t believe how amazing I feel (and look!) after only 30 days of working out and eating clean! LSF has changed the way I think and feel about food, which has been the most freeing thing of all coming from a girl who has literally tried every diet under the sun since she was 14.”
She plans to stick with everything she learned during the challenge. What I really love is that when Tori’s feeling down, she’ll put on one of my YouTube videos to get herself motivated again. She also says, “Engaging and interacting with fellow LSF girls is the best and keeps me going!”
We really saw moms come through on this challenge, and April is no exception. Not only does she have an 8-month-old baby girl, but she’s also mom to a 3-year-old corgi. April’s a married pastor and you can usually find her walking her neighborhood or savoring a coffee at one of her local cafes.
“I felt AMAZING after the challenge,” she says. “I’ve had so much inner confidence radiating within since the challenge and have really been going after the goals I set for myself in my career and in health and fitness. This challenge really motivated me to take time for me since almost every roll call was focused on self-care in some way — and to find ways to move again after a very long break due to pregnancy and postpartum recovery.”
April plans to stick with the 2-Day Detox for the first two days of each month to reset and keep herself on track. She’s also using her HBMP to meal plan for each week.
April’s got a lot of support at home — her husband is super encouraging, which I love! But she’s also tapped into Team LSF. “Every time I pop on Instagram, I see major motivation with all the babes crushing their daily workouts and goals. That is just SO motivating and encouraging, and it makes me want to do the same. Any time I’m faced with a challenging workout, I always remember all the babes cheering me on and giving me major inspo, and that keeps me going!”
Heidi hails from New Zealand and works with her local elderly community. She’s crafty and loves to diamond paint, cross-stitch, and more. She also enjoys reading and spending time in nature.
A Team LSF member since January 2018, Heidi says one of her first workouts was one of our vids.
“After the challenge, I felt strong, confident, and happy,” she says. “I felt healthy again.”
I absolutely love Heidi’s new year’s resolution, which was to choose herself this year. For her, that’s meant drinking plenty of water and staying on track with her workouts. She’s still sticking with her resolution and turns to the LSF community regularly. “My favorite part of LSF is the endless amount of support and love in the community — and making friends,” she says.
Our Pink Heart Award goes to our girl, Angel! AKA @lsf_angel
Our Pink Heart winner for this challenge is Angel, who’s also a mom! When she found LSF on YouTube in August last year, she says she had lost hope in finding a fitness program that works for her. We’re so glad we could be a part of turning things around!
Angel says she felt amazing after the challenge. “I felt like myself again,” she explains. “I was stronger, more motivated, proud, and consistently pushing myself daily!”
She said something else I really love, too: “I have completely changed my bad eating habits and now I eat to fuel my body and I never feel guilty about any meals or snacks that I have!” That’s music to my ears.
Angel is still sticking with her new routine of waking up early and getting in her workout before she starts the day. “It really helps me stay on track when I see women from all over the world encouraging others and being honest about their ups and downs throughout their fitness journey,” she says.
She loves that no matter her mood, she can find an LSF workout that fits. She’s also using our daily inspirational quotes and journaling to stay on track.
Angel has a ton of great things to say about the LSF community, but one of her favorite parts is the support. “It’s never a contest, it’s never about who can do more reps, or sweat more, or have the most progress. It’s just genuine love and caring as we are all on the same path, and we are ALL getting stronger and building confidence together!”
Aren’t these women amazing? I am so proud to be a part of Team LSF with them!!
What makes me so confident you’ll be able to reach your little piggy wiggies?
Because we teach even the most “inflexible” of folks how to touch their toes in our 1-on-1 Online Coaching Program, and we’ll share with you all our secrets below.
Here’s what we’ll cover in our guide,How to Touch Your Toes:
If you want to increase your flexibility, you’re gonna need to stretch.[1] It’s how you make your muscles elastic and strong.
Why bother though? What’s the big deal about being able to touch your toes?
The benefits of stretching include:
Increase range of motion. If you can move a joint through its full range of motion, you’re gonna have more freedom of movement. Confidently navigating the physical world is a sign of a healthy nerd, which is why flexibility shouldn’t beoverlooked. One of the best ways to become more flexible is to stretch.[2]
Improve posture.If you want to stop slouching so much, regularly stretching may help.[3] Stretching works to improve muscle imbalances, which in turn might help your posture.
Alleviate back pain.If you suffer fromback pain, it might be worth starting a stretching routine .[4] The muscles in your back might be tight, restricting your range of motion, which causes pain. Stretching can help loosen up the area, plus strengthen the muscle. This might help prevent future injury.
Stretching, and theflexibilitythat comes with it, should not be overlooked when building a workout routine.
While there are many indicators of good flexibility, one of the most popular isundoubtedlybeing able to touch your toes.
After all, it was so important the President had all American schoolchildren perform the “Sit and Reach” test to see if they could grab their feet.[5]
Touching your toes might have been a struggle for you then. It might still be a struggle for you now.
What’s going on?
Why Can’t I Touch My Toes?
If you are unable to touch your toes, it’s most likely because of one of these four major reasons:
#1) Shortened/tight posterior chain muscles. Although most people think not being able to touch our toes just means your hamstring muscles are inflexible, in reality our whole system (including the lower back) can play a huge role as well! As Mark Rippetoe explains in this video about the Romanian deadlift, what you may think is a lower back issue is also a hamstring issue (and vice versa):
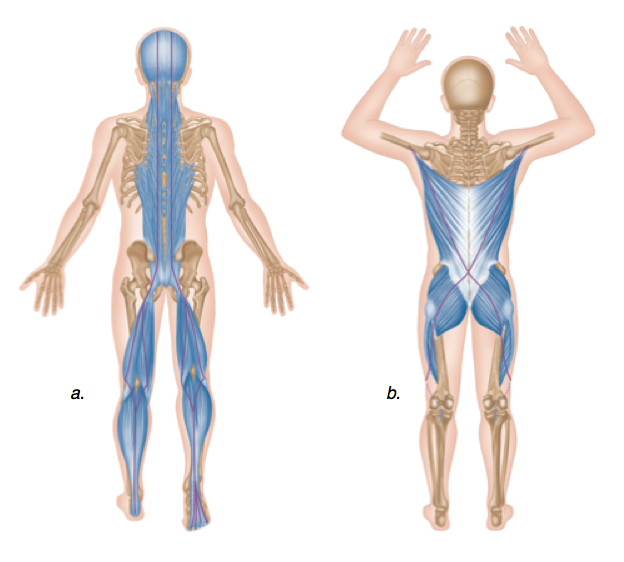
You see, the posterior chain is an interconnected series of muscles that includes our back muscles, erector spinae (muscles along our spine), lower back muscles, butts, and hamstrings.
The posterior chain is shown here:
Weak mobility points in one place in the system can become debilitating (and often easy to spot) when we do compound movements like the deadlift.
If you’re somebody who sits at a desk all day and struggles to touch your toes, you probably aren’t strengthening or lengthening these muscles because the chair is doing all of the work for you.
#2) You have relatively long legs compared to your torso and arms. People with long legs and short torsos will have a greater challenge than people who have short legs and long torsos and arms.
But fear not, you too can level up and get those toes touched.
#3) You have too much body fat. If you are overweight and happen to have a big stomach, it can certainly make touching one’s toes more challenging. Because you already know that diet is 90% of the battle when it comes to weight loss, focus on nutrition to begin losing weight (here are the 5 rules of weight loss to help you begin). This may be a factor in making it easier to touch your toes.
#4) You’re not warmed up yet. If you JUST woke up or spent all day in a car, you’re familiar with the rigidity that makes you feel like a steel girder. Your muscles act like rubber bands; the more they are used, the more they are warmed-up, and the further they can stretch. This is why we encourage people to go through a mobility warm-up before exercise!
Let’s put a plan in place to finally touch our toes!
Determining Your Initial Flexibility (We All Start Somewhere)
Before we can implement a strategy to develop more flexibility that allows you to touch your toes, we need to know your starting point.
As Peter Drucker said, “That which gets measured gets managed.” Or in this case, that which gets measured gets more flexible!
Stand straight with your legs about hip-width apart. You want your legs to be straight, but don’t aggressively lock out your knees either (this feels like a “microbend” to a lot of people).
Begin by bending and leaning forward towards the ground with your quads (front of your legs).
Let your body rest naturally, as if you were a ragdoll. Keeping your hands relatively close together, straighten your fingers and begin to stretch down slowly to the ground.
Do this 2-3 times to get warmed up. Try to keep your legs straight by flexing or activating your quads; keep your legs straight, without locking your knees.
Other than the microbend, don’t bend your knees to help you get closer to the ground! I’m watching you. If you’re videotaping yourself on these to track your progress, note that depending on your body (and your hamstrings) your legs may not look 100% straight.
When you are ready, reach towards the ground and hold it for a few seconds. Measure the distance in one of the following ways:
If you aren’t touching the ground, have a friend measure the distance from the tip of your fingers to the ground. If you don’t have a friend with you, place your hands on your legs and note where the tips of your fingers end up.
If you can touch the ground, you’ll want to flatten your hands as much as possible, and record the distance from the top of your head to the ground. As you can stretch further, the top of your head will actually get closer and closer to the ground.
If this seems easy, try hugging your calves and pulling your head in towards your body.
Record your measurement in a document or on a piece of paper (if you’re part of the flexibility challenge, we have a document you can print out), and/or save the photo/video to show how far down you are reaching.
The 4 Best Stretches to Touch Your Toes (Improve Your flexibility)
There are two key factors that will determine whether or not you are successful in gaining the ability to touch your toes as you practice over the next few weeks:
Actively stretching your muscles JUST past the point of comfort. Like strength training by adding 1 rep or a few pounds to an exercise, we want to stretch just beyond the point where we stretched last time so our muscles have to elongate.
Consistent practice and effort! You can’t improve your flexibility by stretching for 5 minutes once a month. You’d be better off stretching for 30 seconds spread out 10 times throughout the month.
That’s right. Studies confirmed that actively focusing on touching your toes for 30 seconds, 3 times per week was enough to lengthen hamstring muscles in 4 weeks. [6]
I‘m sure there’s an inappropriate joke to be made here about 30 seconds of effort, but I’m better than that (I think).
In less time than it takes to update your Facebook status, you could be touching your toes and make Gumby proud.
HOW TO TOUCH YOUR TOES (CONSISTENT FLEXIBILITY PRACTICE):
All I’m asking for is 2 minutes. 2 minutes! You can even spread these movements out throughout your day – I like to do them after I work out. After a long day at a desk, after driving, or upon waking up are all good times to work on flexibility!
Through each of the movements below, make sure you are breathing slowly and steadily.
You can follow along with all of the movements below that come from our really fun online course, Nerd Fitness Yoga (part of NF Prime). It’s essentially yoga for people that don’t do yoga.
THE 4 BEST STRETCHES TO TOUCH YOUR TOES:
Standing toe touch stretch – 30 seconds
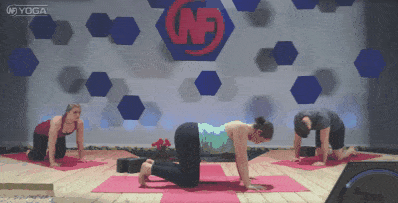
Cat/Camel – 30 seconds (switch positions every 5 seconds)
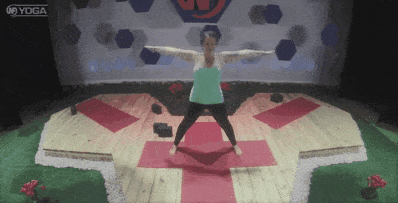
Star stretch – 30 seconds (as many slow reps as you can)
Moon the sky – 30 seconds (as many slow reps as you can)
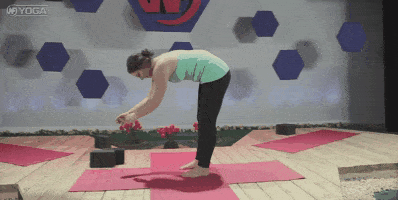
1) Standing toe touch stretch: Flex/activate the front of your legs, keep them straight, and bend over at the waist juuuust past the point of discomfort; hold that position for 30 seconds. Repeat this process every other day and hold it for 30 seconds.
2) We can loosen up a tight lower back by doing 30 seconds of moving back and forth every few seconds by doing a “cat” and then a “cow”:
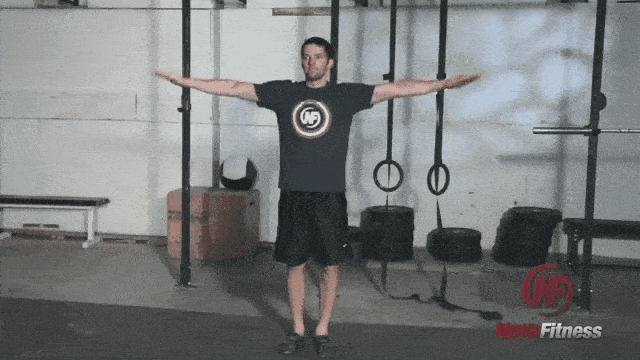
3) You can also do what we call a star stretch to help stretch those legs out! Stand with your legs spread wide, and arms extended (hence the term Star!), and then reach down with one hand to your opposite leg; hold for five seconds, back to start, and repeat with the other leg.
4) Here’s another favorite movement of mine that helps improve my flexibility and mobility: the “Moon the Sky” stretch!
This is a great stretch to mix into your pre-workout warmup to get your legs, butt, and back prepared for work:
Squat down and put your hands under your feet
Slowly move your butt up with your hands remaining under your feet.
Raise your butt and try to straighten your legs
Go a TEENY bit higher each time until you can fully straighten your legs!
For any of the above moves, a good way to check your form would be to record a video of yourself and match it against the videos and gifs here. If they look close, you’re doing great!
If you want to have an expert review your stretches, our coaches can do just that in our snazzy app!
How to Become More Flexible (Next Steps)
It’s now time to train to touch your toes!
Test your toe-touching abilities before and after doing the 2-minutes of exercise above, and I bet you’ll notice a difference right away – just wait to see what you can accomplish in a few weeks!
The cool thing about flexibility is that any combination of the stretches above will help you improve your flexibility as long as you consistently work on it a tiny bit every day.
At the end of my day for a minute or two before bed
All added up, it’s less than 5 minutes of time, but it’s enough to show me some results!
If you follow our guide above, you’ll be well on your way to increasing your flexibility and touching your toesie wosies.
You just need to start!
Want some help getting going? A little extra push out the door?
We built three perfect next steps for increasing your flexibility!
#1) Work with a professional Yoda!If you want confidence that you’re following a program that is tailor-made for your busy life, situation, and goals, check out our popular 1-on-1 Coaching Program.
Many of our clients have “increased flexibility” as one of their fitness goals, and they take comfort knowing acertified NF instructor isguiding them there.
#2) Exercising at home and need a plan to follow? Check out Nerd Fitness Journey!
Our fun habit-building app helps you exercise more frequently, eat healthier, and level up your life (literally).
Try your free trial right here:
#3) Join our amazing free community, the Nerd Fitness Rebellion!Not only is it free to join, but we’ll provide you with loads of free goodies when you sign-up:
Get your Nerd Fitness Starter Kit
The 15 mistakes you don’t want to make.
Full guide to the most effective diet and why it works.
Complete and track your first workout today, no gym required.
That should just about do it for our guide onHow to Touch Your Toes.
Now, your turn:
Can you touch your toes?
Does attempting to “sit and reach” bring back horrors from grade school?
Any other tips or tricks for mobility training?
Let us know in the comments!
-Steve
PS:Make sure you check out the rest of ourMobility Trainingseries:
Read, “Effect of an exercise program for posture correction on musculoskeletal pain.” Source, PubMed.
Read, “Stretching and strengthening are key to healing and preventing back pain.” Source, Harvard Health Publishing.
A practice that has now been discontinued.
Read,“The effectiveness of 3 stretching techniques on hamstring flexibility using consistent stretching parameters.” Source, PubMed. Here’s another study that shows 30 seconds of effort results in a more flexible frame!
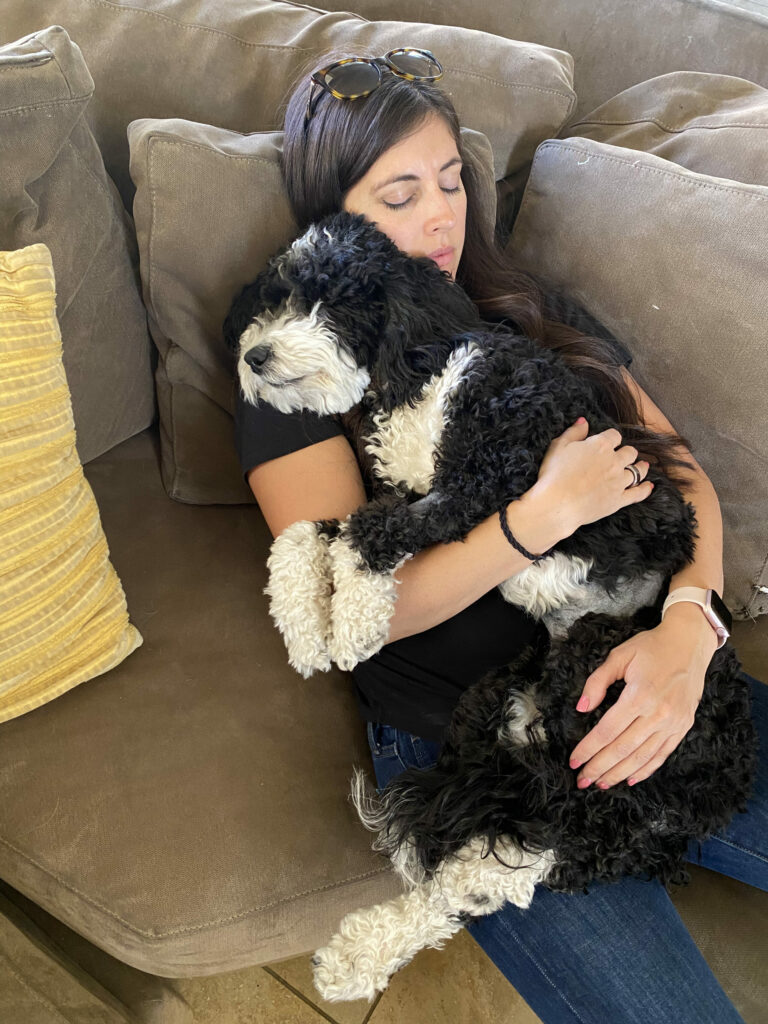
Hi friends! Happy Friday! What do you have going on this weekend? It’s Rodeo Break – it’s an AZ thing – but we’re staying in town. Maisey got spayed yesterday (wahhhhhhhh) so we’re letting her rest and recover. If you have any tips, please send them my way! I ordered her this little recovery suit that she can wear instead of the cone.
When I carried her inside after picking her up, we snuggled on the couch for about an hour like this. Poor baby.
Some exciting news: my brother GOT MARRIED this week!
Trevor went to Las Vegas with his girlfriend on 2/22/22 and they eloped! We celebrated at my mom’s house with lots of champagne and cake, and they’ll have a wedding reception/celebration next year. I’m so happy for them and absolutely love that they just went for it. 🙂 Especially after everything that’s happened the past two years, I’m all about doing the thing that brings you joy and happiness.
– Before I head into this week’s faves post, I wanted to share the girls’ updated rooms with you! We re-did their rooms because so much of the stuff in there was from when they were toddlers. They both wanted an update and I love how they came out! I also love that they still look like *kids rooms.* It’s so common to see rooms on Instagram and Pinterest that are completely neutral colors and look like a 20-year old professional could like there (which if it works for you, live your best life), but ours definitely still have a strong kid vibe. 🙂
I got them each new cooling bamboo sheets for their beds, and they picked out the themes.
Liv picked a fox theme (which she’ll likely outgrow in the next couple of years, but she was really into it)
(bedding is here, rest of the decor was from Target and Bed, Bath and Beyond)
(I ordered some very cute pics of her and her friends, her and P, and a baby fox to hang over her bed. I’m also going to spray paint the frames to match the new color scheme)
It’s time for the weekly Friday Faves party. This is where I share some of my favorite finds from the week and around the web. I always love hearing about your faves, too, so please shout out something you’re loving in the comments section below.
After lurking it forever, we finally tried Butcher Box and LOVE it. I’m very particular about where we buy meat, and love that their meat is humanely raised with grass-fed, wild, and organic options. We recently got an extra deep freezer for the garage, so we’ve packed it with Butcher Box meats, veggies, grains, and all of the fun frozen stuff from Costco that we didn’t have room to store in our regular freezer. You can use this link to check it out and get $30 off + ground beef for liiiiife.
Fashion + beauty:
Got this Parker dress in my latest RTR Unlimited shipment. I could wear it to dinner with the family on Sunday while it was still in the 80s… it’s been super cold the rest of the week, but I was grateful for a little glimpse of spring!
I’ve you’ve been looking for some Beautycounter skincare recs, fill out this form and I’d love to help!
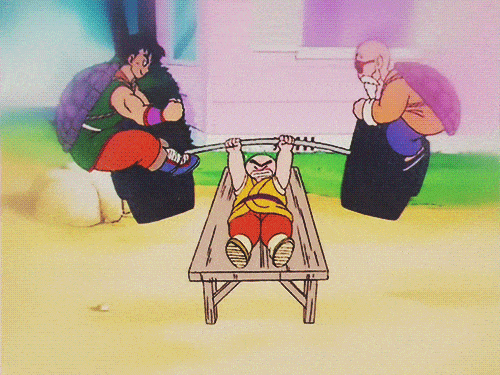
Let’s get you comfortable using the bench press, starting today!
We specialize in helping people pick up barbells for the first time. So if the bench press makes you worry…DON’T PANIC. We’ll set you up with a plan so you can use it safely and effectively.
This guide is part of our Strength Training 101 series.I would encourage you to check out the rest of the articles if you’re just starting your weight training.
If you’re in a rush, you can download the entire guide for free when you enlist in the Rebellion (that’s us!), by joining our free bi-weekly newsletter:
Download our comprehensive guideSTRENGTH TRAINING 101!
Everything you need to know about getting strong.
Workout routines for bodyweight AND weight training.
How to find the right gym and train properly in one.
How Important is the Bench Press?
For the last 30-40 years, the bench press has become the universal lift for bros everywhere to determine how strong someone truly is.
You know, questions like:
How much do you bench?
Do you even lift?
As popular as it is, the bench press in its current form is less than 100 years old.
Until the 1930’s, people did a movement called the “floor press”, which was similar to a bench press only done from the floor.
In fact, at first many people did a movement called a “belly toss” – where the bar would come down and bounce off the belly to help the lifter get it back up.
The three movements – bench press, belly toss, and floor press were all popular until the 40’s and 50’s, when the bench press started to become more and more popular, as bodybuilders liked how the bench worked their pecs (better than the other two movements).
Arnold benches, for sure.
As the bench press became more and more popular, powerlifting emerged in the 1970’s and separated itself from weightlifting as a sport of its own.
What Muscles Does the Bench Press Utilize?
The bench press is a great movement to have as a part of your strength program, and one move we consider to be a part of the “big 4” basic lifts.
Some of the issues coaches have with the bench press (such as a tight chest creating bad posture) don’t come from benching itself, but come from bench being one of the ONLY movements in your program, and can disappear when incorporated as a part of a well-rounded strength program.
In other words, don’t JUST train using the bench press.
The bench press is widely known as a “chest” exercise, however, that’s definitely not all it is.
The bench press trains:
Shoulders
Triceps
Forearms
Lats
Pecs
Traps
Rhomboids
Plus pretty much every muscle in your upper body
However, the bench press doesn’t JUST use your upper body.
When you bench properly, you use your lower back, hips, and legs as well. Just like our other main lifts (the squat, deadlift, and overhead press), the bench press, while putting an emphasis on specific muscle groups, is a full-body movement.
Think about it – while you’re benching, the rest of your body is not just lying there doing nothing.
Your entire body should be working – your shoulders are pinched together and your lats are engaged, while your back, hips and legs are tight, stabilizing your entire body to create a solid base and help you generate drive from the round.
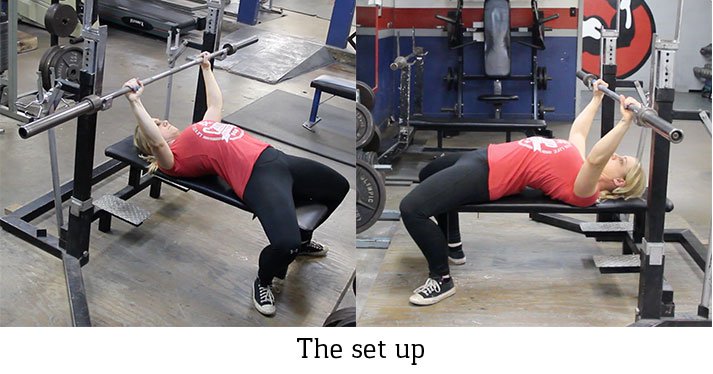
How to bench press: The Setup
There are a lot of different ways to perform the bench press.
We’ll start you out with a standard and basic bench press variation, which we believe is the best (and safest) method for general strength.
Remember: just because you see someone benching a ridiculous amount of weight at the gym does not mean they are using proper or safe form.
They could be an advanced athlete who is making compromises to their form (knowingly or unknowingly) in order to bench higher numbers.
What do you need to perform the bench press?
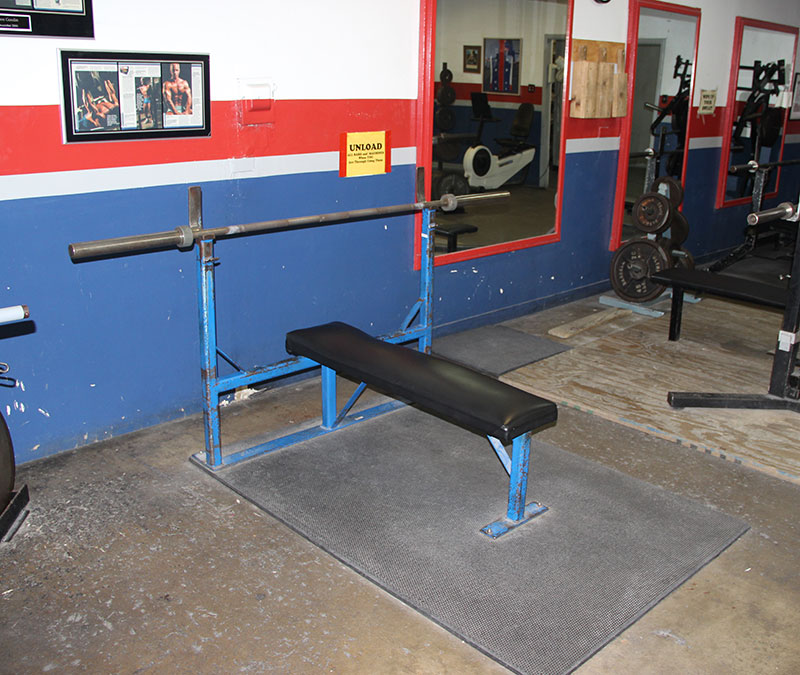
A weight bench with uprights:
Barbell – the standard weight is 45 lbs, but this may be too heavy to start. No matter how strong you are, I recommend starting with a PVC pipe or broomstick to learn proper form.
There are many different ways to set up for a bench press – as you’ll see by watching any powerlifting competition, or even by spending just 20 minutes in your local gym.
Some people get on the bench and curl themselves under the bar, some enter the bench from the back and slide in under the bar, and others just lie down and then get tight.
The key here is to set up in a way that helps you get your body tight and ready for the lift.
Before you begin, it might be a good idea to roll the bar forward on the uprights, as this is where you will be lifting it off from.
Having the bar in the same spot in the uprights will help you with a standard setup that is the same every time.
Here’s how to position yourself during the bench press:
Squeeze your shoulder blades together (as if you were trying to hold a pencil between them), press your lats into the bench, and raise your chest up slightly towards the bar.
While you’re doing this, squeeze your butt and plant your feet into the ground. Your entire foot (heels included) should be on the ground, on either side of the bench.
Keep your entire body tight. The raising of your chest to the bar, squeezing your shoulders together, squeezing your butt, and driving your heels into the ground will create a tight arch in your back. (more on this later).
Imagine you are a superhero and pretend you are sucking all the energy out of the room and absorbing it. As you the bar descends, absorb that energy and get ready to explode upward with the bar.
Your shins should be perpendicular to the ground and directly below your knees. If they are out in front of you, your feet are too far forward and you won’t be able to generate proper drive.
When you look up, your eyes should be just north of the bottom of the bar – you should see the bar directly above your eyes. Your head, upper back, and butt should never leave the bench.
Note: Some people (including myself) find it easier to get tight in their upper back if they put their feet up on the bench, grab the bar, get tight in their upper back, and then place their feet on either side of the bench one at a time.
This is just another method and something you can try out after you get the hang of the bench!
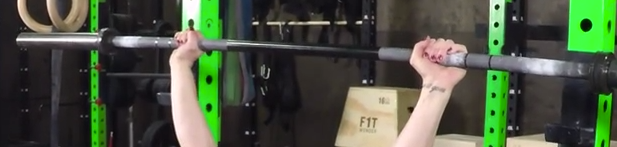
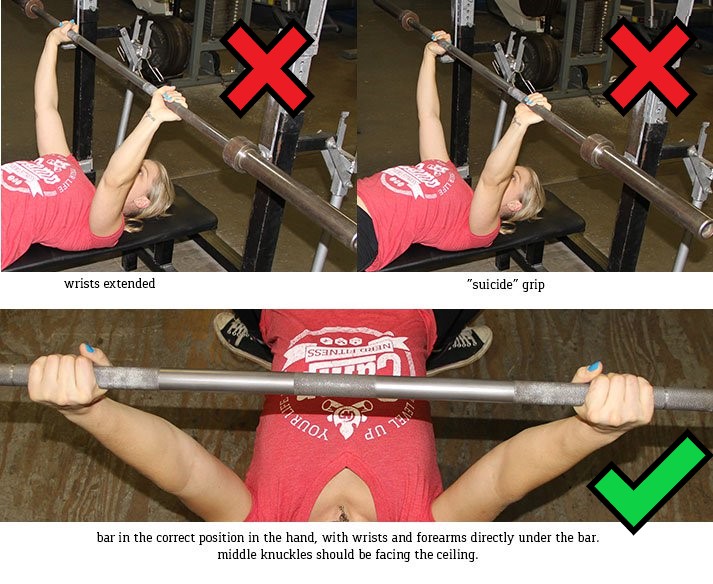
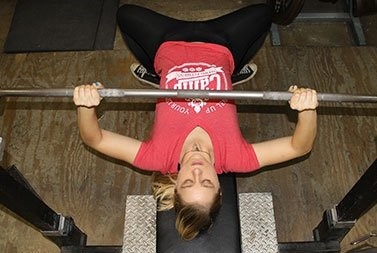
Next, take your arms and put them straight up, and grab the bar. Your grip should be with your thumbs around the bar:
A thumbless grip is not to be used on the bench press, as it is unsafe, and often nicknamed the “suicide grip,” as it is far too easy for the bar to fall off of your hands and land on your body (warning: hard to watch).
When you hold the bar, it should be in the heel of the palm (the same spot in your hands as for the overhead press.) Your wrists will not be extended, and your forearms are under your wrists, forming a solid line of support.
If you hold the bar in the upper half of your hand or the fingertips, not only are you not in a strong position, but you could hurt your wrists.
Bench Press Grip:
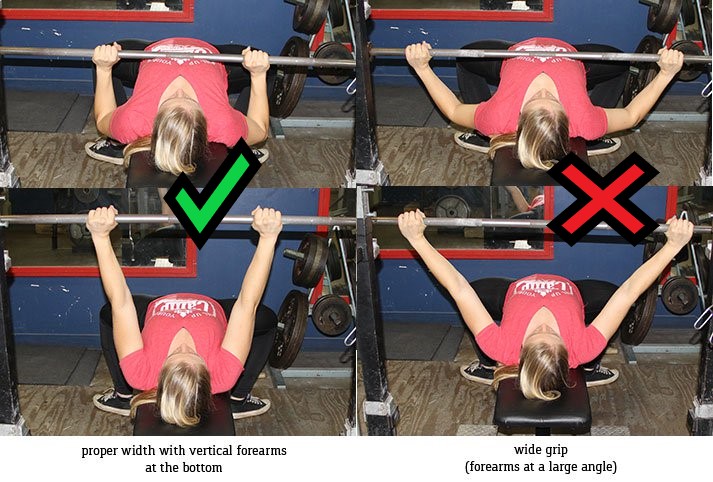
Bring the bar (or, preferably PVC as we are just learning) down to your chest. At your chest, the width of your grip should make your forearms straight up and down (as perpendicular to the floor as you can).
Get a friend to help you (as you won’t be able to see on your own), or tape yourself so you can see. Don’t stress too much about getting your forearms 100% perfectly vertical.
Once you get comfortable with the movement, you may change the width of your grip, as there is wiggle room for personal preference, but this is a great place to start.
Also, keep in mind that your grip may seem way wider or narrower than your friends based on the width of your shoulders. This is normal!
Why would people alter their bench press grip?
A wider grip is more pec-focused
A narrower grip is more tricep focused
You will see powerlifters use a super-wide grip because it reduces the range of motion and therefore allows them to lift more weight in competition.
However, more weight does not always mean stronger, and our goal today is safety and strength!
This is why we recommend a grip with your forearms in a vertical position, it’s the most well-rounded and safest version for overall strength.
If you’reworried about whetheryou have the right grip in place, record yourself and match it against the videos in this guide. If it’s close, you’re doing great.
You could also record a video and sent it to your own Nerd Fitness Coach!
Click on the bottom below to learn more:
The Most Important Bench Press Tip (Keep Tight)
If you’ve set up correctly, your entire body should be tight.
Focus on the following when performing your bench press:
Think of your body as one single unit, not single muscle groups.
Drive your feet into the ground, tighten your entire lower body and core, squeeze your shoulder blades together, and squeeze the bar. You should feel like one solid, single unit.
When you tighten your body, your neck, upper back, and butt should be on the bench (and your feet and heels on the ground).
When you drive your heels through the ground, squeeze your shoulder blades together, and raise your chest to the bar, it will form a small arch in your back – this is natural and what we’re aiming for.
You don’t want to push your lower back into the bench to create a “flat back,” or try to not create an arch. If you have heard people talking about not using an arch in the bench press, they are most likely referring to the extreme arch used by many powerlifters:
That is not what we are going for here – that is a way to help you lift more weight by reducing the range of motion, and is only safe to look into when you have been benching for a long time and really know what you are doing. For overall strength, we recommend benching with a full range of motion instead of trying to reduce it.
Now, feel how tight your body is? It is very important that you keep this tightness throughout the entire movement.
Proper Bench Press Form
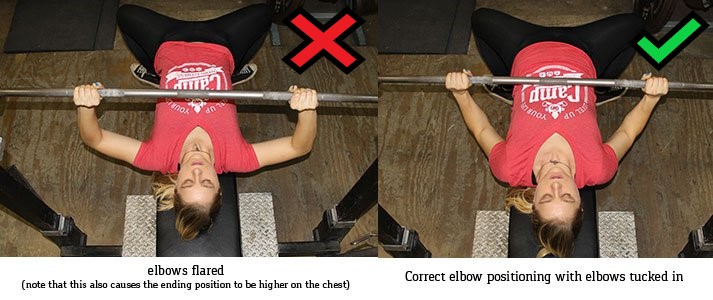
Now that we are set up and have our hands around the bar, we want to think about having our elbows tucked in and not letting them flare out.
One way to do this is that when you grab onto the bar, think about trying to bend it in half upwards towards the sky.
This “upward bending” cue will also help you engage your lats, which doesn’t actually help you with the press, but do help you keep your body tighter.
We review how to bench press with proper form in this video (taken from NF Prime):
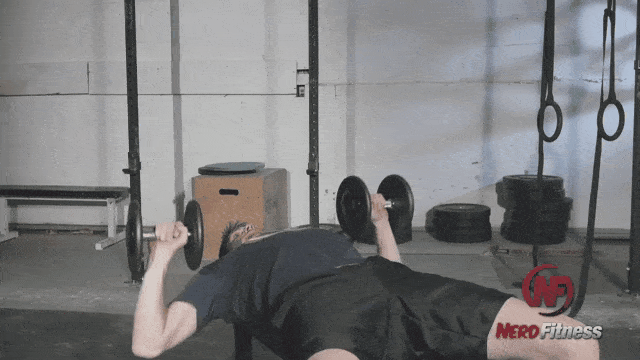
Here’s how to perform the bench press:
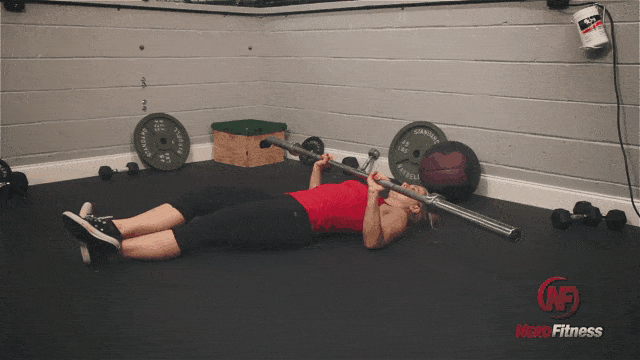
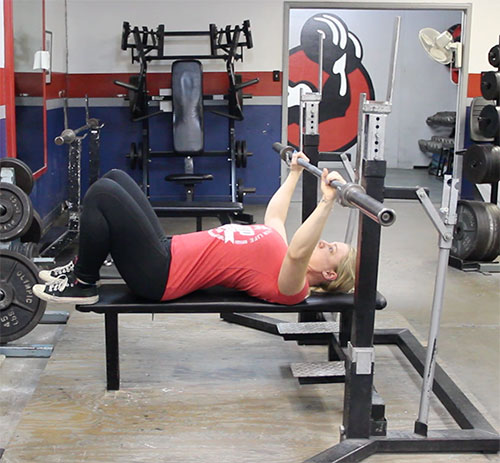
#1) Unrack the bar and position the bar directly above your shoulders(without losing tightness – keep squeezing your shoulder blades together!).
#2) Continue to look up at the ceiling, unlock your elbows and lower the bar to your chest.Don’t just drop the bar to your chest – you want to pull it down towards you with control.
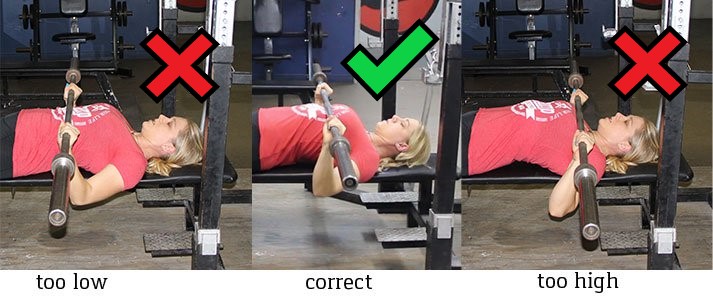
#3) At the bottom of the movement, you want the bar to touch a few inches below your clavicles.If it’s up by your throat or on your stomach, it’s in the wrong position.
#4)Once the bar touches your chest, press up to put the bar backto its starting position.
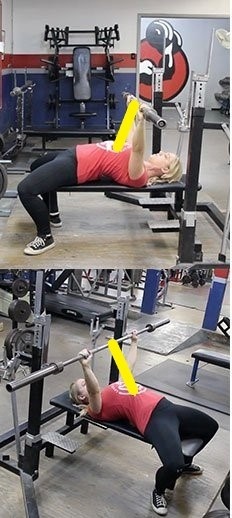
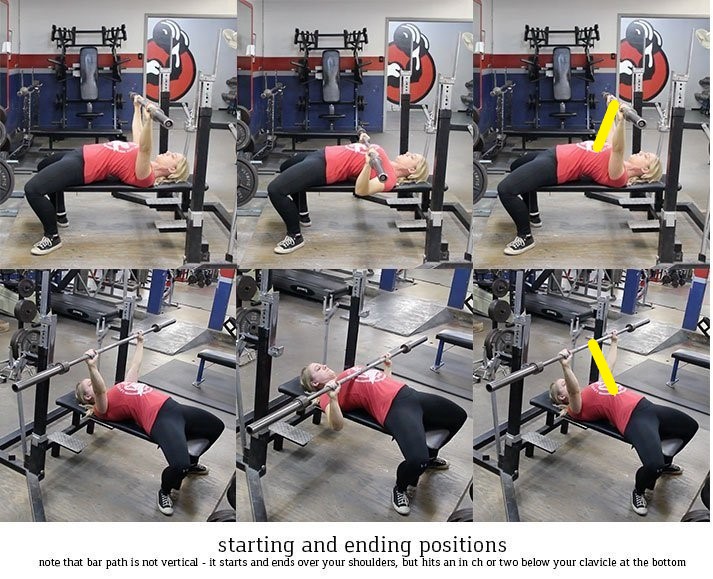
Note that unlike thedeadliftandsquat, the bench press movement will not be in a straight up and down motion.
Because of our anatomy, the bar will follow a slightly diagonal path down, and then follow the same path back up.
#5) While pressing, remember to keep your elbows tucked in, and don’t let them flare out.
Think about squeezing so that your biceps touch the side of your chest (though youwon’tbe close enough to have this happen), or try to get your elbows under the bar.
You don’t want to be too tucked though – the goal is about a 45-degree angle:
#6) As you press, the same parts of your body that were touching the bench before should still be touching the bench, and your feet should still be on the floor.Don’t let any part of you (the most common is your butt) come off the bench.
To help prevent your butt from coming off of the bench, instead of pushing up when you drive with your heels, think of pushing up and back, towards the front of the bench (where your head is).
#7) To re-rack the bar, move the bar backwards to the uprights and touch them with the bar, and then let go of the bar.Don’t look at the racks, you know that they are there! For beginners, it’s great to have a friend help you guide the bar back to the right position in the rack.
What’s a Beginner Bench Press Weight? (Determining Your Starting Weight)
Okay okay, you’re wondering how much you should put on the bar as a beginner who is starting out with bench pressing.
This is a very important question, and for somebody that is trying to level up as quickly as possible, you’ll be tempted to put WAY more weight on the bar than you can probably handle.
In other words, your ego is writing checks your body can’t cash.
Hell, even veteran powerlifters who can bench press 500+ pounds will always start out by just bench pressing the bar.
You can too. Nobody in the gym cares. I promise you.
NOTE: The bar STILL weighs 45 pounds, which MIGHT be too heavy for you. That’s okay! You don’t go to show people how strong you are at the gym, you go to the gym to get stronger.
So start by making sure 45 pounds isn’t too heavy for you.
If you are even SLIGHTLY concerned that it might be, consider using dumbbells or finding a smaller/lighter barbell in the gym and using that to build up to the strength with the bar.
HOW TO BENCH PRESS MORE:
Now, if you can bench press the bar safely, great.
Do 3 sets of 10 on your first day in the gym.
When it’s time to bench press again, add 2.5 lbs (1.2KG) to each side of the bar, and repeat.
You’ll then be lifting a total of 50 lbs.
Each week, add 5 pounds total (2.5 to each side) to the bar. This will be “slow going” at first. However, even at a paltry 5 pounds per week, you’ll rapidly reach a point in the next 6-12 months where you’ll approach a weight you can no longer lift.
“BUT STACI, I CAN LIFT WAY MORE THAN THE BAR, WHY START THERE?”
Because you need to train your body correctly, and we’re looking to build momentum. When you practice perfect form with light weight, your body starts to learn the proper pathway for the bar. Your muscles, tendons, and joints all learn how to bear the load of a weighted bar.
The entire strategy of our new app, Nerd Fitness Journey, is based off this strategy: slow progress over time. And because we’re nerds, you’ll actually build a superhero along the way (because why not!).
5 Common Bench Press Mistakes
Not keeping body tight – As soon as you lose tightness, you have the potential for missing the rep. Make sure even when you are warming up and the weight is light, that you keep your entire body tight.
Butt coming up – make sure your butt stays on the bench at all times! It’s easy to let it come up off the bench once the weight gets heavy and you really start driving through your heels. Instead of thinking about driving upwards through your heels, think about driving up and backwards. If you’re struggling with your butt coming up, either try putting plates under your feet or re-evaluating your foot position (or lower the weight).
Bouncing off your chest – when you come to the bottom part of the lift, don’t bounce! Lower the bar to slightly graze your shirt, and then press.
Half reps – One of the most common faults I have seen in the gym! Make sure you are hitting full range of motion every single rep (down to chest!).
Wrong starting, middle, and ending positions (pictured below) – we’ve learned in the past that a vertical line is the most efficient way to move a bar, but with the bench press, the safest is to move the bar at a slight curve. The bar will start and end above your shoulders, but the middle point of the bar will be below your clavicles. If your middle position is above your shoulders, in a vertical line, your middle position is too high.
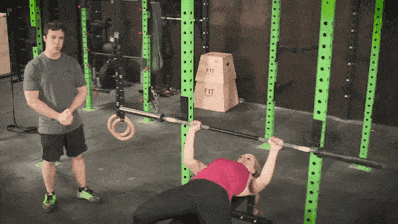
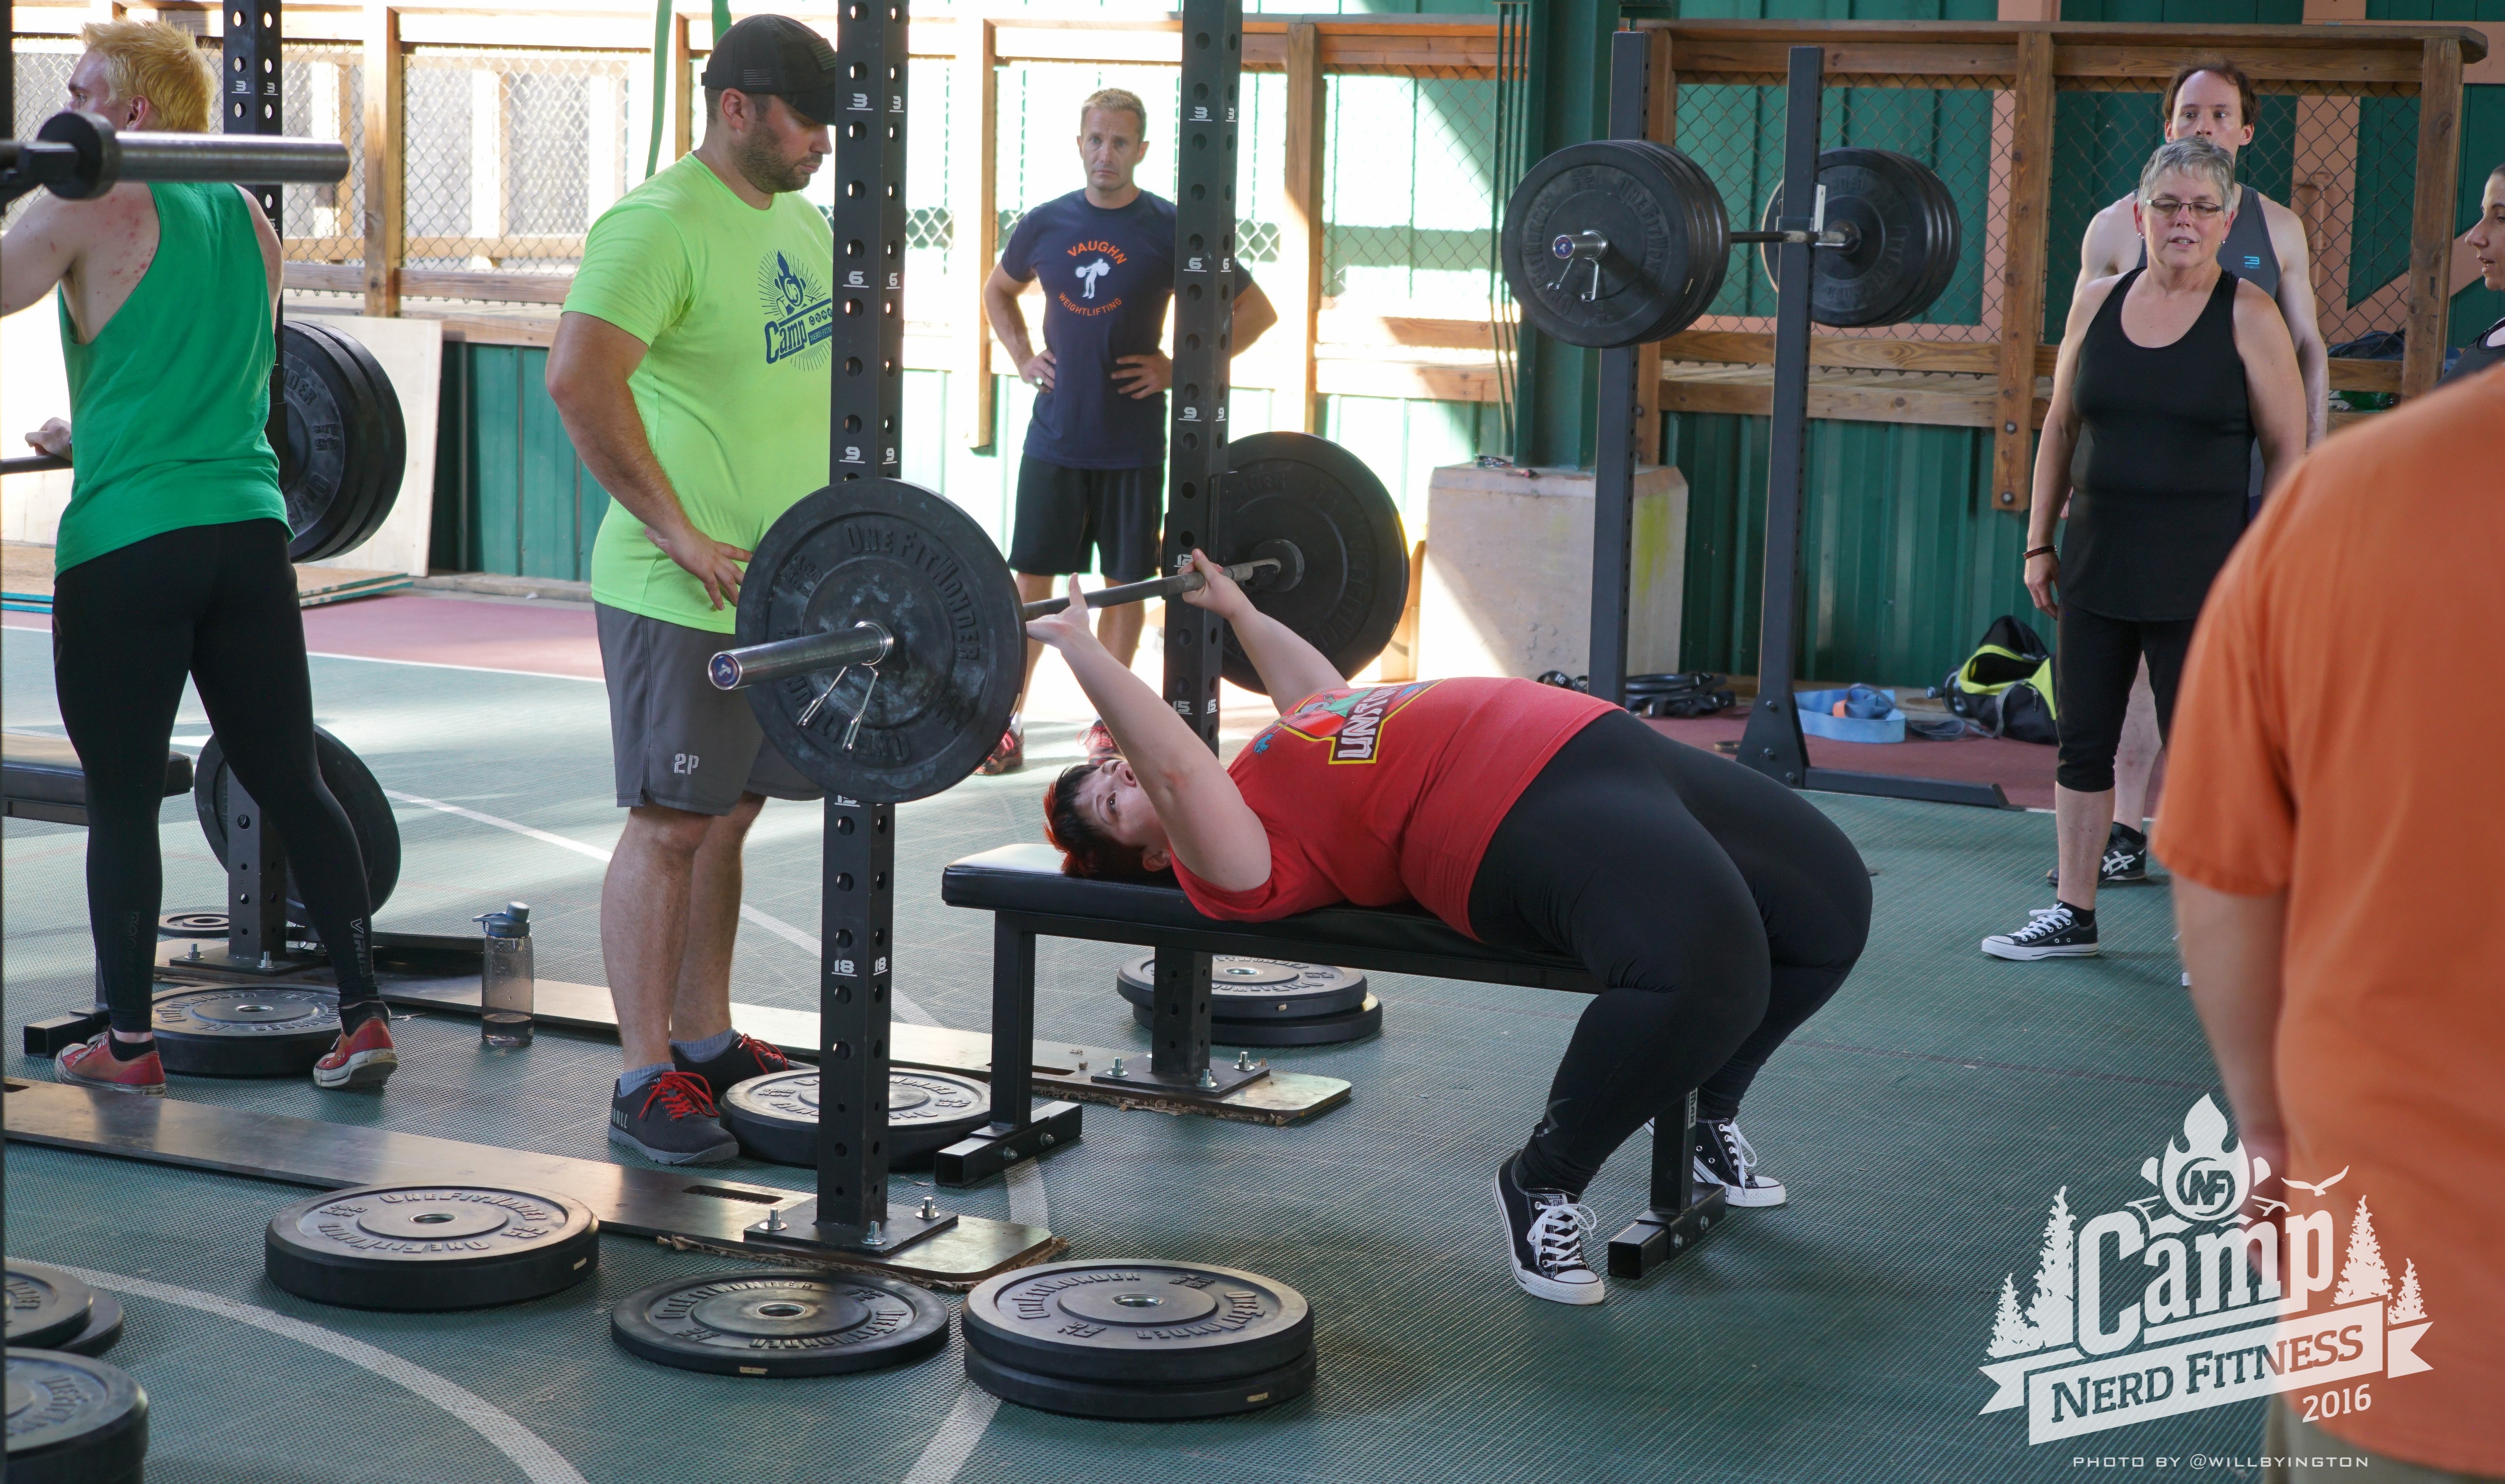
How to Ask for A Spotter with the Bench Press
Spotting is a very important part of bench pressing – not only having someone spot you, but having you spot other people. It can be extremely dangerous to bench press alone.
A spotter’s purpose is to ensure the safety of the lifter – not to help the lifter with reps.
The spotter always watches every rep while staying out of the way.
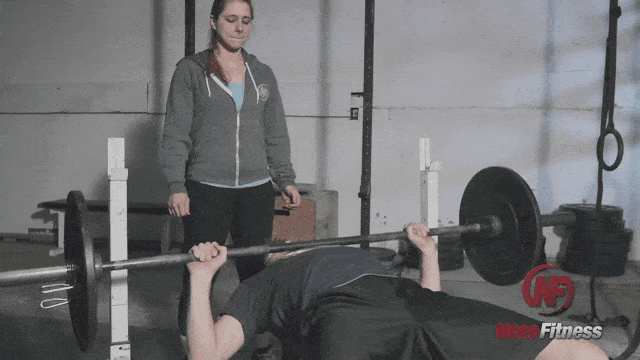
The only thing they may help with is giving you a lift-off, but after that, it is all you!
*A lift-off is when you help the lifter take the bar out of the rack, and then let go of it when it is in the correct starting position.
You don’t need a spotter for your warm-up sets, but everyone should have one for their work sets.
How do you ask someone to spot you? “Hey, will you spot me real quick?” usually works (it’s really that simple!). I’ve never had anyone turn me down.
If you’re always at the gym at the same time as someone else, make friends and spot each other.
That way you’re not always nervous asking someone random to spot you.
If someone asks you to spot them, always ask:
How many reps they are going for?
Do they want a lift off?
How would they like to be spotted?
Some people don’t want you to touch the bar unless they tell you to; others want you to help them guide the bar up if they start to fail, and others want you to take the bar immediately if they fail the rep.
Some want a lift off, and some don’t.
When you ask someone else to spot you, they will probably ask you the same questions!
What if I don’t have a spotter? Can I bench press without a spotter?
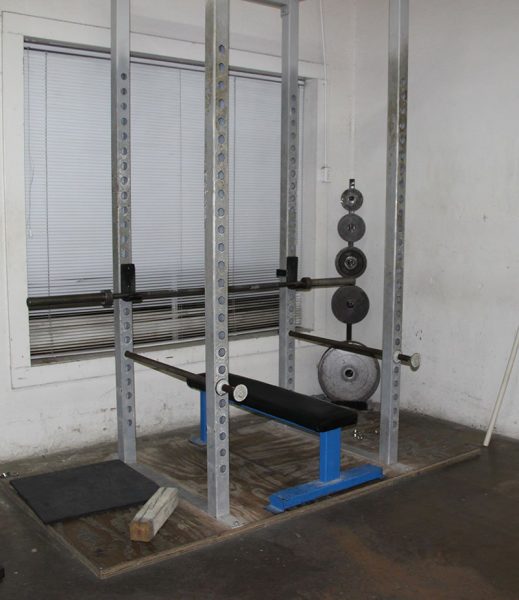
If you don’t have a spotter, you can use the power rack to bench.
Apower rackwould look like so:
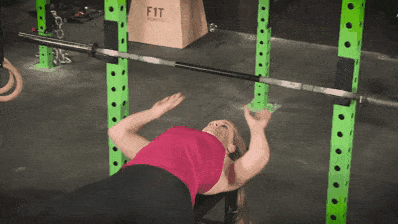
NF Coach Jim demonstrates how to bench press using a power rack here:
Just set the pins at a level just barely below your chest, so if you miss a rep you can get out.
If you don’t have a power rack, and absolutely don’t have a spotter – you can either not put clips on the bar, and then let the weight slide off one side at a time, or do the “Roll of shame,” where you roll the bar down your body, sit up, and pick up the bar.
However, both of these methods are dangerous and you’re risking injury by doing them. Please do not bench press alone – especially when just starting out. Even if the weight seems light, it’s very possible to injure yourself.
The best thing you can do is to ask someone at the gym to spot you.
There’s nothing weird about it all – in fact, it’s normal and expected!
If that’s not an option, consider dumbbell presses or another chest exercise until you can find a spotter.
Frequently Asked Questions about The Bench Press(Plus Tips to Get Started)
1) “I see people with their feet up on the bench – what’s going on?”
This isn’t technically correct – but it’s really a completely different movement than your standard bench press. It eliminates the use of the lower body in the movement, and can be good for people with injuries or as an assistance exercise.
I’ve seen it the most in bodybuilding routines. We recommend you stick to the bench press form we presented until you master the movement.
2) “If the bench is one of the ‘big 4’, why do some people not bench press?”
The bench press is a great way to build strength. But out of the big 4, it is the lift that has the most alternatives available.
While it’s hard to replace a heavy deadlift, you can easily replace the bench press with push-up and dip variations and continuously get stronger with just your own bodyweight for a very long time.
I personally keep the bench in my program because I enjoy it, but also because it’s a competitive lift in powerlifting.
Steve, however, has chosen to not bench press and replaces it with bodyweight variations of push-ups and a lot of gymnastics ring work.
3) “Okay, I get it! What do I do now?”
I’m glad you asked! I have three great options for you:
Option #1) If you want step-by-step guidance, a custom strength training program that levels up as you get stronger, and a coach to keep you accountable, check out our killer1-on-1 coaching program:
Option #2) Exercising at home and need a plan to follow? Check out Nerd Fitness Journey!
Our fun habit-building app helps you exercise more frequently, eat healthier, and level up your life (literally).
Try your free trial right here:
Option #3) Join the Rebellion!We need good people like you in our community, the Nerd Fitness Rebellion.
Sign up in the box below to enlist and get our guide,Strength Training 101: Everything You Need to Know. It’ll help you start incorporating the bench press into your training:
Download our comprehensive guideSTRENGTH TRAINING 101!
Everything you need to know about getting strong.
Workout routines for bodyweight AND weight training.
How to find the right gym and train properly in one.
So that’s all there is to it! Next time you are in the gym, give the bench press a shot!
Start with just the bar, and add weight each time when you hit your weights. Just don’t forget to have a spotter!
So, what kind of benching questions do you have for us!?
-Staci
PS:Don’t forget to check out our other articles in the Strength 101 Series!