VISIT FOR THE BEST FITNESS AND HEALTH ADVICES

Blog Archive

Tuesday, January 31, 2023

HigherDOSE PEMF GO Mat Review


Reviewing the HigherDOSE PEMF GO Mat for people who want relaxation, pain relief, and improved sleep. I’m sharing how I use it for all three at the same time! If you’re interested in getting one of your own, check out the link here and use FITNESSISTA15. I’m also a huge fan of the HigherDOSE sauna blanket and the red light face mask. 

Hi friends! How are you? I hope you’re having a wonderful morning! I’m packing up for a little upcoming trip and getting everything ready to go. Ready for some (more) California beach air!

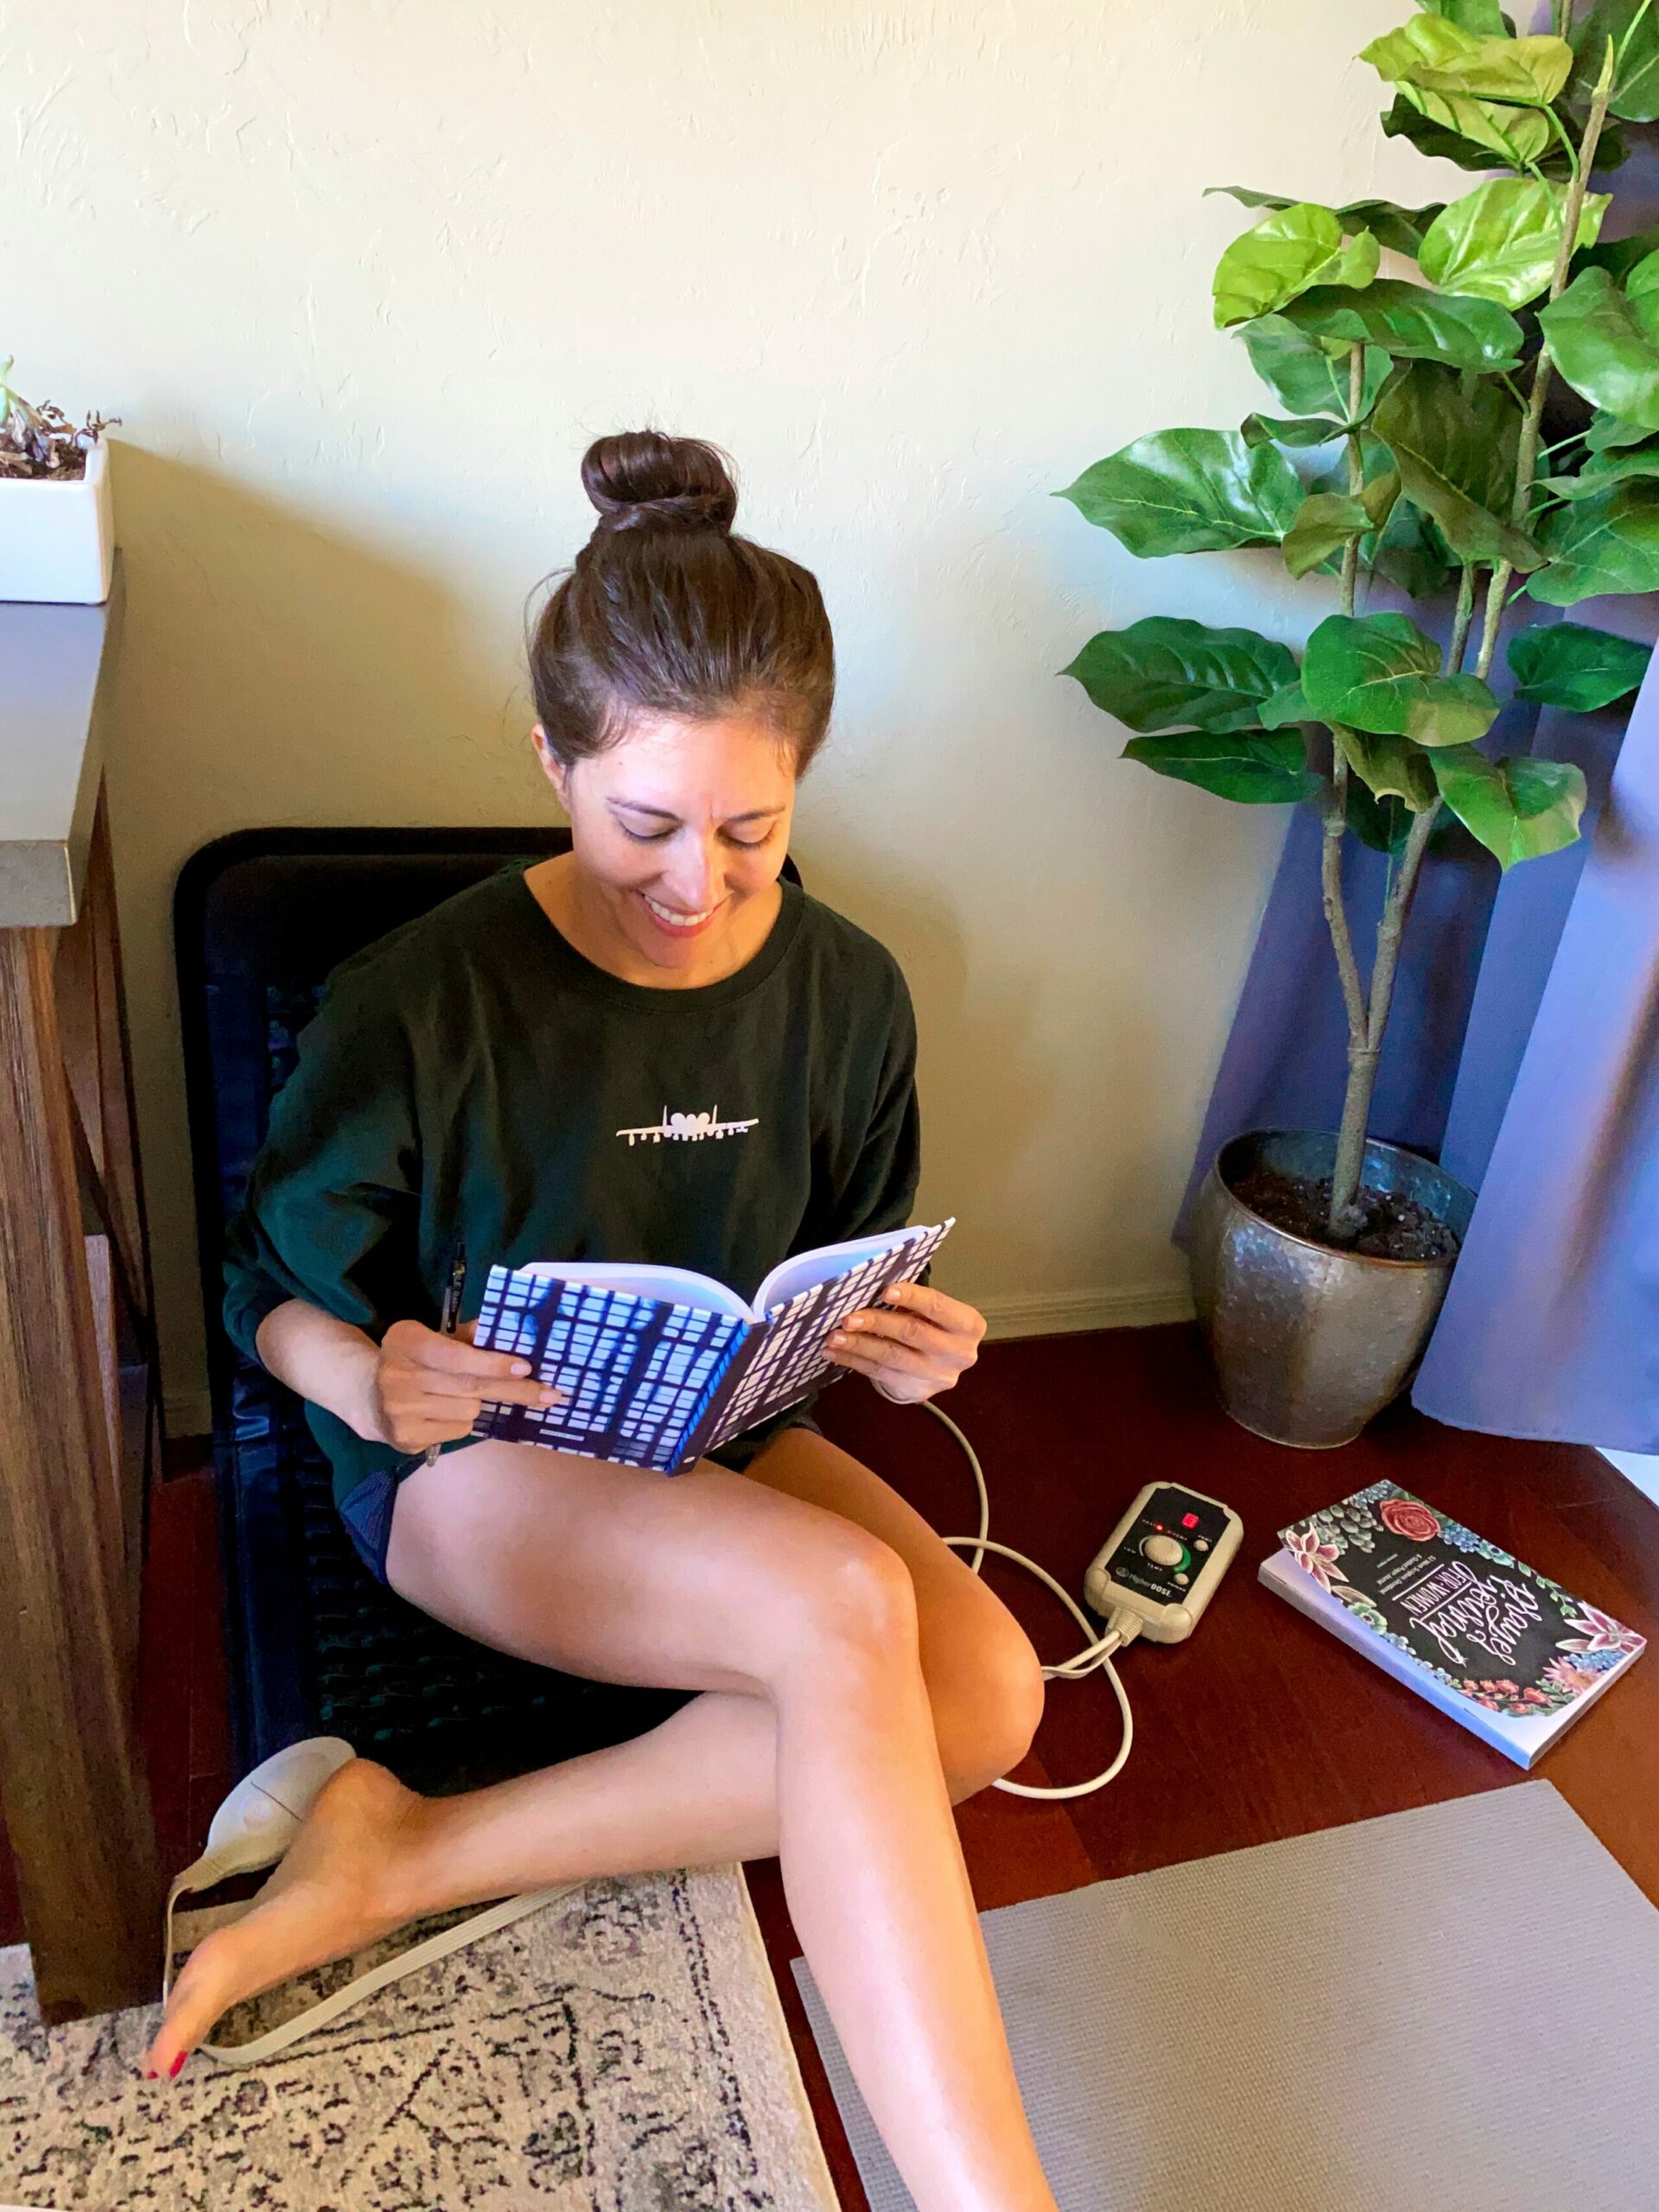
For today’s post, I figured it was time I did a full review for something I use every.single.day: the infrared PEMF Go Mat. I’ve posted about it quite a bit and many friends on IG agreed that it’s worth the hype and one of the best things ever. When I first ordered the mat over a year ago, I knew I wanted something to bring me pockets of relaxation but also energy throughout the day. That’s exactly what it does for me, and today, I’m sharing all the details!

Friendly reminder to check with your doctor before using any new wellness gadgets to make sure it’s a fit for you! This product is not intended to diagnose, treat, cure, or prevent any disease.

PEMF technology promotes rest and digest, which can have a calming effect on the mind.

PEMF technology was originally used by NASA to promote health of the astronauts while in space. PEMF stands for Pulsed Electromagnetic Field Therapy, and is designed to mimic the vibrations found in nature. These vibrations interact with our organs and tissues to help promote healing and relaxation. It’s been scientifically shown to potentially reduce aches, pains, inflammation, improve circulation, and other ailments. It’s been FDA approved for decades and is used in animals as well as humans. You may have seen PEMF used by doctors, surgeons, physical therapists, and chiropractors. Thankfully, they now have lower-cost and portable versions like this, so you can get the benefits at home!

Some studies regarding PEMF technology:

Successful application in post-COVID fatigue regarding mental wellbeing and energy

Effectiveness with neck pain improvement

Improved pain, stiffness, and function

How PEMF can potentially improve anxiety and depression

While it can have all of these internal healing capabilities, it also feels AMAAAAAZING. I feel relaxed yet energized, present, and focused whenever I use my mat.

Features

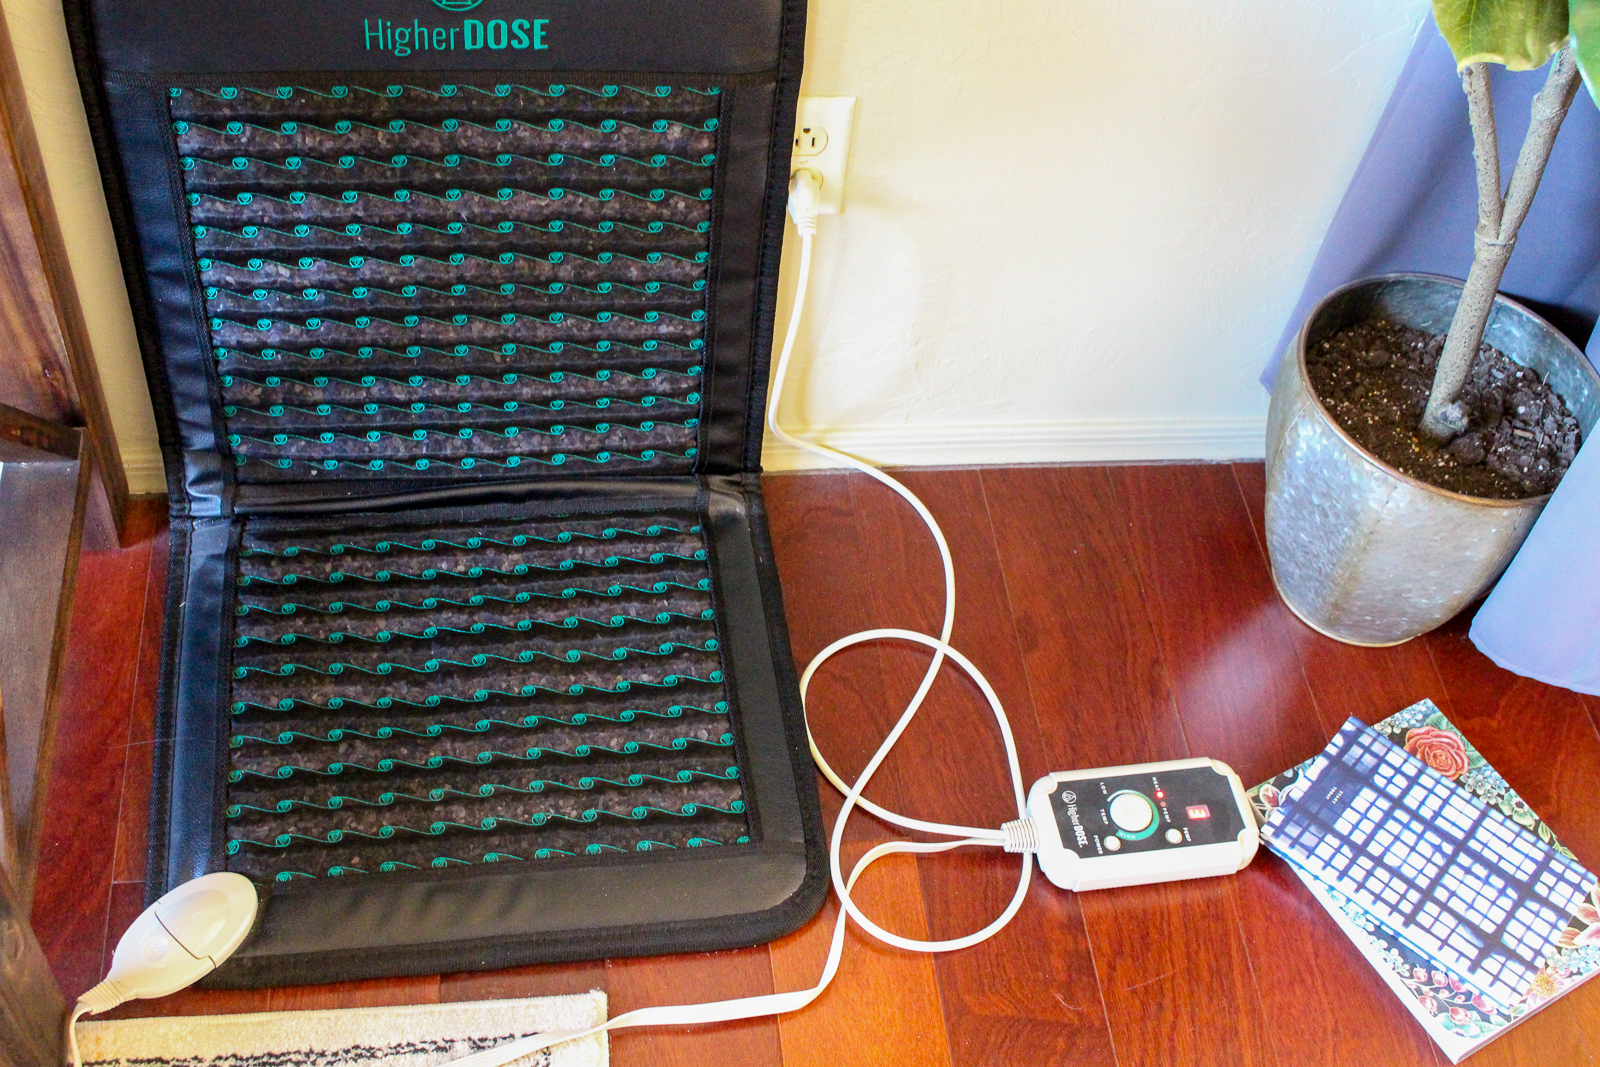
When you receive your mat, you get a simple instruction guide and safety information (treat it like many other electronic devices). The set-up takes less than 5 minutes. You just attach the plug to the base, plug it in, and set up wherever you’d like.

Benefits

– This particular infrared PEMF mat is the Go size (about 2/3 the size of a yoga mat), which makes it very easy to transport and move around. I can use it on the floor to meditate, or also put it on my desk char for longer work sessions. They have a full-size option here, which you can use if you’d like to practice gentle yoga on the mat or lie down and have your entire body be on the surface of the mat.

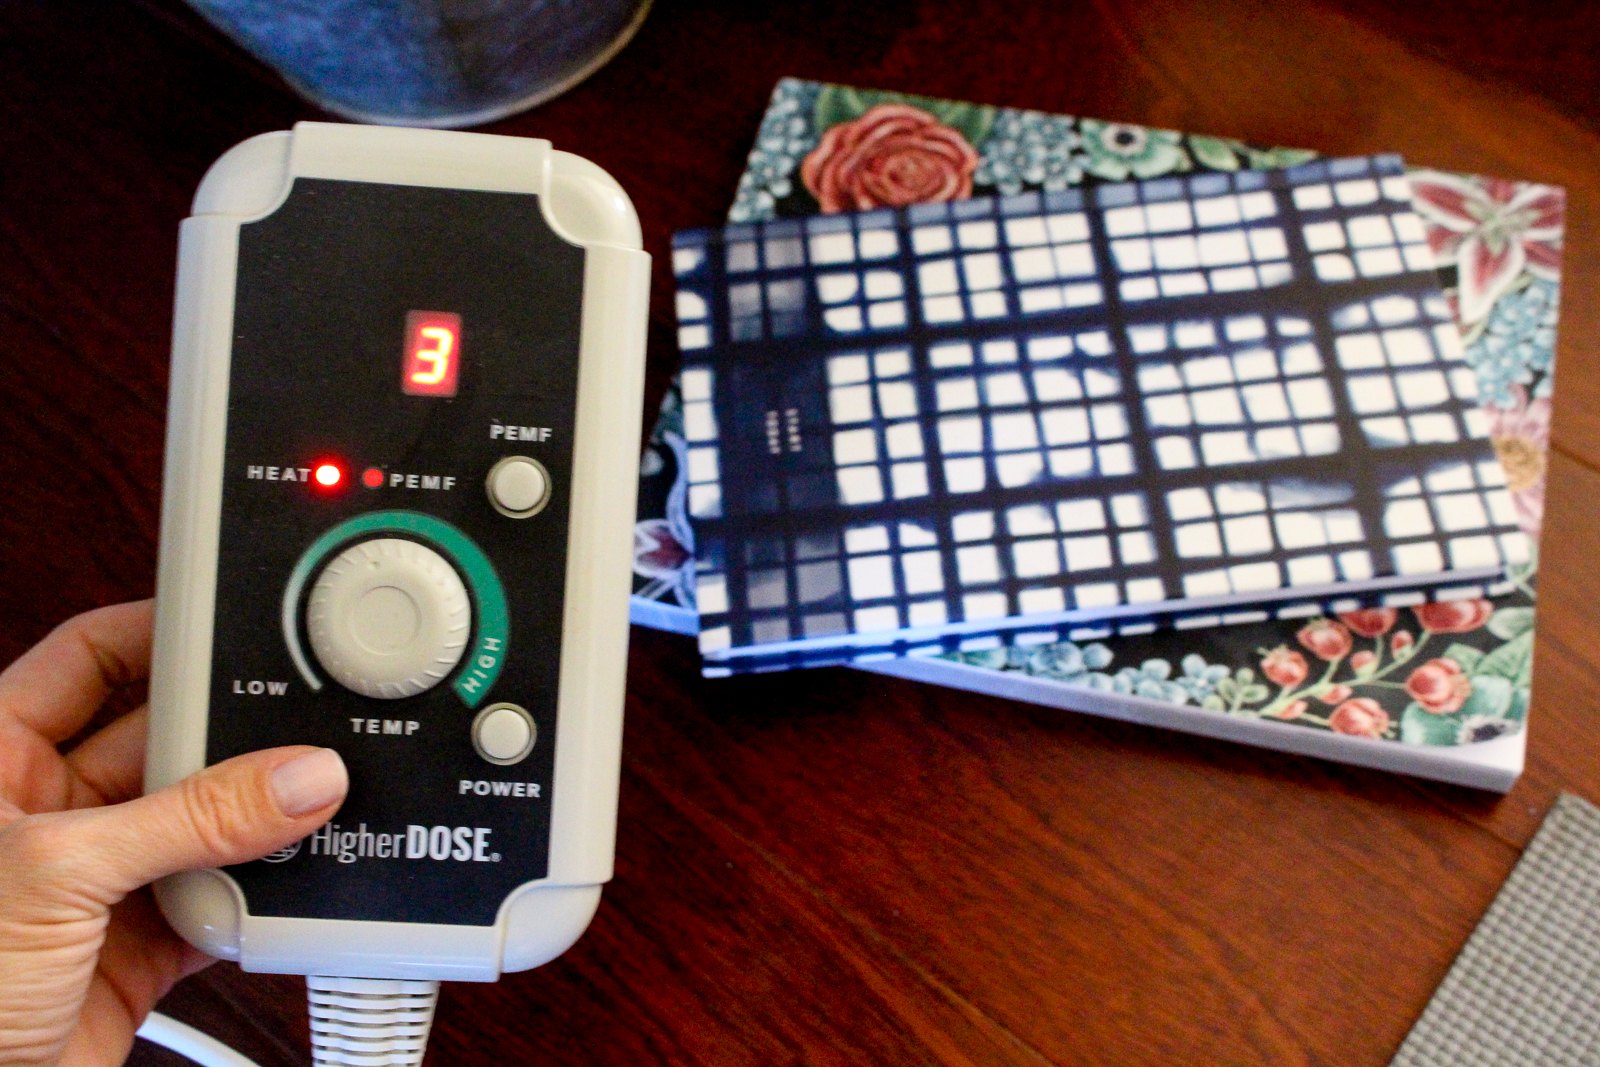
– In addition to the PEMF therapy, it also includes infrared heat. It gets up to 70 degrees celsius, and you can wear whatever you’d like when you’re using the mat. I find that if you want the heat cranked up, it’s better to wear more clothing as a barrier.

– Layers of healing tourmaline crystals, charcoal, and clay. These help to produce negative ions which can neutralize free radicals and improve mood.

– Low EMF. I’m always wary of electronic devices emitting extra radiation and was glad to discover that it’s low EMF.

Disadvantages

– The fabric is a little bumpy. I’v heard you can practice yoga on the mat, but I don’t think I would because the surface has ridges.

– No sweating. When I use infrared heat, I like to SWEAT. However, I can’t walk around like a sweaty beast all day and don’t always have time to shower, so this is helpful when I want the benefits without the full commitment.

How do you use it?

– Set it up where you’d like to use the mat. Plug it in, and adjust the PEMF frequency depending on your goal. It has level 1-4, with 4 being the highest frequency.

Here are the different settings (from their website) and levels of Hz frequency:

Level 1 | 3hz – Delta Brain Wave

3 Hz is for deep relaxation and can help with falling asleep and staying asleep. When we are in a very deep sleep, our brains are typically in Delta. This can occur throughout the night, but it is typically the most intense in the hour after we’ve fallen asleep. Often times, this is the deepest sleep we get into during the night and this allows the brain to slow down dramatically – ultimately giving the body a chance catch up, facilitating healing and regeneration of tissues.

Level 1 can be used before sleep to help you drift off and keep you in this body-brain nurturing state. In the waking hours, level 1 can also be helpful if you are feeling anxious and want a boost back to equilibrium. 

Level 2 | 7.8hz – Theta Brain Wave + Schumann Resonance

The Earth’s natural frequency, also known as the Schumann Resonance, is 7.8 Hz! When you’re feeling disconnected or overstimulated from computer and cell phone usage, or can’t get outside, use Level 2 to recharge and reconnect. 

7.8hz is in the Theta brain wave, which can also be accessed during sleep. This portion of our night is known as dream sleep which only accounts for about one third of the total sleep time.  

When our brains are in Theta, we can experience deep creative insights, enhanced learning and memory, and improved stress tolerance.

Level 3 | 10hz – Alpha Brain Wave

Alpha falls right in the middle of the brain wave spectrum and is predominately known for being present during meditation and wakeful relaxation. Using Level 3 at 10hz can promote mindfulness and open-mindedness, as well as reduce the physical effects stress and increase tissue regeneration. 

Level 4 | 23hz – Beta Brain Wave

Beta brain wave is present during our waking hours when we are most alert, focused, and involved in daily living and decision making. By using level 4, Beta waves are stimulated and promote improved mental function, increased concentration, and improved memory. This is especially helpful if you find yourself hitting a mid-day slump, or feel sluggish. Hit the PEMF Mat for an instant recharge!

Avoid using level 4 before bedtime, or if you are feeling anxious.

*The mat’s PEMF cycle is 20 minutes long with 100-minute breaks in between. This cycle repeats 4 times before shutting off completely. 

– I use the level 3 setting for meditation or after intense workouts, Level 2 if I’ve been on the computer for too long, Level 4 if I hit a slump during a workday, and Level 1 before sleep!

– For the heat, it can get very toasty. I like it at a level 4.

How do you clean it?

Since I don’t get sweaty at all on this mat, I just use a soft towel to wipe away dust. It’s super easy clean-up.

How much does the Higher Dose PEMF Go Mat cost?

Right now, it’s $599 but you can get a discount with this link and with my code FITNESSISTA15

Final verdict:

100% worth it. It’s one of the tools in my wellness kit that I genuinely miss when I travel, and use every single day. It helps me with mental focus, clarity, relaxation, and takes my meditation and devotional time to the next level.

So, tell me, friends: what’s one of your favorite wellness essentials? If you could pick one, would you go with the sauna blanket or PEMF Go Mat?

xo

Gina

More:

HigherDOSE Infrared Sauna Blanket review

Red Light Face Mask review

Fitness gear that’s worth the hype (and what’s overrated)

The post HigherDOSE PEMF GO Mat Review appeared first on The Fitnessista.


from The Fitnessista https://ift.tt/Xt2v87q

Saturday, January 28, 2023

The 43 Best Bodyweight Exercises: The Ultimate Guide for Working Out Anywhere!


Deadshot does his bodyweight training, in between "jobs."

Here are the 43 best bodyweight exercises you can do to build muscle and burn fat, no gym required! 

These are the exact exercises we start our coaching clients on, and many perform them from their house or apartment.

In a hurry? Sign-up for our free weekly newsletter and we’ll send you PDFs of our “Work Out at Home” guides!

We’ve organized the exercises in today’s guide by major muscle groups (click to jump to those movements):

Plus, we’ll pull it all together at the end so you can create a complete bodyweight workout routine!

Alright, let’s get to it.

The 11 Best Lower-Body Bodyweight Exercises

Buddha isn't trying to lose weight. But he's also zen about you trying to.

You don’t need the gym for “leg day.” Do the following wherever! 

#1) ASSISTED BODYWEIGHT SQUAT:

Doing assisted bodyweight squats is a great step towards regular bodyweight squats

(Perfect if you can’t do regular bodyweight squats).

#2) BODYWEIGHT SQUAT:

Do a proper bodyweight squat to work out your legs

If you want even more instruction, here’s how to do a proper bodyweight squat:

#3) ASSISTED PISTOL SQUAT:

A small stool can help when you first start doing one legged squats!

#4) PISTOL SQUAT:

The one legged "pistol" squat is a great advanced bodyweight movement.

#5) SUPPORTED LUNGES:

Do the assisted lunge until you can do regular lunges

#6) REGULAR LUNGES:

Do Lunges to strengthen your legs for the beginner bodyweight exercises!

We have a guide on how to do lunges with proper form for you too.

#7) SINGLE LEG DEADLIFT:

Doing a deadlift on one lef is a great way lower body bodyweight exercise.

#8) HIP BRIDGE:

Raising your hips of the floor, like so, is how you do the bridge bodyweight exercise.

#9) CALF RAISE:

Just stand on a step, raise your heel , then lower.

#10) STEP UP:

This exercise really is as simple as stepping up and down a box or small secure stool.

#11) BOX JUMP:

Be careful on your box jump! But it is a bodyweight exercise.

The 8 Best Push Bodyweight Exercises

These LEGO characters are on a mission to grow some muscle.

Let’s walk you through the best bodyweight exercises to train your push muscles. We’ll more or less progress in difficulty as we go.

#1) KNEE PUSH-UP:

Knee push-ups like this are a great way to progress to a regular push-up!

#2) ELEVATED PUSH-UP:

Do elevated push-ups to work up to regular push-ups

#3) PUSH-UP:

This gif shows Staci doing a push-up in perfect form.

We have a whole article on how to do a proper push-up, but we also cover it extensively in this 5-minute video:

#4) DECLINE PUSH-UP:

Decline push-ups like this are a great way to progress your bodyweight exercises.

#5) SIDE-TO-SIDE PUSH-UP:

Steve showing you how to do a side-to-side push up.

#6) ASSISTED DIP:

A resistance band is a great way to get started with this bodyweight exercise.

With a resistance band, you can start performing assisted dips. A great exercise while you build up strength for normal dips.

#7) DIP:

Bodyweight dips are a great exercise to include in an advanced circuit.

Here’s how to do a proper bodyweight dip if you’d like a step-by-step guide.

#8) HANDSTAND (WALL WALK):

The wall walk will help you build strength for a handstand. Be careful here.

The wall walk is a great exercise as you progress into a full handstand. If you’re a complete newbie to turning upside down, check out our guide “Get Your First Handstand” for a full tutorial.

Just make sure you take it slow with your handstand and don’t be an “Overeager Beaver,” a label we define in our guide “15 Mistakes That Newbies Make When Trying to Get Healthy.”

Download it and the rest of our guides for free when you sign-up for our weekly newsletter!

The 8 Best Pull Bodyweight Exercises

One arm pull-ups would be a great bodyweight exercise, but let's start you off with something easier.

Don’t neglect your pull muscles when creating your bodyweight workout. Here are the top 7 to include:

#1) INVERTED BODYWEIGHT ROW (HIGH):

A bodyweight row like this is a great "pull" exercise you can while building up strength for pull-ups.

An inverted bodyweight row can be a great “pull” exercise if you can’t do a pull-up yet, or if you don’t have a proper pull-up bar nearby. Because a good sturdy table can be used for inverted rows:

Alternatively, you could do doorframe rows if your table seems sketchy:

Coach Jim showing you the doorway bodyweight row

#2) INVERTED BODYWEIGHT ROW (LOW):

As you get lower, like this, the row will be harder to do. Great way to progress into a pull-up.

Once you get comfortable doing an inverted bodyweight row, try going lower to increase the difficulty.

You can check out The 5 Best Pull-up Alternatives for more ideas on how to perform rows, including how to build your own station:

This gif shows Jim doing a row on chairs

#3) BAR HANG:

Staci showing you the simple yet effective bar hang.

#4) ASSISTED PULL-UPS (WITH BAND):

Staci using a band for an assisted pull-up, a great exercise for a bodyweight circuit.

A resistance band is a great tool to help build strength for proper pull-ups. It’s part of our arsenal for getting your first pull-up.

#5) ASSISTED PULL-UPS (WITH BOX):

A box can be used instead of a chair for a pull-up.

#6) NEGATIVE PULL-UPS:

Staci jumping up to do a negative pull-up., a great movement until you can bring regular pull-ups into your circuit.

Once you start to feel confident enough you can do assisted pull-ups and support MOST of your own weight, start looking into negative pull-ups.

Jump and hold yourself above the bar, and then slowly, under control, lower yourself to the ‘starting position’ of a pull-up.

Then repeat!

This is a great way to build up enough strength to eventually get your first pull-up.

#7) PULL-UP:

A pull-up would be considered an advanced bodyweight movement, great for including in your at home training.

We have a full guide on proper pull-up form so you can hone in your technique.

#8) CHIN-UPS:

A chin-up is a pull-up, but with your hands facing towards you.

Much like a pull-up, but with your palms facing toward you.

Here’s a video going over proper pull-up and chin-up form:

Don’t have enough strength yet to hoist yourself up? No problem.

Download our guide, Strength Training 101: Everything You Need to Know, for an exact plan of attack to start growing strong today:

The 12 Best Core Bodyweight Exercises

Yep, clearly this boxer's jump rope skills lead him to victory.

Our next stop on building a bodyweight workout finds us at the core. Here are the 10 best exercises to include:

#1) REVERSE CRUNCH:

The reverse crunch is a great way to engage your core during your bodyweight workout.

#2) KNEE-PLANK:

If you can't do a normal plank, start with doing them on your knees until you can advance.

#3) PLANK:

The plank is a great bodyweight exercise to engage your core muscles.

#4) SIDE PLANK:

Doing a plank on your side is a great way to progressive this bodyweight movement.

#5) HIP BRIDGE HOLD:

#6) HANGING KNEE TUCK:

Much like the standing knee tuck, but utilizing a pull-up bar.

#7) JUMPING KNEE TUCK:

If you have good jumping abilities, you can try the knee jump in the air.

#8) HOLLOW BODY HOLD:

The hollow body is one of the best ways to engage the midsection and stabilize the body. We utilize the hollow body exercise as part of our strategy for getting your first handstand.

The hollow body is a great exercise to practice doing a handstand.

Once you get comfortable holding the position, try…

#9) HOLLOW BODY ROCKING:

Extending your arms will up the difficulty of this handstand workout.

#10) KNEES TO ELBOWS:

If you have a bar to hang from, you can try this core bodyweight exercise.

#11) TOES TO BAR:

This is an advanced move, but is a great core bodyweight exercise.

#12) GOOD MORNING:

Catch our guide “How to Strengthen Your Core” for even more exercise ideas!

5 Dynamic Body weight Exercises (Full Body)

Batman does bodyweight training during the day, At night he's fighting crime, or jumping out of cakes.

Next, we’ll cover some dynamic full-body exercises to get your heart rate roaring during your workout.

#1) WALKING JACKS:

Do walking jacks if you can't do jumping jacks!

#2) JUMPING JACKS:

Jumping Jacks are a great cardiovascular bodyweight exercise

#3) STAR JACKS:

If you start in a crouch you'll turn your jumping jack into a star jack!

#4) BURPEES:

The infamous burpee bodyweight exercise!

#5) BURPEES WITH PULL-UP (WHAA…):

If you start mixing pull-ups with your burpees, you are rocking it!

How to Build a Bodyweight Workout

You don't need a gym to start strength training, as shown here.

Alright, it’s time to pull this whole guide together and build a bodyweight workout!

We will pick a bodyweight exercise from each section:

We’ll aim for 3 to 4 sets under each category for 8-12 reps.

Plus, we’ll bookend the workout with a dynamic warm-up (DON’T SKIP) and a post-workout stretch.

Your warm-up can look like this:

Your post-workout stretch can look like this:

Example Bodyweight Workout:

  1. Dynamic Warm-Up
  2. Jumping Jacks: 10 reps
  3. Bodyweight Squats: 10 reps
  4. Push-ups: 10 reps
  5. Pull-ups: 10 reps
  6. Reverse Crunch: 10 reps
  7. Repeat 2-6 two more times, for 3 complete circuits.
  8. Post-workout stretch.

Boom!

You now have a bodyweight workout you can do in your own home.

Let's start bodyweight training!

You can mix and match from each category or progress to more difficult moves as you get stronger.

Now, you don’t HAVE to do these exercises at home. You can even do them while exercising around the world, as I did!

If you want to learn all the fine details of building a workout, make sure you check out our extensive guide “How to Build Your Own Workout Routine. It’ll walk you through creating a program of bodyweight exercises – or using weights if you want to train in a gym.

Don’t want to bother creating your own bodyweight workout? No problem, I have two options for you:

Start at the Beginner workout and move onto the Advanced when it becomes easy.

This should help you get started with a bodyweight training routine. But we hear frequently that people want MORE instruction, MORE guidance, and MORE workouts.

If that’s you, we have MULTIPLE options to take the next step. Pick the option below that best aligns with your goals and timeline:

1) If you want step-by-step guidance, a custom bodyweight training program that levels up as you get stronger, and a coach to keep you accountable, check out our killer 1-on-1 coaching program:

2) If you want an exact blueprint for working out at home, check out NF Journey. Our fun habit-building app helps you exercise more frequently, eat healthier, and level up your life (literally).

Try your free trial right here:

3) Join the Rebellion! We need good people like you in our community, the Nerd Fitness Rebellion. 

Sign up in the box below to enlist and get our guide, Strength Training 101: Everything You Need to Know. It’ll help you start incorporating these bodyweight moves into your training.

Alright, your turn: I’d love to hear how your bodyweight training is going!

Did you make your own workout?

Try one of ours?

Include different moves we didn’t cover today?

Leave a comment below with your results or any questions you have on bodyweight training.

For the Rebellion!

-Steve

###

Photo source: Deadshot, Laughing Budda, 102, 103, 104, hanging, 167/366, Yeaaaah…. Surprise ladies!!, acrobat

The post The 43 Best Bodyweight Exercises: The Ultimate Guide for Working Out Anywhere! first appeared on Nerd Fitness.


from Nerd Fitness https://ift.tt/7rLqo2w