Hi friends! Happy Friday! I hope you’re having a wonderful week so far. This morning, I’m catching a Peloton class and then tackling Liv’s closet. I’d been avoiding it but really need to clear out the pants and winter stuff, especially since we’re in the heat of summer. That will be my project for the day before we head off for Friday night pool night. I hope you have a good one, too!
One of the highlights of this week: picking veggies at Apple Annie’s. We hadn’t been to Apple Annie’s since Liv was a baby — it was SO much fun and the perfect outdoor adventure. We met up with some friends and picked green beans, okra, tomatoes, green chilies, bell peppers, and artichokes!
(Livi’s bracelet has tiny macarons on it)
Lunch was on the patio at La Unica, and was INCREDIBLE. I had an egg scramble with green chilies, rice, and beans. So, so good. This little day trip was such a nice way to break up the week and explore a bit. The girls had a great time… and they’ve been excited to eat more vegetables because they picked them. Always a bonus.
It’s time for the weekly Friday Faves party! This is where I share some of my favorite eats, wears, reads, etc. and I love hearing about the things you’re lovin’ too. Please shout out a current fave in the comments section if you’d like to join in the fun!
Fashion + beauty:
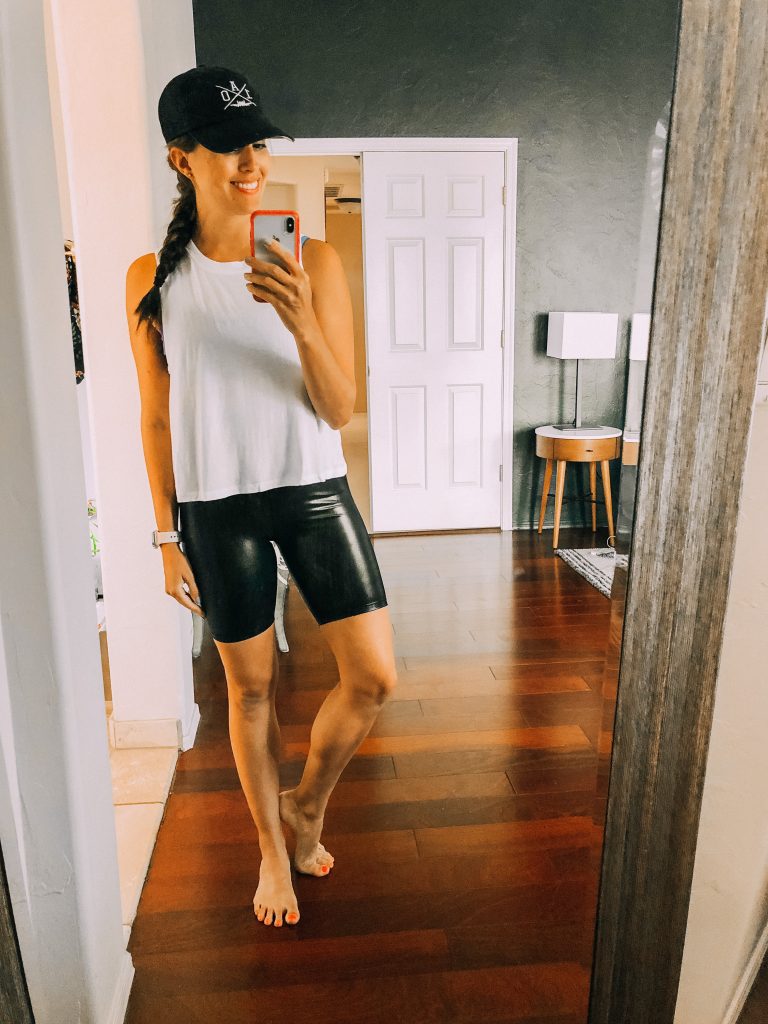
These bike shorts. (<- -my referral code is GINAHAR if you decide to order and would like 15% off!) I was very late hopping on the bike short trend for a couple of reasons. 1) They remind me of 3rd grade, which is a time period I’d be perfectly happy deleting from my life and 2) I’m not vertically blessed and I didn’t think they’d be flattering on me. Even so, I decided to give these ones a try because I love the shine on them! Verdict: they’re super cute and more flattering than I thought they’d be. It’s a fun way to switch up the usual lulu shorts without having to wear long leggings.
Wrap hat. I found this gem on Amazon with awesome reviews and love it so far. It’s can be conveniently rolled into my pool bag and I can wear it with my hair up in a high bun. Wins all around.
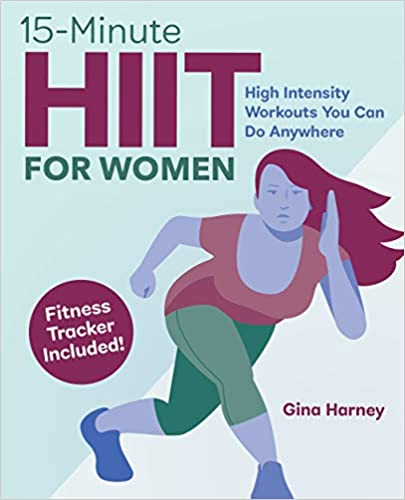
My second book is out! My manuscript was due about 4 weeks into this whole situation, so needless to say, finishing was a huge endeavor. This book is geared more towards beginners with lots of info on how HIIT works, breakdowns of exercises, fun 15-minute workouts, simple healthy meal ideas, and more. Since the beginning, I emphasized the importance of diversity and approachability throughout the pages. Callisto did a beautiful job featuring so many different types of women through the photos and illustrations. If you’re looking for a “back to basics” type book, or would like to gift it to someone that’s just getting started in the fitness world, the link to check it out is here. If you’d like a copy, leave a comment below! I’ll pick 5 lucky winners and ship out some signed books and goodies early next week.
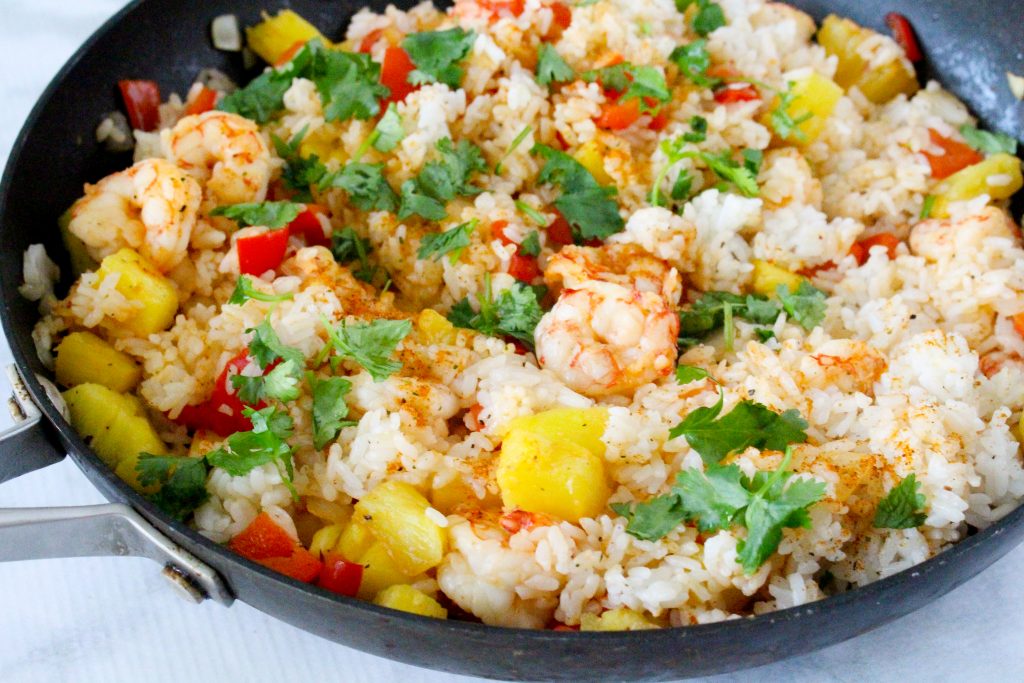
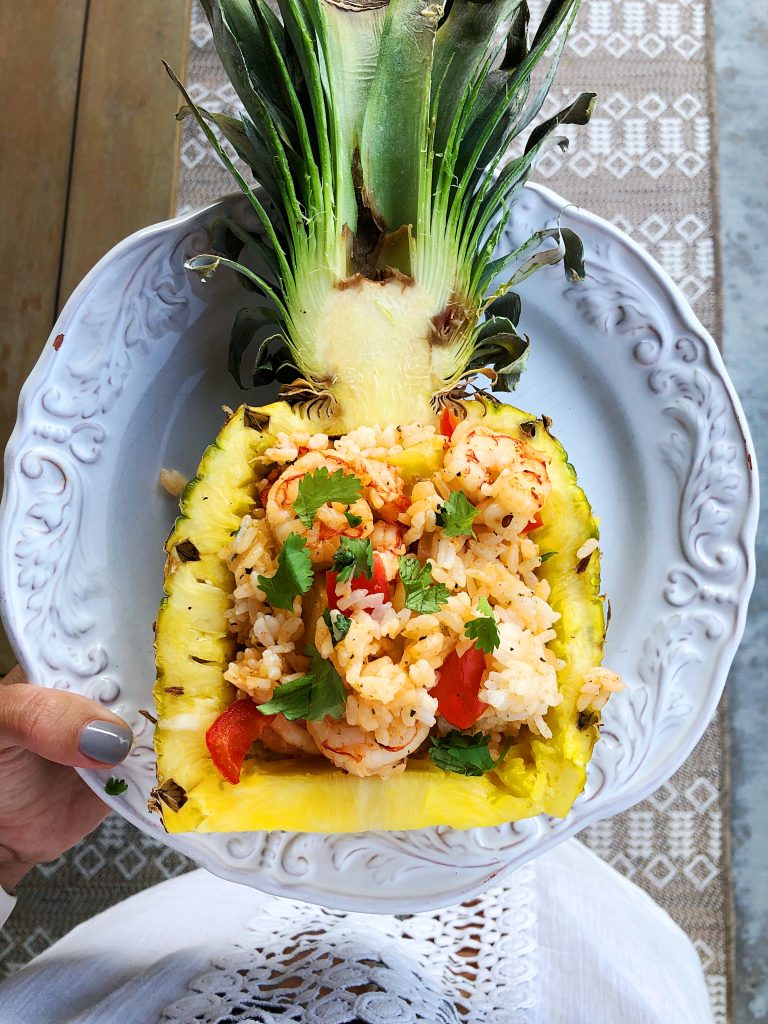
Shrimp and rice in a pineapple bowl! We’ve been really trying to switch up our food rotation and this was such a delicious summer meal. I’ve made a version of this here, but for the recent variation, I also seasoned everything with the Trader Joe’s Everything But the Elote seasoning.
Food is exponentially more fun when it’s served in a pineapple bowl.
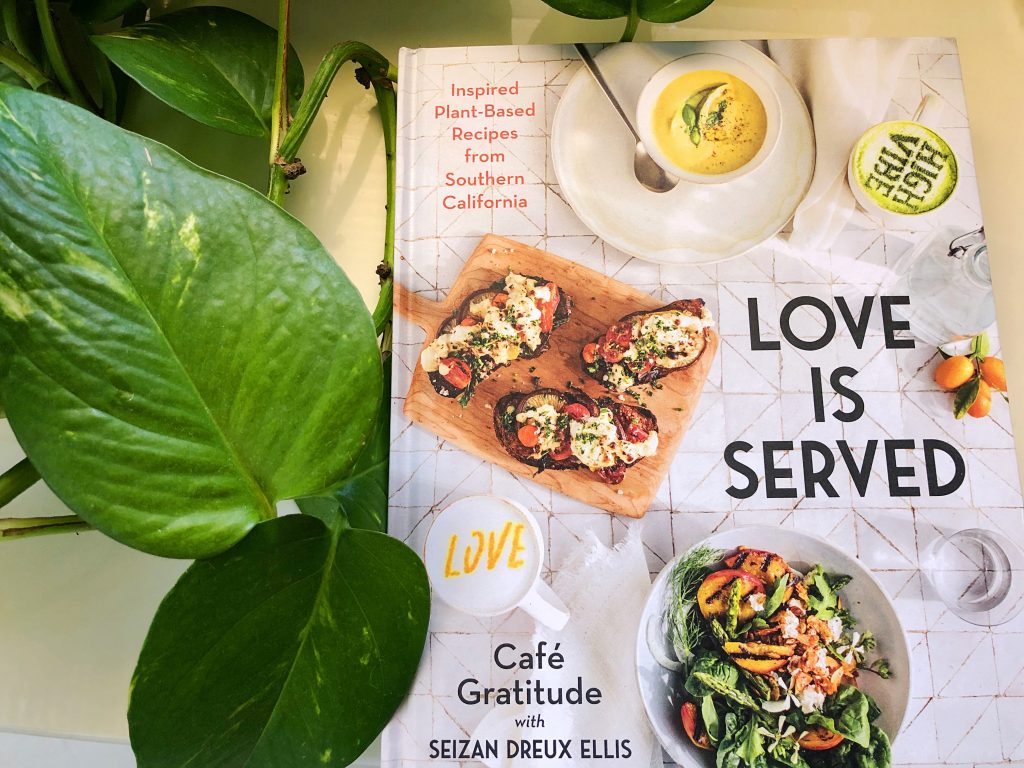
Cafe Gratitude cookbook. I’m still on a mission to try out new recipes and cooking techniques because I’m so bored with food and was thrilled to see this online. Cafe Gratitude is one of my favorite vegan restaurants ever and this book is filled with gorgeous photos and recipes. It reminds me of the raw food recipes of yore – “Ok, I want pizza 4 days from now so I need to start dehydrating the crust today and soaking the nuts for the sauce I’ll make tomorrow” – and they have many steps. While I don’t think it will be realistic to make these on the daily (especially since a waffle eaten over the sink is fine cuisine right now lol), but I’m going to make one recipe each week as something special to enjoy and have leftovers for lunches or breakfasts.
Thank goodness we live in the era of life hacks, right? I mean, if you haven’t tried frozen grapes to keep your wine cold, you’re missing out.
We just have so many options to make it easier for ourselves to live our best lives. And that’s definitely true when it comes to eating healthy! I just feel like every year, it gets simpler for me to make good food choices. And that’s def thanks to some hacks I use on the reg.
Want to know what’s worked best for me? Here are my five best healthy eating hacks.
#1: Be strong at the grocery store
It’s SO MUCH easier to make good choices for 30 minutes while you’re at the grocery store than it is to be disciplined for the entire week after. When you’re doing your shop, I know it’s easy to just throw stuff in your cart. But don’t! Once you bring stuff home, it’s just going to tempt you. Psych yourself up before you head into the store so you’re ready and prepped up to make good choices.
Or, if you want to skip the temptation altogether, hit your local farmer’s markets. These are such a great place to pack your fridge and pantry with nutritious, local food.
#2: Make it insanely easy with Vejo
Girls! Vejo blenders are such an awesome way to get nutritious, delicious smoothies into your diet with basically no effort. Basically, Vejo is a blender you can take with you anywhere (no joke, it’s even TSA-approved). And you just need these little pods (which biodegrade after use, btw) to whip up flavorful, super-healthy smoothies and drinks with no artificial colors, sweeteners, or flavors. Oh, and they’re all less than 100 calories!
I’m obsessed! And if you check out the Vejo review articles, you’ll see I’m not alone in this.
Seriously, the easier you can make it to prepare healthy food you’ll look forward to eating, the more likely you are to actually eat healthy. And Vejo does all of the work for you.
#3: Prep your meals
Again, the easier you can make healthy eating, the more likely you are to stick with it every single day. That’s why you’ll always hear me hyping up meal prepping. I swear, it changed my life.
I just set aside a couple of hours, usually during the weekend. I’ll put on a show or pump a playlist and knock out all of my cooking for the week. It’s become my new normal and it ROCKS.
Additionally, if you want to ease your way into meal prepping, I’d recommend starting with mason jar salads or these easy meal prep bowls (so delish). It’s a great way to get a feel for how much meal prepping can improve your life.
Ready to do more? We have a ton of great meal plans to guide you!
#4: Use Pinterest with a purpose
Any other big Pinterest fans out there? I seriously love it. I’ve found soooo many good healthy eating hacks on there!
Instead of just mindlessly scrolling, use your time pinning to find stuff that works for you, like 5-minute recipes or meal prep hacks. If you want to get started, check out our LSF Pinterest account.
#5: Carry a water bottle
I can’t tell you how many times I’ve thought I was hungry but felt totally fine after I drank some water. Having a water bottle on you all the time is an awesome way to make sure you’re not just feeling like eating because you’re dehydrated or bored. And speaking of being bored… if you’re sick of plain water try out these delish infused water recipes!
We have some super cute LSF water bottles to help! Check out our Day Drinking bottle — it’s marked to keep you on track with your water drinking through the day — or our sparkly Just Chill bottle!
Overall, the more you set yourself up for success with these healthy eating hacks, the more likely you are to stay on track. Use these hacks and crush this thing, girl!!
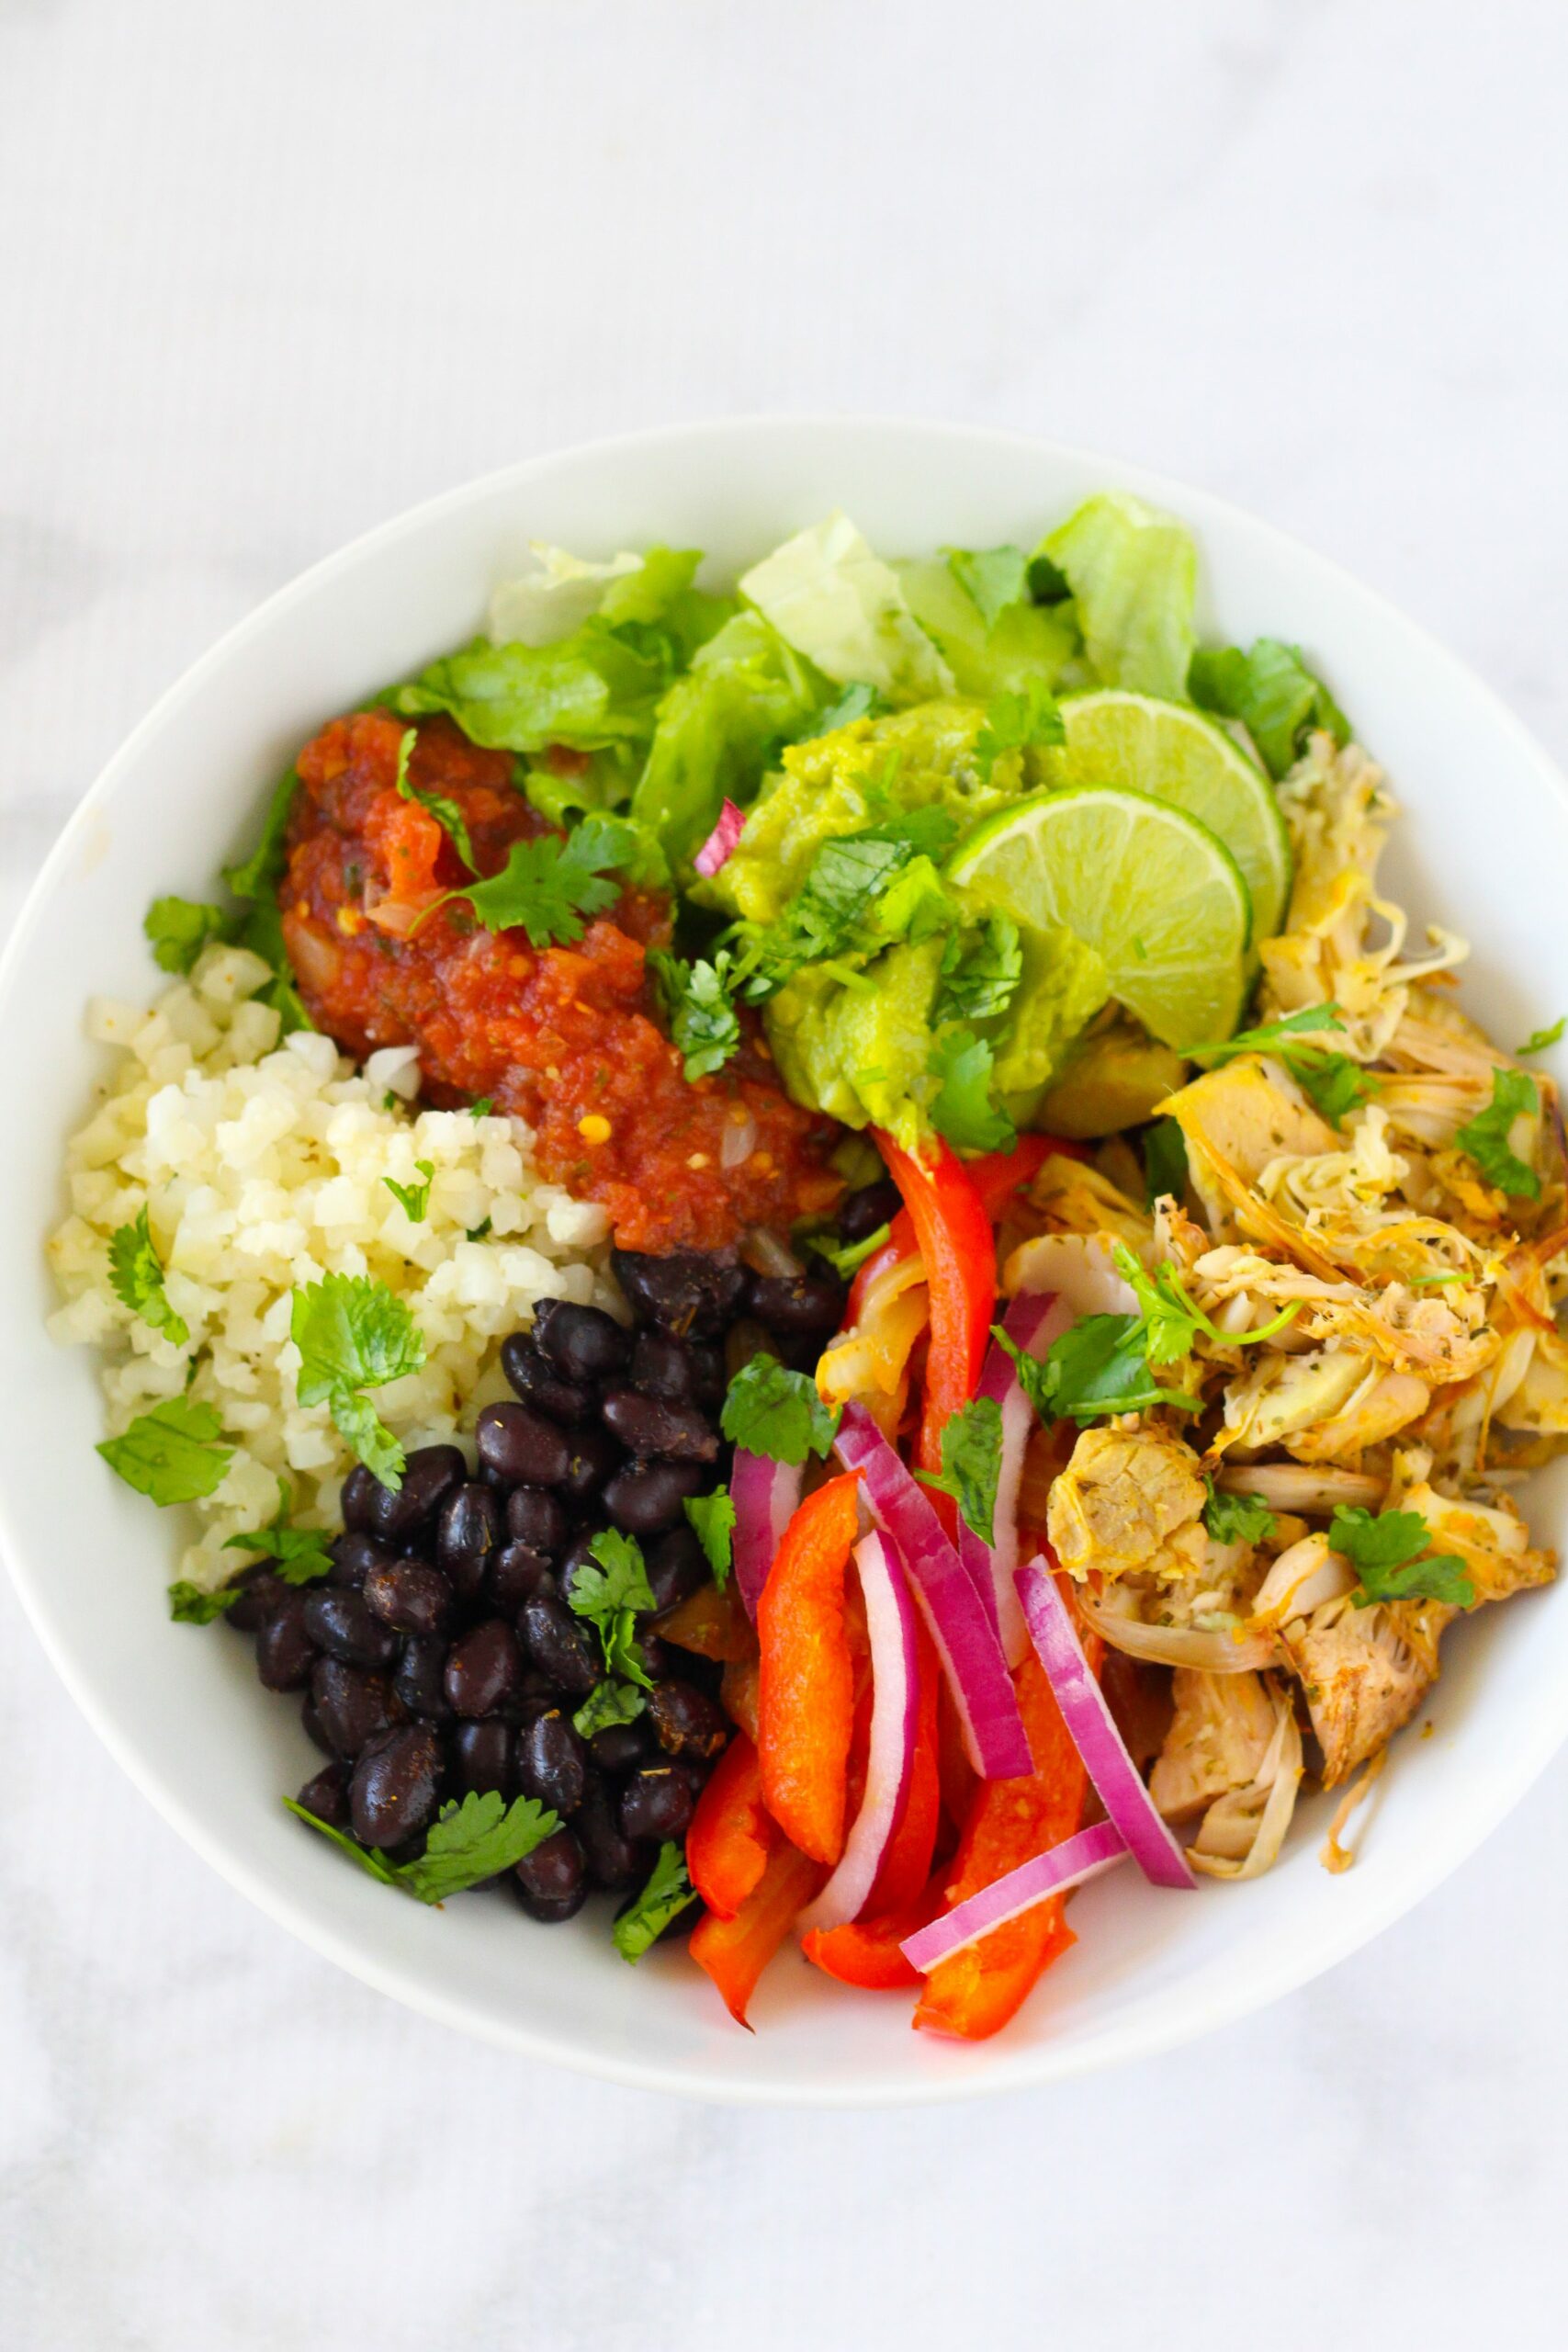
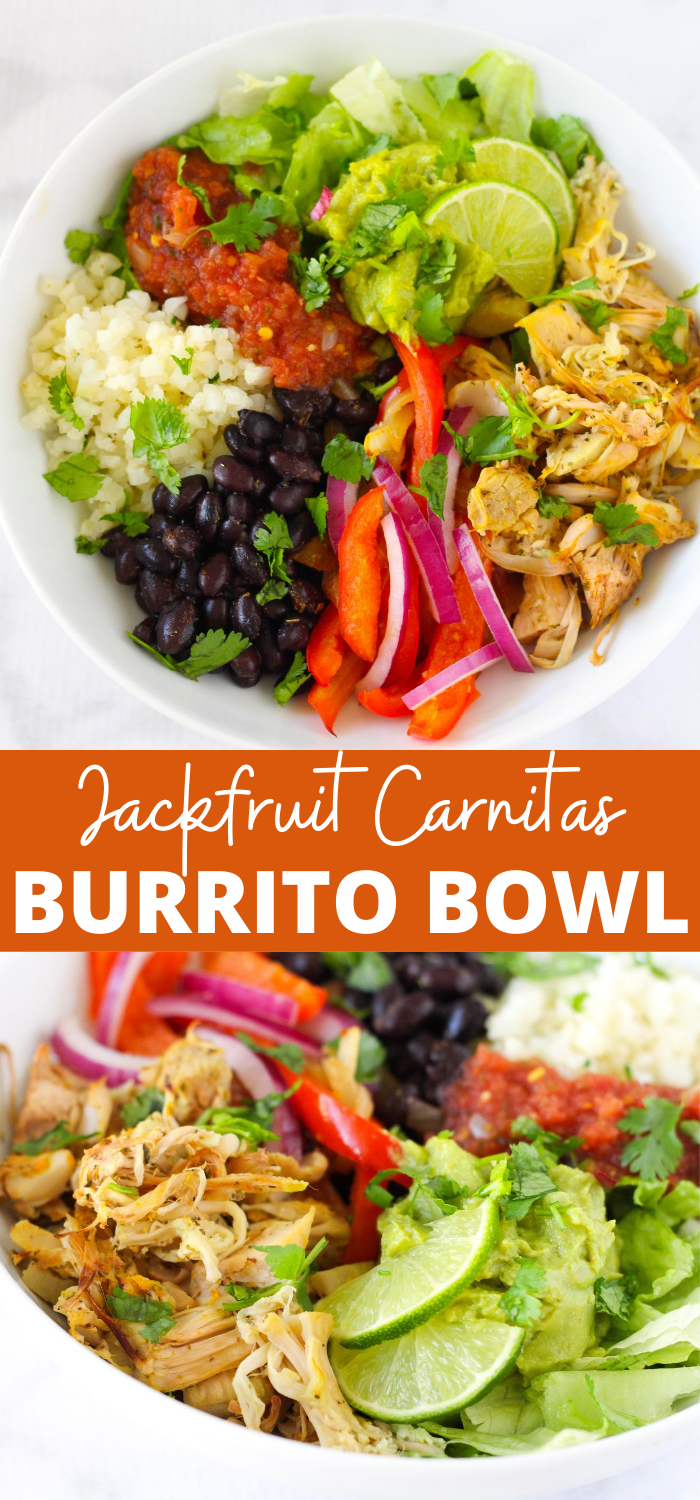
Sharing a delicious and healthy vegan lunch idea: jackfruit carnitas burrito bowl! You can make the jackfruit in advance to enjoy in bowls, burritos, or on sandwiches throughout the week.
Hi friends! How’s the day going so far? I hope you’re having a lovely morning. I’m going to get in an upper body workout and I think we may hit up the outdoor shops this afternoon just to get out of the house. The kiddos haven’t been in a store since the beginning of March, so this is a pretty big deal.
Can we just talk about Down to Earth for a second? If you haven’t watched this gem on Netflix yet, I highly recommend it. The show is a docuseries that follows Zac Efron and his friend Darin Olien around the world as they learn about different sustainability practices, cuisine, tips for longevity, and health. It’s absolutely fascinating and I feel like each episode is better than the last! (I’m only on episode 5 right now.) Also, Zac and Darin are very nice to look at. I ordered Darin’s book and can’t wait to dive in when I finally finish City of Girls.
The show has given me a lot of things to ponder and scheme, especially with the current climate and everything going on in the world. It’s inspired me to make positive changes, focus more on sustainability (and save our sad little garden), and also eat more plants! In a recent episode, they were in Costa Rica and hacked into an enormous jackfruit. I’d been thinking about jackfruit ever since and couldn’t wait to make some jackfruit carnitas this weekend.
What is jackfruit?
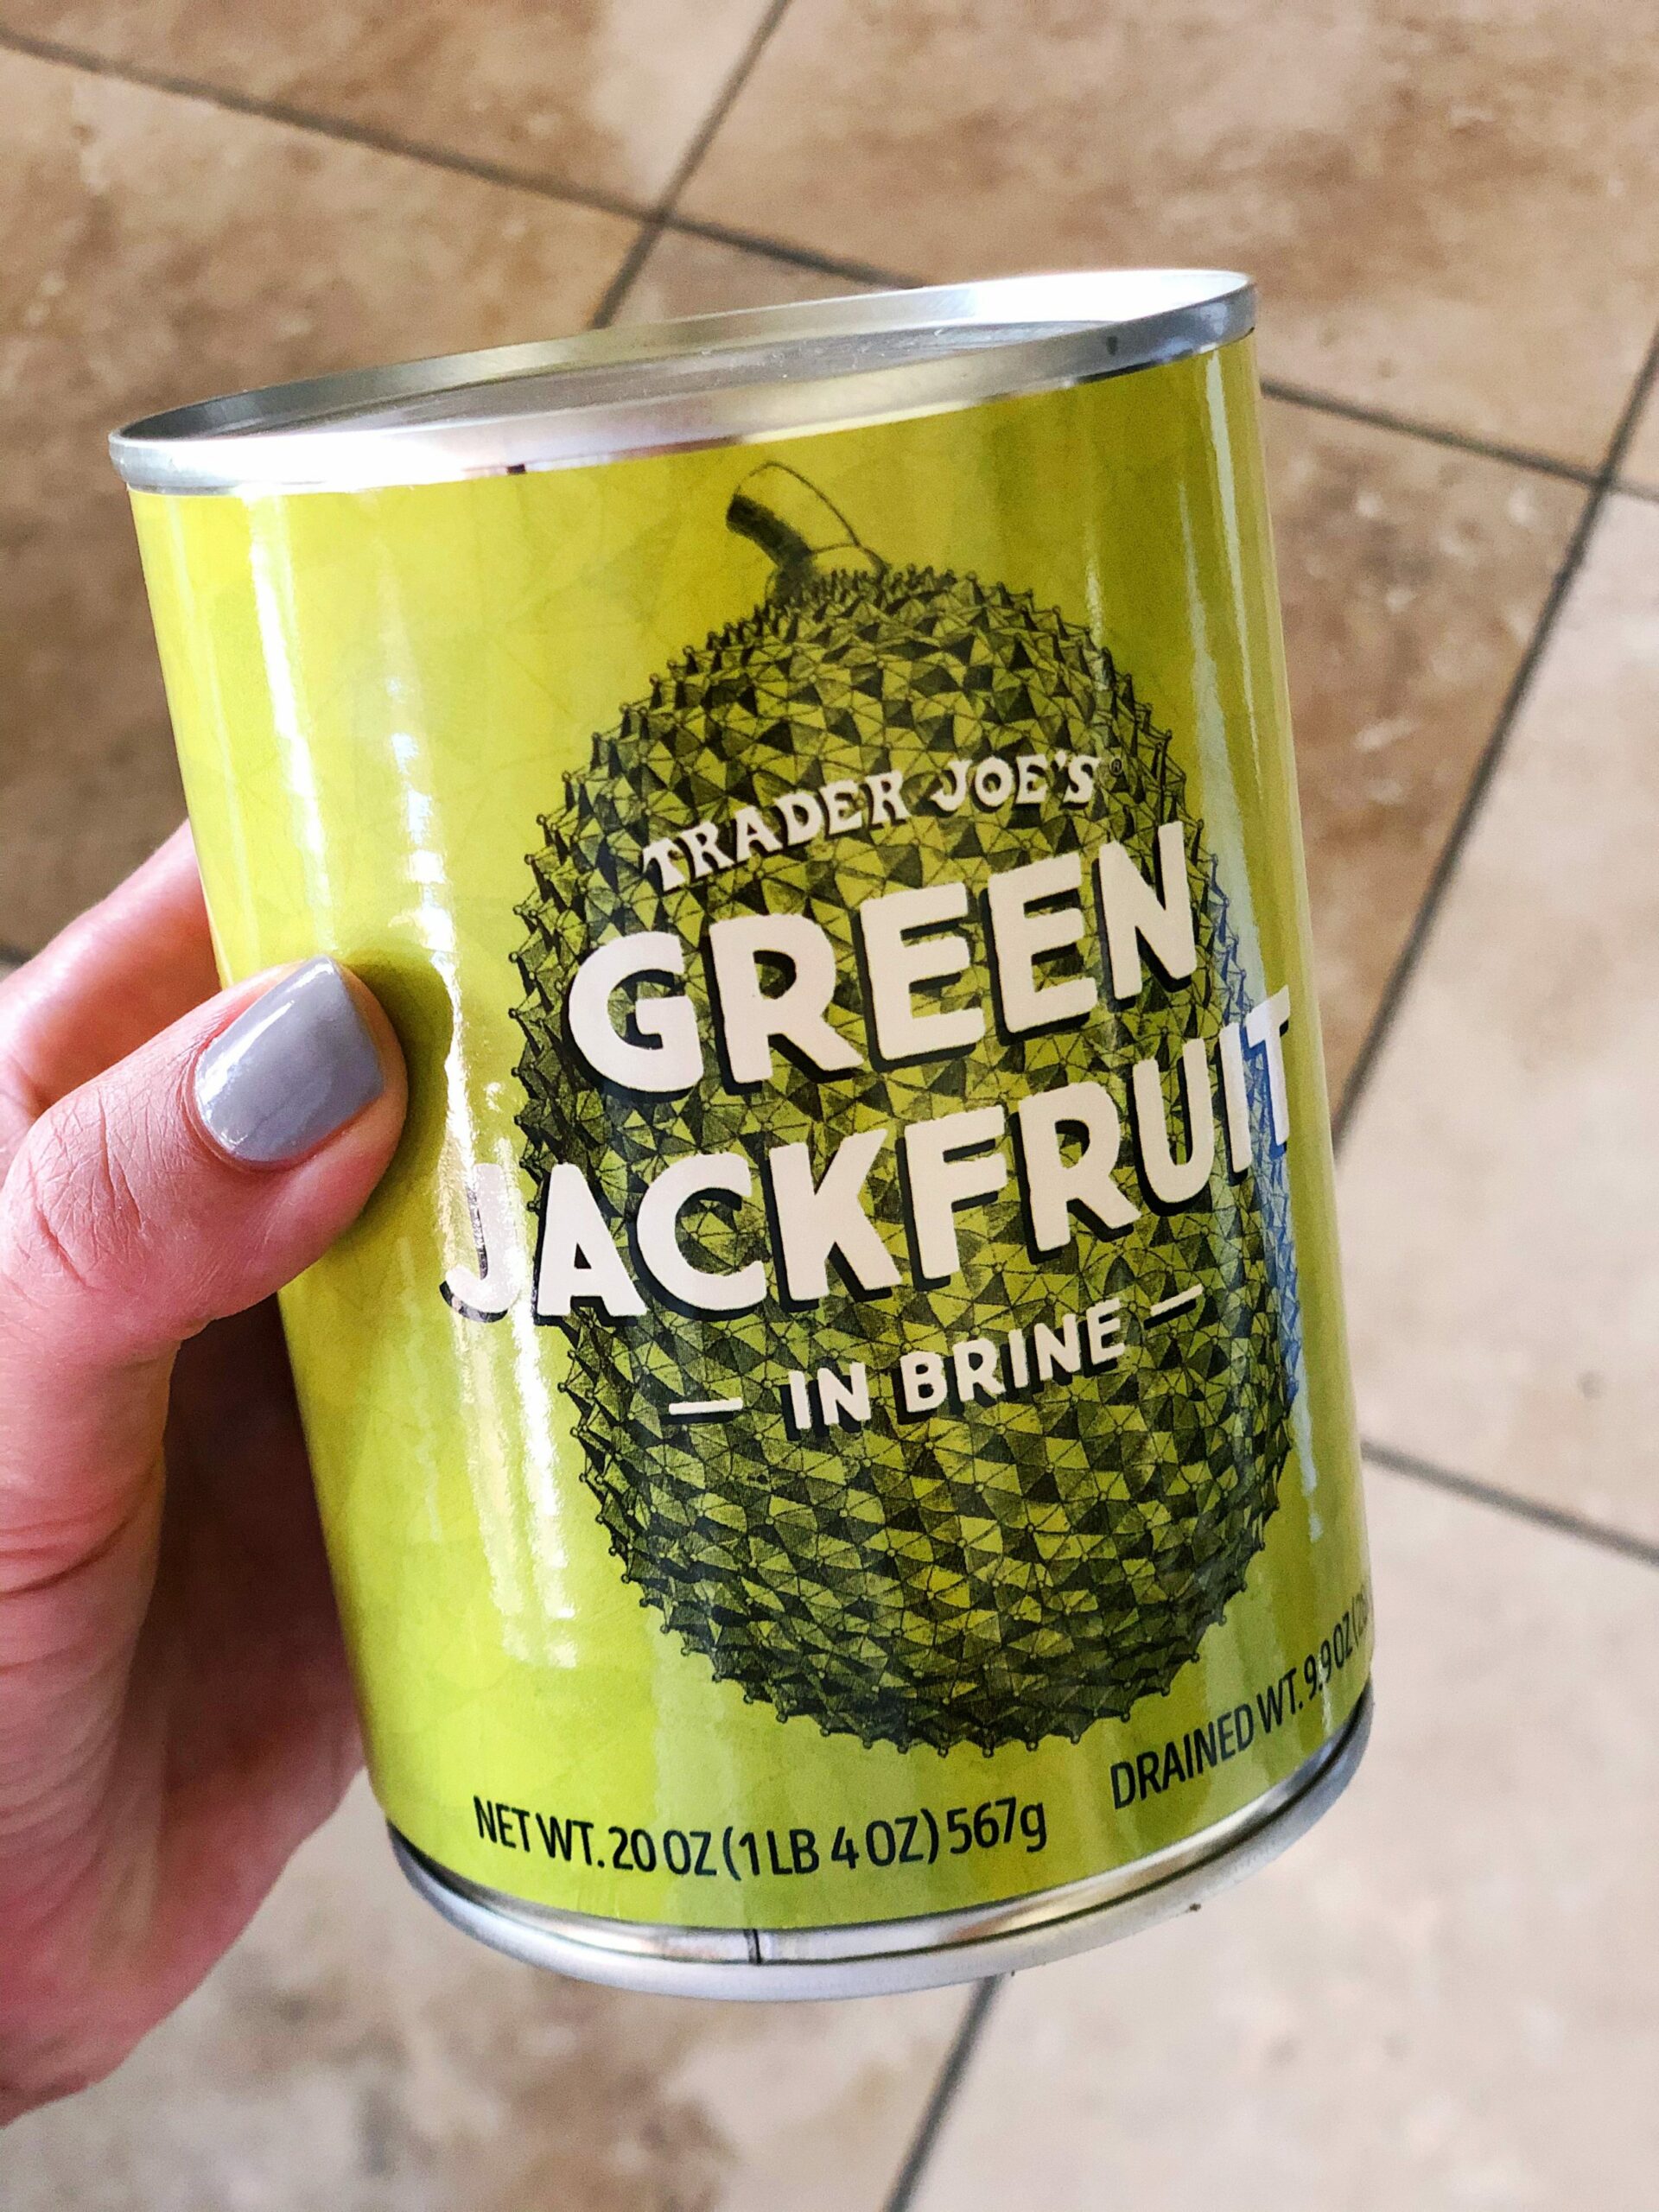
If you’ve never cooked with jackfruit before, it’s an awesome vegan meat substitute. You can shred it like pulled chicken or pork and flavor it however you’d like. Unlike many other meat substitutes that were created in a lab with a bunch of sketchy ingredients, this one is plain and simple young green jackfruit. It has spiky skin and a sweet flesh, and conveniently, you can find the canned version at Whole Foods or Trader Joe’s (or international grocery stores). It’s high in Vitamin C and has a decent amount of fiber. It’s nutrient dense and tastes delicious.
How do you cook jackfruit?
I recommend draining the can – make sure you get the ones in brine and not in the sweet syrup – and shredding with a couple of forks or your hands. From here, you can either sauté it on the stovetop or pop it in the oven on a lined cookie sheet to bake or broil. I prefer savory and aromatic seasonings on jackfruit, like garlic, oregano, salt, pepper, citrus, salsa, or BBQ sauce.
How to make jackfruit carnitas:
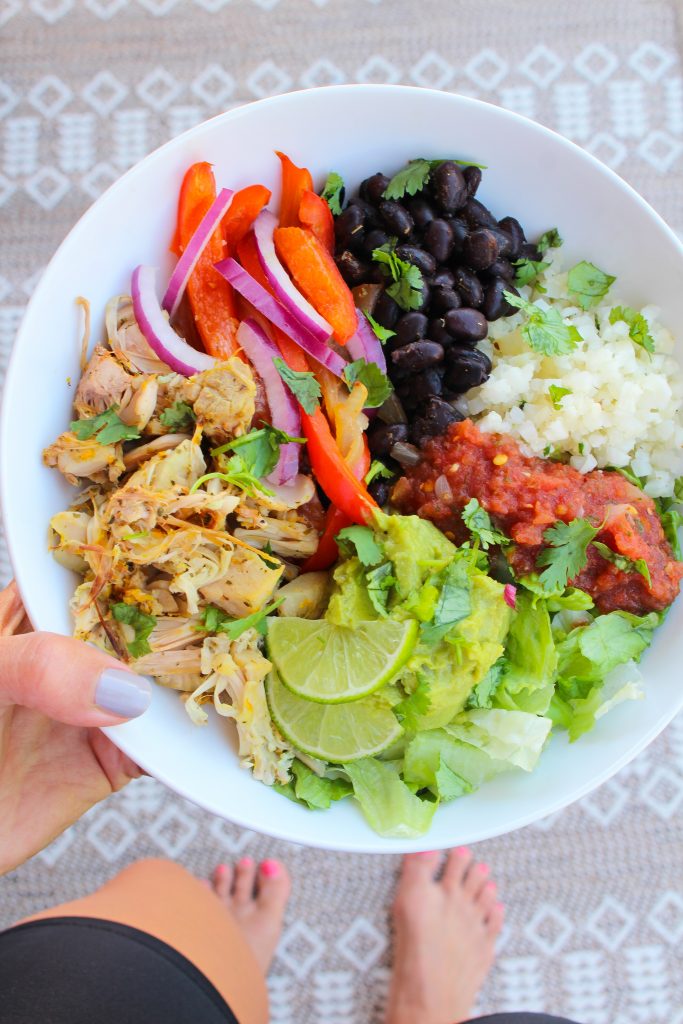
I recently used jackfruit carnitas as the star of an incredible lunch bowl. The bowl had romaine, salsa, guacamole, cilantro-lime cauliflower rice, black beans, fajitas veggies, and lime wedges. It was EVERYTHING! To make the jackfruit carnitas, I followed the exact steps in this recipe.
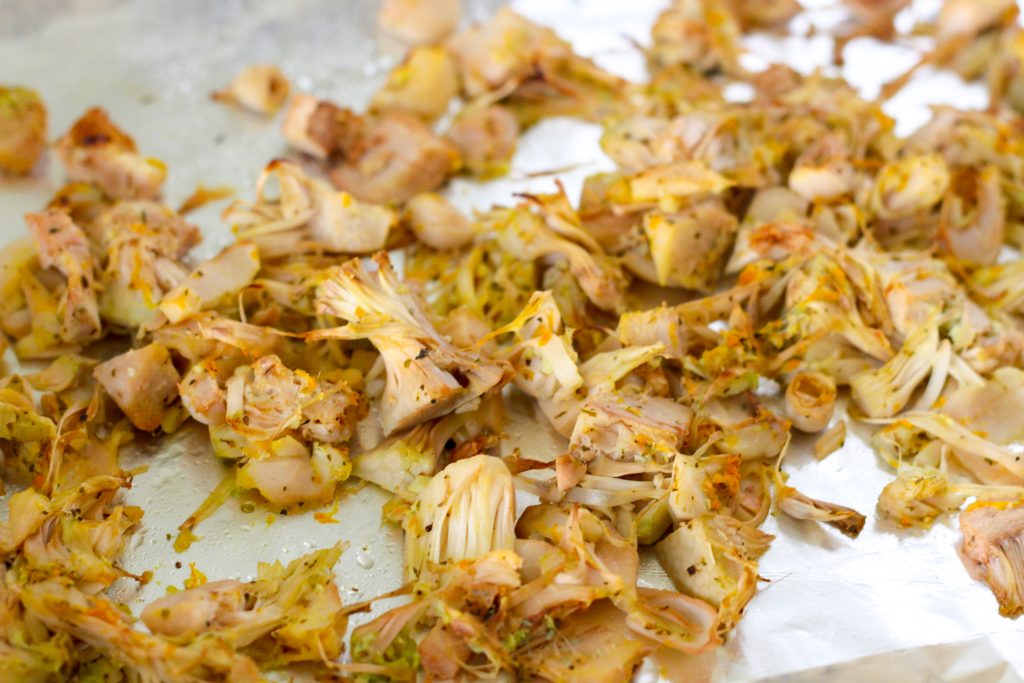
Then, I transferred the jackfruit to a lined cookie sheet (lined with foil and sprayed with avocado oil) and broiled it for 10 minutes to get the crispy BBQ edges on the jackfruit.
Here’s the recipe for this awesome jackfruit carnitas burrito bowl!
A delicious and savory vegan lunch or dinner option! Make the jackfruit carnitas and enjoy in a burrito bowl, salad, or breakfast scramble. Here’s the recipe for my favorite burrito bowl!
Author:Gina Harney // The Fitnessista
Prep Time:10 minutes
Cook Time:15 minutes
Total Time:25 minutes
Yield:4 servings
Ingredients
For the jackfruit:
20 oz jackfruit (brined in water), drained and shredded
1/4 red onion, small diced
2 cloves of garlic, minced
1 teaspoon oregano
1 tablespoon orange zest
Juice of 1/2 orange
To serve:
Cooked fajita veggies ( I sauté an onion with bell peppers and garlic, and season with salt, pepper, and oregano)
Cooked grain of choice (I used cauliflower rice with lime zest, lime juice, cilantro, and salt)
Guacamole (homemade or store-bought)
Salsa (homemade or store-bought)
Cooked beans of choice (I used black beans seasoned with garlic powder, cumin, and oregano)
Salad greens (romaine or spinach work well here)
Lime wedges and cilantro
Instructions
Line a cookie sheet with aluminum foil. In a large pan, sauté the jackfruit ingredients on medium heat for about 7 minutes, until warm and fragrant.
Transfer the jackfruit to the cookie sheet and broil on high for about 10 minutes, until the edges are crispy.
While the jackfruit is broiling, prepare the rest of the burrito bowl. Place the rice, beans, fajita veggies, guacamole, salsa, and salad greens into a bowl and arrange according to your preference.
When the jackfruit carnitas are done, add some to the bowl and top with lime wedges and cilantro.
Notes
Store any leftover jackfruit carnitas covered in the fridge for up to 5 days.
Keywords: jackfruit carnitas, how to cook jackfruit, easy jackfruit recipes, healthy jackfruit lunch ideas
Have you tried jackfruit before? Any recipes that you love??
Another month is coming to a close and we know this summer has been...different. The extra time cooped up alone in our houses can take a toll on us mentally and physically and it’s time for a change. Your body is probably craving movement, purpose, and connection, which is why we’re so excited part 2 of Summer Shape Up 2020 Challenge starts Monday!
Meet an ah-mazing LSF Babe named Carly Lester, @carly_l_lsf on IG! This #LSFMom first saw how powerful these challenges can be when she crushed Summer Shape Up of 2018, but she soon realized what a game-changer the LSF community is. It also played a vital role for her during the Refresh in 21 Challenge this past January.
Chatting with Carly
“It wasn’t until after the refresh challenge…that I made my first post and everything changed for me. I was way more committed after seeing how supportive and welcoming this community is.”
It’s about more than the workout, Carly has learned to love herself more and is feeling all around happier than she ever has! “It’s taught me discipline and patience and that you have to work hard for anything that’s worth having. It’s also all around made me a happier person for my kids and family.”
Ugh, Carly, we could not agree more (see why we love her so much?)! In fact, lots of us can attest to the fact that putting in the hard work to achieve a fitness or health transformation can change your whole outlook on life!
I flipped my own life upside down (in theee best way) during my own weight loss transformation. That journey for me, like Carly, was sparked by having somebody by my side to encourage, love, and validate me. This is why it’s such a priority of ours to cultivate and grow this incredible community, and why it makes such a big difference in people’s lives!
Be Inspired
Carly talked about squashing the voice that tells you ” you can’t do it”. Her amazing ability to break down those mental barriers and reach her goals is strengthened by all of you!
“I seriously owe so much to Team LSF.” Carly said, “It means everything to me. It’s where I look when I need a confidence boost or motivation. Everyone has your back and is so genuine. I don’t have anyone in my personal life that I can relate to when it comes to health and fitness. So having a group of women that are going through the same situations and are able to share their experiences like this is incredible for me.”
Join us for Part 2 of Summer Shape Up!
I’m sure by this point you’re as utterly obsessed with this amazing momma as we are. We are so grateful to have such a #bossbabe a part of this community! Now she can be the one that inspires and motivates other ladies!
Sound like something that would benefit you? Well what’s the hold-up, sister?! Sign up for part 2 of Summer Shape Up, join the LSF community, get connected and get ready to sweat it out with this amazing group of women!
The push-up is one of the best exercises on the planet.
It’s a foundational movement in strength training, and an exercise EVERYBODY should be doing regularly.
However, it’s also an exercise that about95% of peopleget wrong and do incorrectly.
A push-up is one of the exercises we really focus on with our Online Coaching Clients. We make sure each client has great form, and use the exercise as a gateway to many other strength training exercises!
Fortunately, after reading today’s ultimate guide, you’ll know exactly how to do a proper push-up with correct form:
When it comes to push-ups, your form is crucial. Each push-up needs to be done with proper form so that your total reps measured from workout to workout are on equal footing.
If you did 20 push-ups two days ago, and then today you did 25 push-ups by only going down halfway, sticking your ass up in the air, etc., it’s absolutely impossible to tell if you got any stronger.
Here’s how to get into proper push-up position:
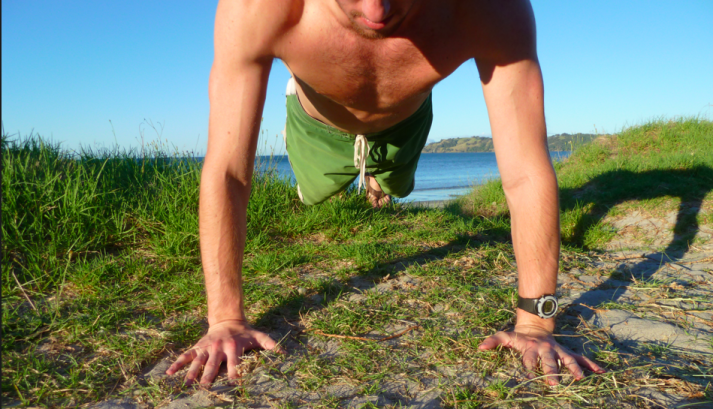
1) On the ground, set your hands at a distance that is slightly wider than shoulder-width apart.
Draw a straight line from your chest/nipple down to the floor – it should be directly over your thumbnail.
Depending on your strength and experience, your hands should be angled in a way that feels comfortable to you. For me, my hands are set up so that my middle finger points straight up and away from me.
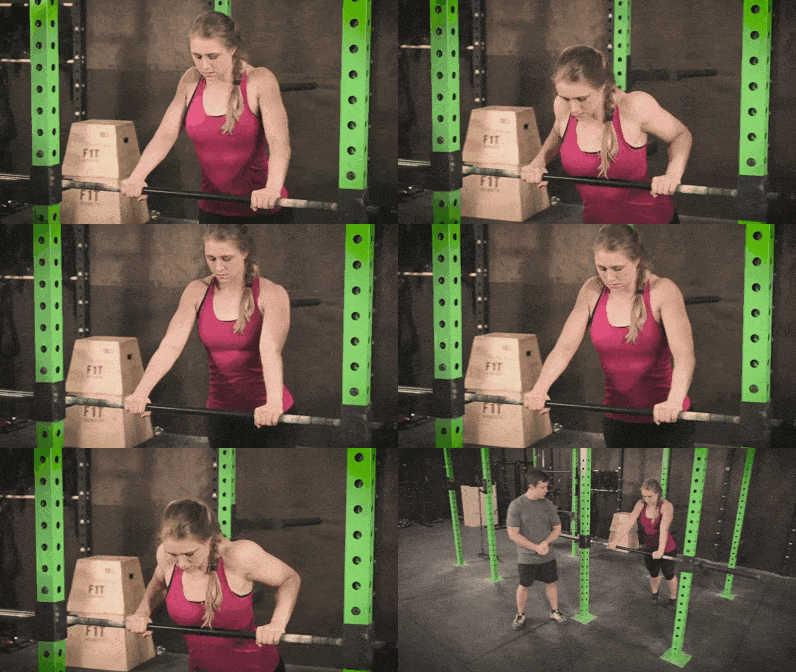
2) To alleviate wrist pain (if you have poor wrist flexibility) do your push-ups holding onto push-up handles (so your wrists aren’t as compromised), or a bar:
If you’re hardcore, you can do them on your knuckles (as long as you’re on a semi-soft surface like grass or carpet or broken glass. Wait, scratch that last one).
3) Your feet should be set up in a way that feels right and comfortable and in balance. For some, that might be shoulder-width apart.
For others, it might be with your feet touching. Generally speaking, the wider apart your feet, the more stable you’ll be for your push-ups.
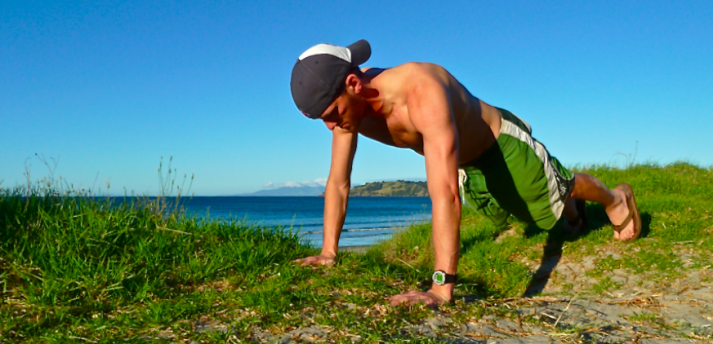
4) Think of your body as one giant straight line – from the top of your head down through your heels. Your butt shouldn’t be sticking way up in the air or sagging. You’re essentially holding a plank throughout the entire movement.
5) If you have a problem getting the proper form with your body, try this: clench your butt, and then tighten your abs as if you’re bracing to get punched.
Your core will be engaged, and your body should be in that straight line. If you’ve been doing push-ups incorrectly, this might be a big change for you.
Record a video of yourself to make sure you’re doing it correctly.
6) Your head should be looking slightly ahead of you, not straight down.
I read somewhere that said “if you’re doing them right, your chin should be the first part of your head to touch the floor, not your nose.”
Looking up helps you keep your body in line, but feel free to look down if that helps you concentrate more.
7) At the top of your push-up, your arms should be straight and supporting your weight. You’re now ready to do a push-up.
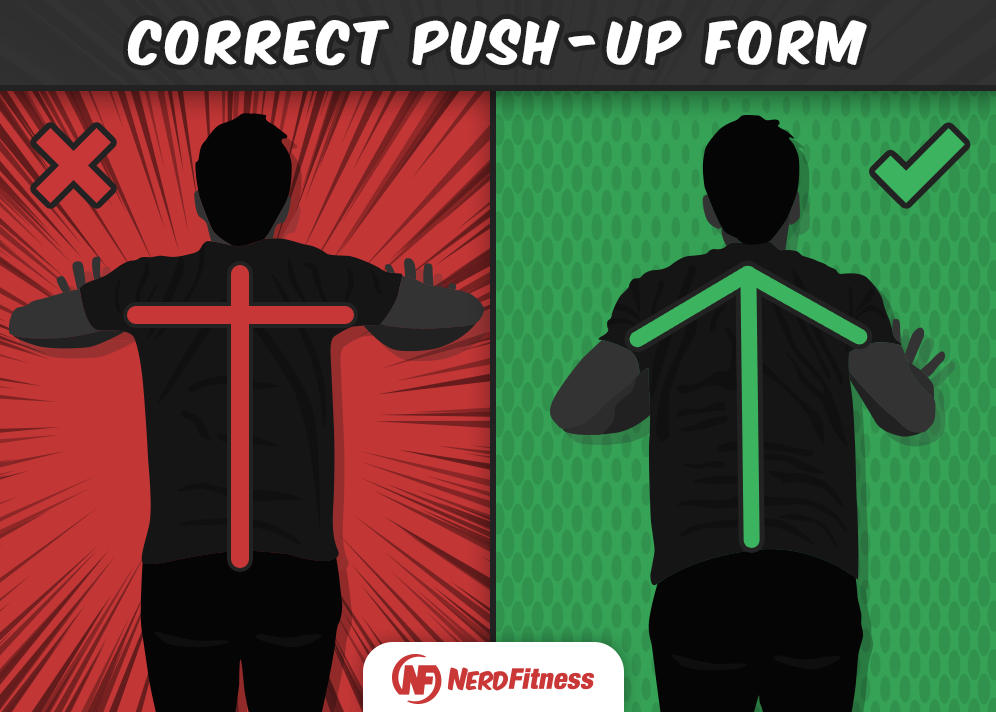
8) I want to draw special attention to that first step with hand position:nearly EVERYBODY does push-ups with their arms out far too wide and their shoulders flared. This is bad news bears.
If I was looking down at you from above, your arms and body should form an ARROW, not a T.
WARNING: If you have been doing push-ups with your arms flared, doing them with proper form will be significantly more difficult!
If you struggle with your push-up form, you’re not alone!
As I said in the intro, 95% of people do push-ups incorrectly, which is why it’s a huge focus of ours in our 1-on-1 Coaching Program: helping people get confident with doing them with proper form.
Let us check your push-up form via video, create a workout program that fits your lifestyle, and even help you make better food choices. We’d love to help!
How to Do a Proper Push-Up (Correct Push-Up Form with Video).
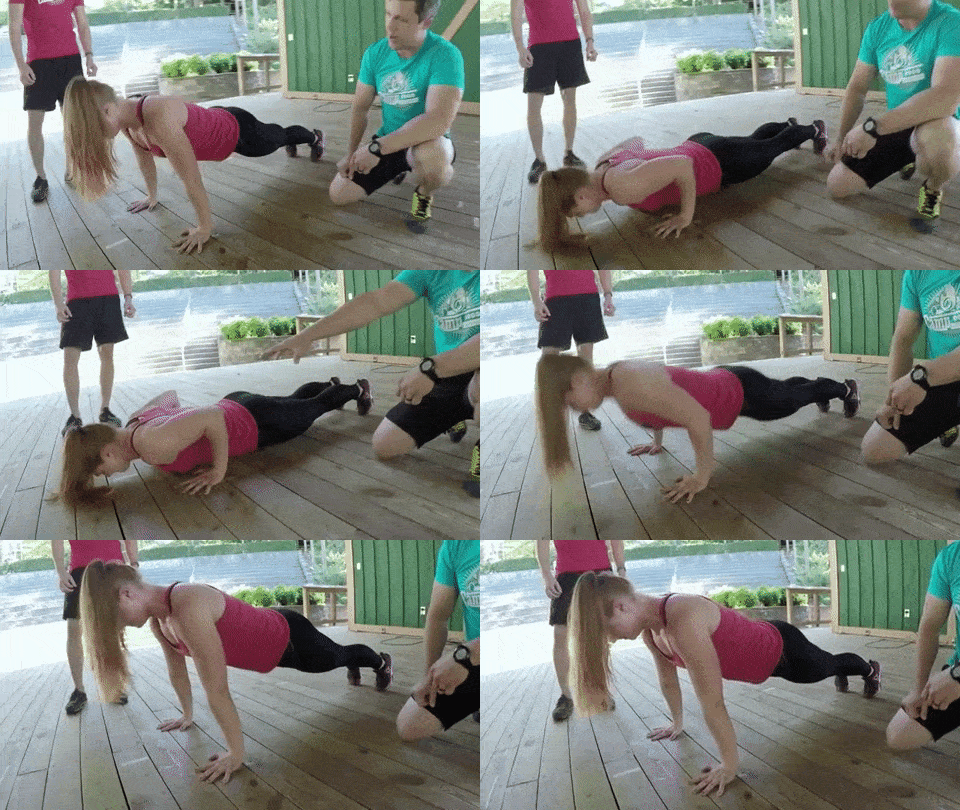
In the 5-minute “Perfect Push-Up” video above, featuring yours truly and two of our coaches, we take you through EACH of the steps of a push-up, including some variations!
Here’s how to complete one perfect repetition of a proper push up:
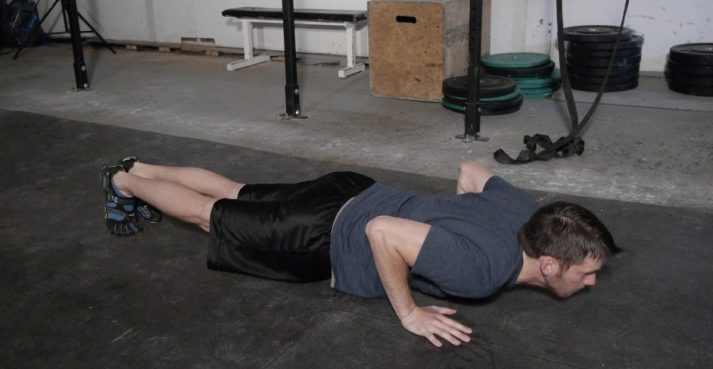
With your arms straight, butt clenched, and abs braced, steadily lower yourself until your elbows are at a 90-degree angle or less. Depending on your level of experience, age, and flexibility, 90 degrees might be the lowest you’re able to go. Personally, I like to go down until my chest (not my face), hits the floor. That way, I know I’m going the same distance each and every time.
Try not to let your elbows go flying way out with each repetition. Keep them relatively close to your body, and keep note of when they start to fly out when you get tired.
Once your chest (or nose/chin) touches the floor (or your arms go down to a 90-degree angle), pause slightly and then explode back up until you’re back in the same position.
Do as many as you can until you start to feel your form slip (even slightly); you are done for that set.
Here’s why you should focus on form over quantity:
10 good push-ups and 5 crappy ones are tough to quantify against eleven good push-ups.
If you can only do 10 of something, write down your results and aim for 11 next time.
Perfect form allows you to keep track of your improvements week over week.
Want to know where push-ups should fall into your workout routine?I have three options!
1) Work with your coach to have push-ups become part of your workout routine!If you’re in the “I just want to be told what to do every day” crowd, check out our 1-on-1 Online Coaching Program!
Grab Your Beginner Bodyweight Routine Worksheet. No Gym Required!
Complete this workout at home, no equipment required
Avoid the common mistakes everybody makes when doing bodyweight exercises
Learn how to finally get your first pull-up
3) Make your own workout with push-ups by following our“Build Your Own Workout” guide! It’ll walk you through everything you need to build an exercise program for your goals in 10 steps.
How Do You Train to Do Push-Ups? (Where to Start If You Can’t Do a Push-Up.)
Don’t worry if you can’t do a push-up yet. We have a plan that will help you get there.
You need to start with an easier push movement, and work up to progressively more difficult types of moves that will eventually result in you doing true push-ups.
This is a similar type of progression we use when helping somebody in our 1-on-1 Online Coaching Program develop the proper strength to start doing proper push-ups.
We’ll progress from Level 1 Push-ups to Level 4 Push-ups:
Wall Push-Ups: Level 1
Elevated Push-Ups: Level 2
Knee Push-ups: Level 3
Regular Push-ups: Level 4
LEVEL 1: HOW TO DO WALL PUSH-UPS
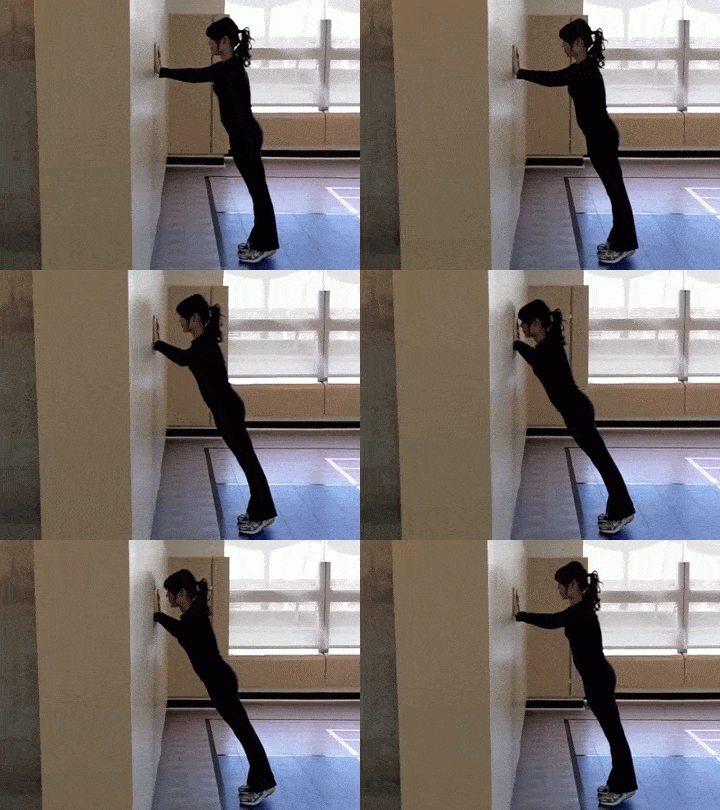
Stand in front of a wall. Clench your butt, brace your abs, and set your hands on the wall at slightly wider than shoulder-width apart.
Walk backwards with your feet until your arms are fully extended and supporting your weight (generally one decent sized step back with both feet will suffice). Keeping the rest of your body in a straight line, steadily lower yourself towards the wall until your nose almost touches the wall, and then explode back up to the starting position.
HOW TO TRAIN WALL PUSH-UPS:
Do 4 sets of wall push-ups with a 2-minute rest between sets, every other day. Keep track of how many repetitions you can do WITH PROPER FORM for each set in a notebook for easy comparison to previous workouts. Once you can do 4 sets of 20 repetitions of wall push-ups, you can progress to knee push-ups.
LEVEL TWO: HOW TO DO ELEVATED PUSH-UPS
As we demonstrate in this video above from Nerd Fitness Prime, elevated push-ups are just what they sound like – your hands are on an elevated surface, whether it’s something as tall as a kitchen table or as low as a few blocks that are inches off the ground. This will depend on your level of strength and experience.
If you’ve just progressed from wall push-ups, pick something that is at a level that’s right for you – I generally find the back of a park bench or the side of a picnic table to be a perfect height for doing incline push-ups. Like so:
HOW TO TRAIN ELEVATED PUSH-UPS:
Do 4 sets of elevated push-ups with a 2-minute rest between sets, every other day. Again, keep track of all of your stats for how many proper form repetitions you can do in each set. Once you can do 4 sets of 20 repetitions, it’s time to either move to regular push-ups, knee push-ups, or a lower height for your hands to be supported.
Once you can do 4 sets of 20 repetitions, it’s time to either move to regular push-ups, knee push-ups, or a lower height for your hands to be supported.
To work on progression, try to doing your elevated push-ups on the stairs in your house. As you get stronger, you can move your hands to lower and lower steps until your hands are on the ground.
LEVEL THREE: HOW TO DO KNEE PUSH-UPS
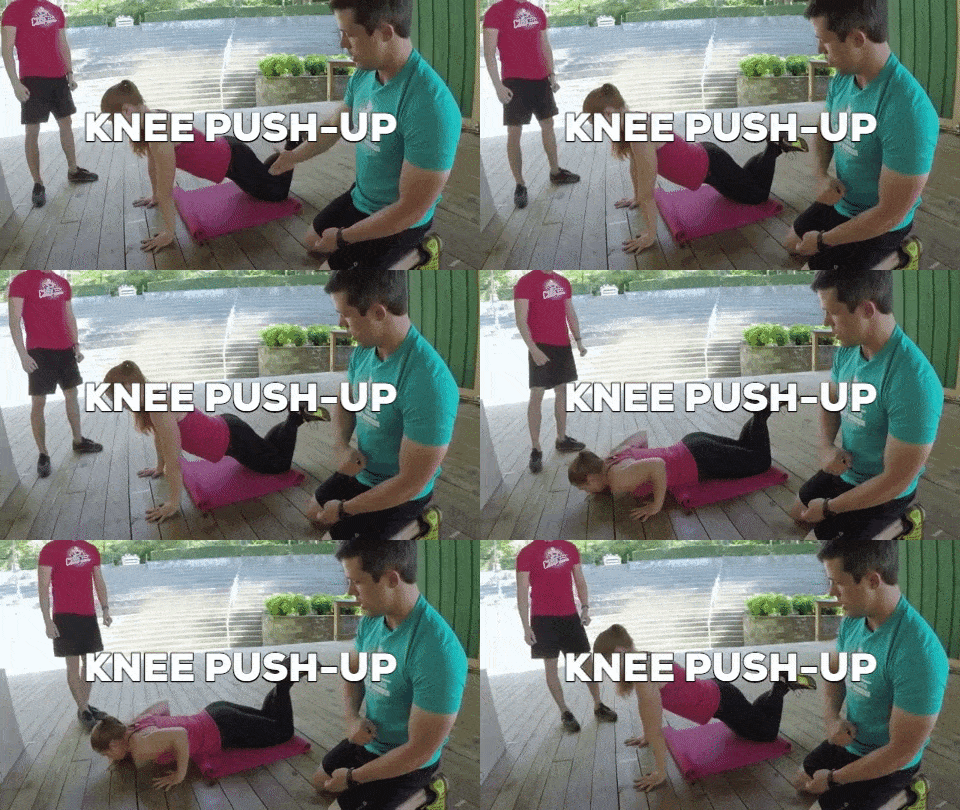
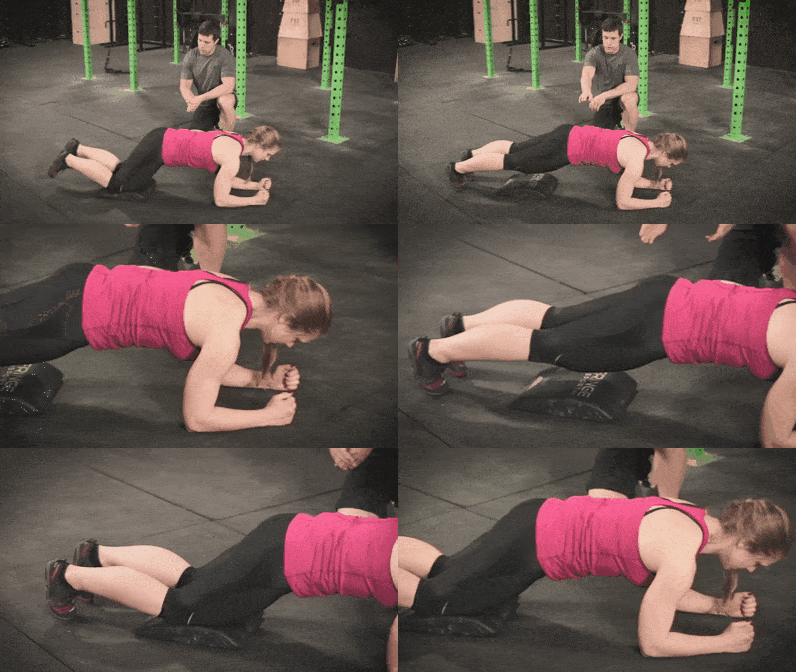
Once you’re comfortable doing wall or elevated push-ups, proceed to knee push-ups. Your shoulder and hand placement will look just like a regular push-up (an “arrow”, not a “T”), but you’ll stabilize yourself on your knees instead of your feet. As demonstrated here:
HOW TO TRAIN KNEE PUSH-UPS
Once you can do 4 sets of 20 repetitions on your knees, you can start thinking about doing regular push-ups.
To recap, if you can’t do a regular push-up, move from:
Wall Push-Ups: Level 1
Elevated Push-Ups: Level 2
Knee Push-Ups: Level 3
Regular Push-ups: Level 4
How do I know the above progression will work? Well, it’s the exact plan we use with our 1-on-1 Online Coaching clients! We help busy people just like you do push-ups for the first time with tailor-made workout routines.
Plus, our coaching app lets you record and send a video of your movement directly to your coach, who will make sure you’re doing your push-upssafelyandeffectively.
What Are Other Types of Push-Ups? (Push-Up Variations)
Basic push-ups can get boring…
Fortunately, there are dozens upon dozens of variations to make things more difficult for you.
Once you’re cranking out perfect form push-ups like it’s your job,[1] try some of these advanced variations on for size.
Click on each for a video demonstration (these are some of the push-up variations pulled from NF Prime):
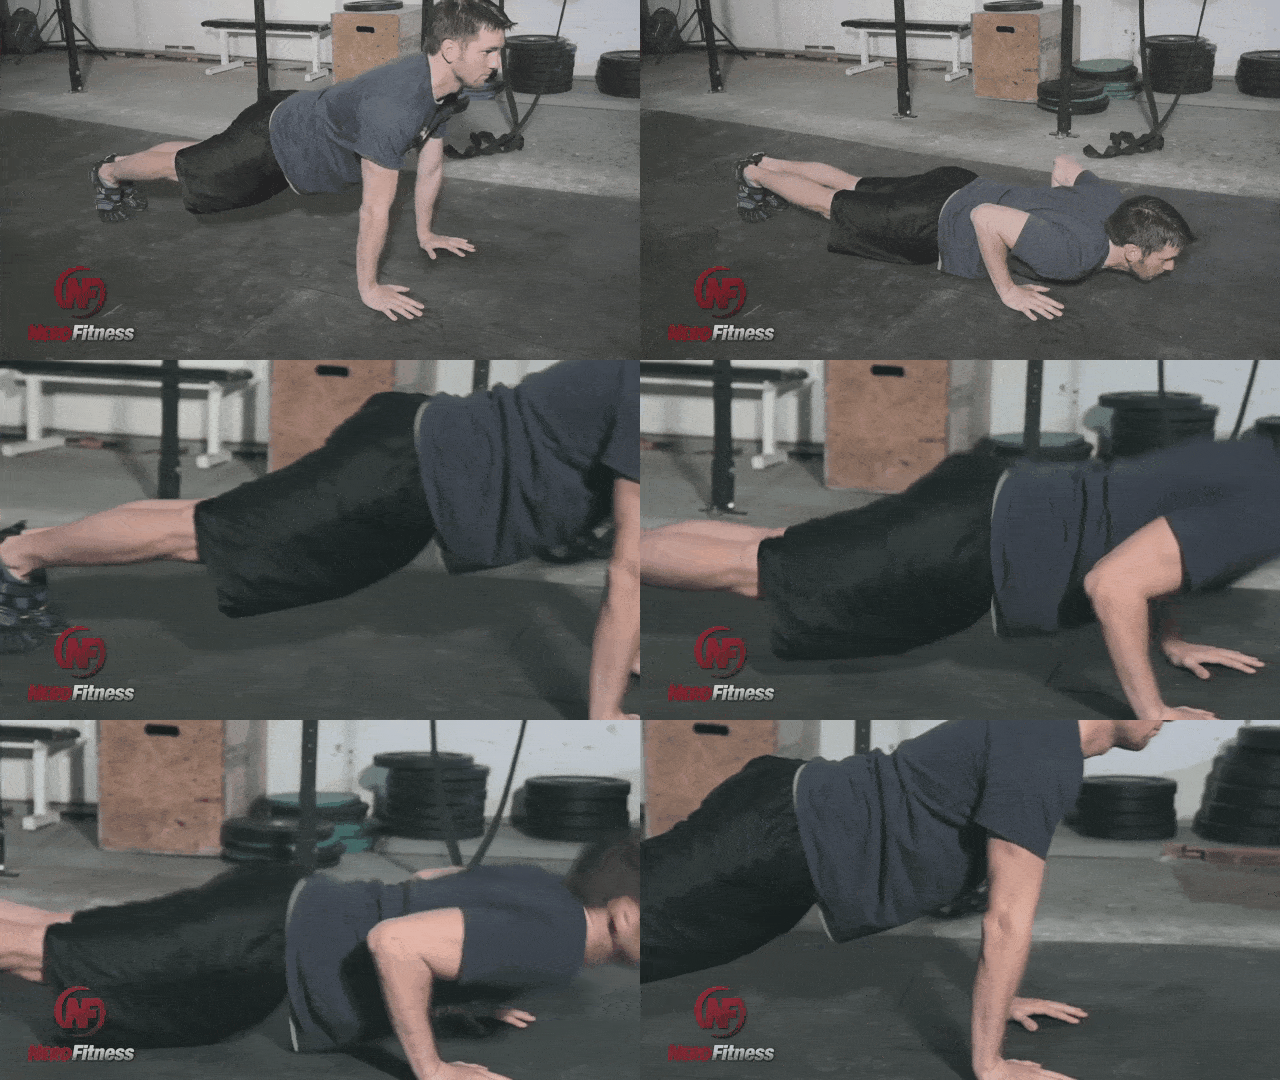
#1) One-legged Push-ups: introducing some variety and balance by removing one of your legs for less stabilization:
#2) Side-to-Side Push-Ups–Get into the classic push-up position and move your hands farther apart. Now, lower yourself down towards one arm only – you should feel like you’re supporting a lot of your weight.
To complete the rep, slide horizontally over to the other arm, and push-up. The farther apart your hands, the higher percentage of your bodyweight will be supported by that side of your chest/shoulder and arm (thus getting harder)!
#3) Decline Push-Ups – these work your shoulders and triceps more so than normal push-ups.
#4) Diamond Push-Ups – keep your arms tight at your side, rotate your hands outward, and keep your elbows tight as you lower your body. Works your triceps like crazy.
#5) Dive-Bomber Push-Ups – funky, difficult, but oh so fun. I’d explain it, but just watch the video
#6) Plyometric Push-Ups – these are brutal and will wear you out just after a few repetitions. Just don’t hurt yourself and smash your face during a failed attempt (not that I’ve ever done that. Shut up my face always looks like this)!
#7) Handstand Push-Ups – This goes without saying, but you should be able to do a proper handstand before attempting these!
Kick up against a wall, and without flailing your elbows way out to the side (which can wreak havoc on your shoulders and elbow joints), slowly lower yourself down until your head touches the ground softly.
Then raise yourself back up.
Rotate some of these advanced push-ups into your workout routine and you’ll be well on your way to a great strength training practice.
The coaches in our 1-on-1 Coaching Program are all huge nerds who can’t wait to help people like you get strong as hell.Whether you’re working on knee push or trying to nail your first handstand, we can build custom workout programs that fit your lifestyle and align with your goals.
We also provide text support and worldwide accountability to make sure you actually DO your workouts!
We also have a comprehensive guide, Strength Training 101: Everything You Need to Know, when you sign up for the Rebellion (that’s our community) below:
Download our comprehensive guideSTRENGTH TRAINING 101!
Everything you need to know about getting strong.
Workout routines for bodyweight AND weight training.
How to find the right gym and train properly in one.
How to get better at push-ups
So you’ve learned how to do a push-up, you can do a few of them, but you want to get better!
Here are some tips to help you along the way:
Get healthy! As you lose weight (which is 80% nutrition!), you will have to move less weight around than before, which will make your push-ups easier to manage. Have you had trouble losing weight in the past? Check out our article “Why Can’t I Lose Weight?” to find out why.
Don’t cheat on the last few push-ups – when you’re tired, it’s easy to skip out on good form for your last few reps. As soon as you do one bad form push-up, you’re done. Finish up your four sets, write down your numbers, and try to beat those numbers next time.
When starting out don’t do push-ups two days in a row. You need to give your muscles time to rebuild and recover – take off at least 48 hours in between your push-up adventure. However, when push-ups became a warm-up exercise for you – you can do them every day if you want. If you’re advanced, you can consider a PLP program.
Get enough protein into your system after finishing up your workout – protein helps rebuild the muscles you just broke down doing push-ups, and it helps them rebuild those same muscles stronger than before. You can read our ultimate guide on protein for some tips on how to up your protein intake.
If you can do 4 sets of 20-25 perfect form push-ups no sweat, then it’s time to start looking into push-up variations to keep things interesting.
Build up your core with planks – this will help keep your core strong so that it’s not the weakest link in your proper form push-ups.
These 6 tips will be a great addition to your strength training plan. Keep at it and before you know it you’ll be doing one-arm push-ups like Batman.
What’s that? You don’t have a strength-building plan!!! Well then…
What’s Your Strength Building Plan?
It makes me sad when we get emails from people who struggle and try and work hard to get healthier, and to be better at push-ups, and just can’t seem to make any progress.
If that’s you, you’re not alone!
1) Consider working with an online coach (or in-person trainer).
Helping people learn push-ups and other bodyweight exercises is why we built our1-on-1 Online Coaching Program:We build programs for busy people to cut through the noise and just get results
2) Exercising at home and need a plan to follow? Have questions you need answered? Check out Nerd Fitness Prime!
Nerd Fitness Prime contains at-home exercise routines, live-streamed workouts with NF Coaches, a supportive online community, group challenges, and much more!
3) Join our community!We have hundreds of thousands of people, and I send out two free emails every week to help them level up their lives. Join our free community today, and I’ll send you a dozen free ebooks, including TONS of workout plans you can do anytime, anywhere.
Join the community by signing up in the box below:
Grab Your Beginner Bodyweight Routine Worksheet. No Gym Required!
Complete this workout at home, no equipment required
Avoid the common mistakes everybody makes when doing bodyweight exercises
Learn how to finally get your first pull-up
YOUR MISSION, SHOULD YOU CHOOSE TO ACCEPT IT:go home, set up a camera, and check your form on your push-ups.
I hope you’ll find that your form is as good as you expected, but it’s okay if it’s not, it’ll give you something to work on.
Go do some push-ups, and work on getting better with them every day.
You’ll be moving from Level 1 to Level 4 push-ups and beyond!
-Steve
PS:Not to brag, but I typed this entire article while doing 1-handed push-ups.
PPS:Okay no I didn’t. But it would have been cool if I did, right?

 (Livi’s bracelet has tiny macarons on it)