Sharing tips on how to create a home gym on a budget and what equipment you need.
Hi friends!
For this post, I wanted to chat about how to set up a home gym and what equipment you need, especially since many of us are still working out at home, or you might be considering building a home gym on a budget.
Home gyms are getting even more popular since the pandemic started and there are SO MANY benefits to having your gym at home. One of my favorite parts is that there’s zero commute time, no gym membership, and if the kids are home, I can just get in a workout while they play or watch a show.
Creating a home gym can be a bit challenging if you have a limited budget (some gym technology and gear is pricey!) but there are ways you can create a home gym that works for your needs without breaking the bank. You can also customize it based on what you like to do and what products you think you need.
Before I get started, I just want to emphasize the fact that you don’t need fancy or expensive pieces of equipment to get into a great workout. All you need to get an awesome workout is a plan, sneakers that fit you, and motivation. Anything else is just a bonus.
How To Create A Home Gym On A Budget
Take advantage of what you already have and create a wish list for future items
Grab a program like Microsoft Excel or Google Sheets and start listing all the stuff you already have. Then, prioritize them in the second column by assigning a rating system or numbering them. For the items you want to get your hands on, add them in a third column and prioritize them too. This will keep you organized and help you make smart decisions about what to get next. So, get ready to conquer your shopping list like a boss!
Create a budget and estimate expenses
Determine a total spending budget and after doing some searching online, you can estimate how much your total gym set-up will cost. Be realistic and don’t break the bank! Next, hit up the interwebs and search for the equipment you want. Check out prices on different sites and make a list of what you need. Add up the total cost and voila! You’ve got an estimate. Just remember to factor in any extra costs like shipping or assembly fees. Now you’re ready to flex those budgeting muscles and get your gym set up on point!
Invest in multi-tasking tools at first
An example of this is if you’re looking for strength training equipment, find something that you can use for multiple things (like dumbbells) and is versatile, before expanding into different products in the same theme (like barbells, kettlebells, etc.)
Create a dedicated workout space
There can be a full-room gym in your house, a garage gym, an office corner gym, or whatever you have the room to use. If you don’t have a dedicated space, you could even store your workout items in a closet in a large bin. If space is an issue, focus on the items that don’t take up a ton of room (like resistance bands, jump rope, small Pilates ball, etc.)
Buy secondhand equipment
Looking for a deal on gym equipment like iron plates, bumper plates, or a squat rack? Check out Facebook Marketplace for some sweet discounts on used gear. Just make sure to inspect it before you buy it! And keep an eye out for gyms that are closing or moving – they may be looking to sell their equipment to recoup some costs. But remember, if they leased it, they can’t sell it. So do your research, negotiate the price, and get ready to pump some iron without breaking the bank!
Choose the equipment you will use!
This one seems obvious, but don’t purchase anything you won’t be excited to use in your routine. 🙂 A spin bike makes a lovely clothing rack but would be a waste of money.
Tips For Creating An Apartment Home Gym
Living in an apartment doesn’t mean you have to sacrifice your fitness routine. While you may have less space to work with, there are still plenty of ways to create an effective home gym right in your apartment. One key tip is to focus on equipment that can be easily stored away when not in use, such as resistance bands, yoga mats, and adjustable dumbbells. You can also look for equipment that doesn’t require jumping or making loud noises, like stationary bikes or rowing machines with magnetic resistance.
Another tip is to use vertical space to your advantage – consider installing wall-mounted shelves or using storage bins to keep your equipment organized and out of the way. This will help you maximize your space and keep your apartment looking tidy. Finally, don’t forget about the importance of noise reduction – using a noise-reducing mat or investing in quieter equipment can help keep your neighbors happy. By following these tips and getting creative with your setup, you can create a functional and effective apartment home gym that fits your space and your fitness goals.
Here are some of my top home gym essentials!
Home Gym Essentials
Weights and resistance training
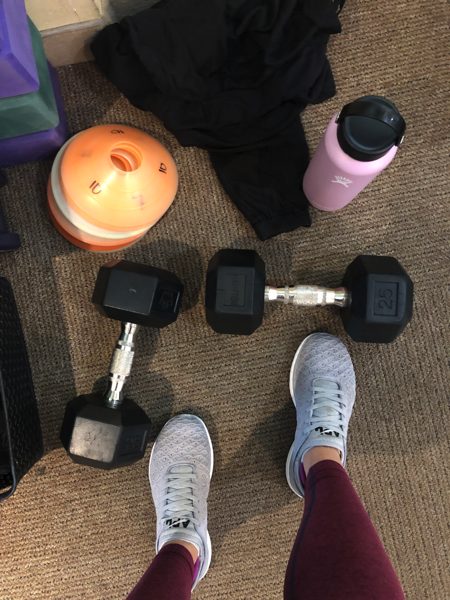
Dumbbells: The classic never dies. I think if you add anything to a home gym, a couple of sets of dumbbells are all you need and provide the best value and versatility. I’d go with a light pair (3-8 lbs) and a heavier set (12-25 lbs). Adjustable dumbbells are another great option if you don’t want to take up a ton of space.
Kettlebells: Kettlebells are a great way to switch up your strength training. I love using them for swings and unilateral strength work like single-leg deadlifts, shoulder presses, farmer carries, and rows. A kettlebell workout is here.
Barbells: If you’re used to strength training with dumbbells, a barbell can be a fun way to do something different.
Bowflex or cable machine: A Bowflex is a little less cumbersome than a cable machine and does a lot of the same things. I have this one and love it.
TRX: TRX is another one of my must-have items. You can install them anywhere, they’re extremely lightweight, and you can do so many exercises with them. My favorite TRX exercises are here.
Resistance bands: These are perfect if you’re a beginner and don’t want to purchase dumbbells yet, or if you have limited space. These are also wonderful for travel.
Cardio options!
For cardio options, check out Facebook Marketplace or Craigslist. People are always getting rid of fitness equipment and you might find something awesome!
Treadmill: My #1 favorite brand is Woodway, but they’re hard to find, and Peloton offers a treadmill. <— I haven’t tried it but know it has to be good.
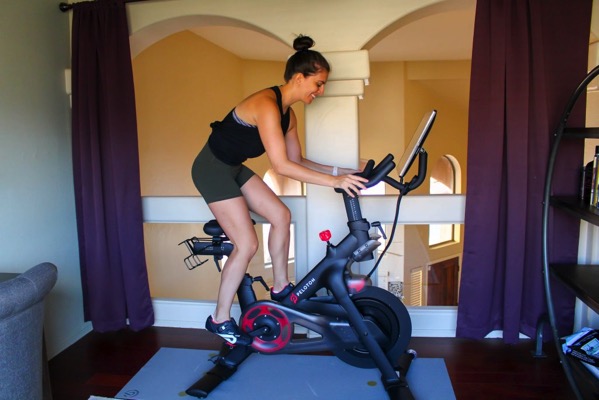
Spin bike: My Peloton is still one of my all-time favorite purchases. I use it at least once a week and LOVE the classes. The Pilot is hooked on it now, too! I recommend a spin bike because it’s low impact, you can get in an excellent cardio workout, and they don’t take up an insane amount of space. Check out my review of the Peloton bike here, and how to PR on the Peloton here. If you decide to go for it, email me and I’m happy to pass along my referral code.
Rowing machines: These are incredible to have at home if you want a different cardio option or you like interval training. I like the rowing increases strength and definition in arms and back, when these areas can be a bit neglected on the spin bike, treadmill, or stairclimber. The IndoRow is my fave brand.
Battle rope: Battle ropes are so much fun (lots of exercises here!) and a fantastic way to get your heart rate up quickly.
Jump rope: This is the most economical cardio option. Grab a jump rope and do some jump intervals.
Mat. Any mat will do, and Target and Amazon offer inexpensive mat options. My all-time favorite mat is Manduka.
Theragun. This handy tool is inssannnnneee at relieving sore muscles. If you’re looking for an ultimate recovery tool, this is a good one.
Fun extras
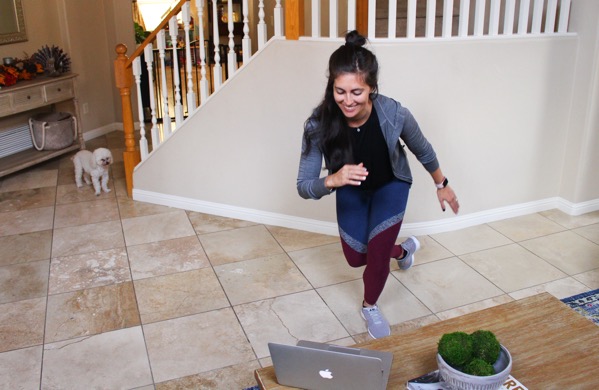
(I miss my lil Bella Boo)
Apps and On-Demand Workouts
Peloton App:
I think we all know I love Peloton. The classes are fantastic and I love the music. I will say I prefer the cardio and yoga classes over the strength and boot camp classes, but I think they do an incredible job. Check out my full review of the app here.
Les Mills On Demand:
Les Mills On Demand is one of my very favorite resources for home and travel workouts. The instructors are the best of the best and the workouts and science-driven and research-based for maximum effectiveness. They put a lot of care and science into the structure and design of their workouts, and you can tell. My top classes are BODYPUMP, BODY ATTACK, and GRIT. Get 21 days of Les Mills On Demand for free with this link.
Sweat app:
Sweat App. If you’re looking to follow a precise plan, the Sweat App is the place to be. They have so many different programs and I like these workouts when I don’t want to think about anything and just go.
Barre apps:
Physique 57, Pure Barre and barre3. These are perfect if you’re looking for a barre workout! I used to prefer the P57 workouts but I feel like the On Demand ones have been a little stale lately.
How much does a home gym cost? Well, that depends on how fancy you want to get. You could go all out and spend upwards of $15,000, or you could keep it simple and spend as little as $200. Don’t let the price tag scare you away though! With some savvy shopping and a bit of creativity, you can build a budget-friendly home gym that will help you crush your fitness goals without crushing your wallet. So, whether you’re looking for a full-blown fitness palace or just a small space to get your sweat on, there are plenty of options out there to fit any budget.
Get fit without going broke – create a budget-friendly home gym and crush your fitness goals!
You don’t need to spend a fortune to get fit and healthy. With a little bit of creativity and planning, you can create a home gym that won’t break the bank. Just remember to prioritize the essential equipment, look for multi-functional items, and keep an eye out for sales and discounts. Trust me, with some effort and dedication, you can achieve your fitness goals from the comfort of your own home without having to shell out a ton of cash. So, what are you waiting for? Start building that budget-friendly home gym today!
Do you work out at home or the gym? If you could add anything to your workout space, what would it be? I want a Peloton tread… or a Technogym Skill Mill.
We’ve helped thousands of people run injury-free and train for their first 5k or marathon, and we’ve put together everything you need to know below too!
If you’re interested in starting a proper running practice (which you are, ’cause you’re here), you may want to try our new app! It contains a fun adventure that will take you from sitting on your couch to running a full 5k – with plenty of benchmarks in between for you to find your groove. No guesswork needed, just tie your shows and follow along with the app.
You can sign-up for a free trial right here:
Alright, let’s do this thing.
How to Run Properly Stage 1: Initial Conditioning
Before you even THINK about strapping on a new pair of Nike shoes and going for a run around your neighborhood, we need to get a few things straight:
Your body needs to have a base level of fitness before running becomes a viable option.
Here’s why running too early can be harmful:
Every time you run, every time you take a step, you put the pressure of your entire body weight on the muscles, tendons, and joints in your legs, knees, ankles, feet, and toes.
If you are overweight and have improper running technique, that means your joints and tendons are taking an absolute POUNDING for however many steps you take during your run: around 6,200 steps in a 5k, 12,200 steps in a 10k, or 50,000+ steps in a marathon.
Your initial conditioning for running will center on three points:
#2) Strength Train.We have coaching clients who repeatedly injured themselves running until they started a strength training practice. After lifting some weights their ligaments grew strong and allowed them to run injury-free.
Swimming – very low impact as the water holds you up.
Elliptical – although I’m not a fan of spending all afternoon in a gym on a treadmill, this is the better option as it removes the opportunity for joint impact.
To Recap: strength train, reduce your calorie consumption, and begin a low impact activity – build up your foundation to prep your body for running. The less weight your body has to carry around, the less work your legs and joints have to do, the less likely you’ll be to damage your joints and/or injure yourself.
Now that you have a solid foundation and you’re ready to start running, you can move on to the next step.
If you don’t know where to start on changing your diet, or have had trouble with it in the past, I got you.
We created the Nerd Fitness Diet cheat sheet to help you get going. It’s a level-up system designed for you to adopt new healthy habits, that will stick, by slowly progressing you from a newbie to an expert.
If you’ve had trouble previously, perhaps it’s because you changed too much too quickly.
Want to check it out? You can grab it for free when you join the Rebellion in the box below!
Download our free weight loss guide
THE NERD FITNESS DIET: 10 Levels to Change Your Life
Follow our 10-level nutrition system at your own pace
What you need to know about weight loss and healthy eating
3 Simple rules we follow every day to stay on target
How to Run Properly Stage 2: Warm-Ups for Running
Before you take your first stride as a runner, you need to be properly warmed up.
When most people think of warming up, they probably think of standing there and doing some static stretching for 10 minutes…you know, to make sure you don’t get injured!
Wrong! Fail! Stretching before running can actually increase your risk of injury.[3]
Instead, try a dynamic warm-up – get your body properly warmed up and prepared for the rigors of running.
Let’s set you up with a few different options:
#1) A running-specific warm-up video from my friend Jason over at Strength Running, who you’ll see in more videos below:
#2) Coach Staci providing you with a quick sequence to try out:
Just like with strength training, if you don’t have time to warm up, you don’t have time to run.
Cut the run short if you need to, but not the warm-up!
How to Run Properly Stage 3: Correct Running Technique
If you don’t learn how to run correctly, you’re doomed to develop an overuse injury and that’s going to negate the whole reason you started running in the first place!
This is why your running form is so damn crucial: when you run, you’re putting hundreds of pounds of pressure on your joints and ligaments with each bounding step down the road. This is then repeated thousands of times over the course of training and a race.
No wonder nearly every runner has tons of stories of injuries they’ve had to deal with. It can be a brutal activity that can wreak havoc even with good running mechanics.
With poor running mechanics, the results are compounded.
Not the GOOD kind of “compounded” like compound interest, which you learned in 2nd grade with the story about starting with 1 penny a day and doubling it for 30 days.
The BAD kind of “compounded” like plantar fasciitis and stress fractures and sore IT bands and torn ligaments and crazy soreness all the time.
You know, painful stuff…
We don’t want that.
Make sure you follow the below five steps:
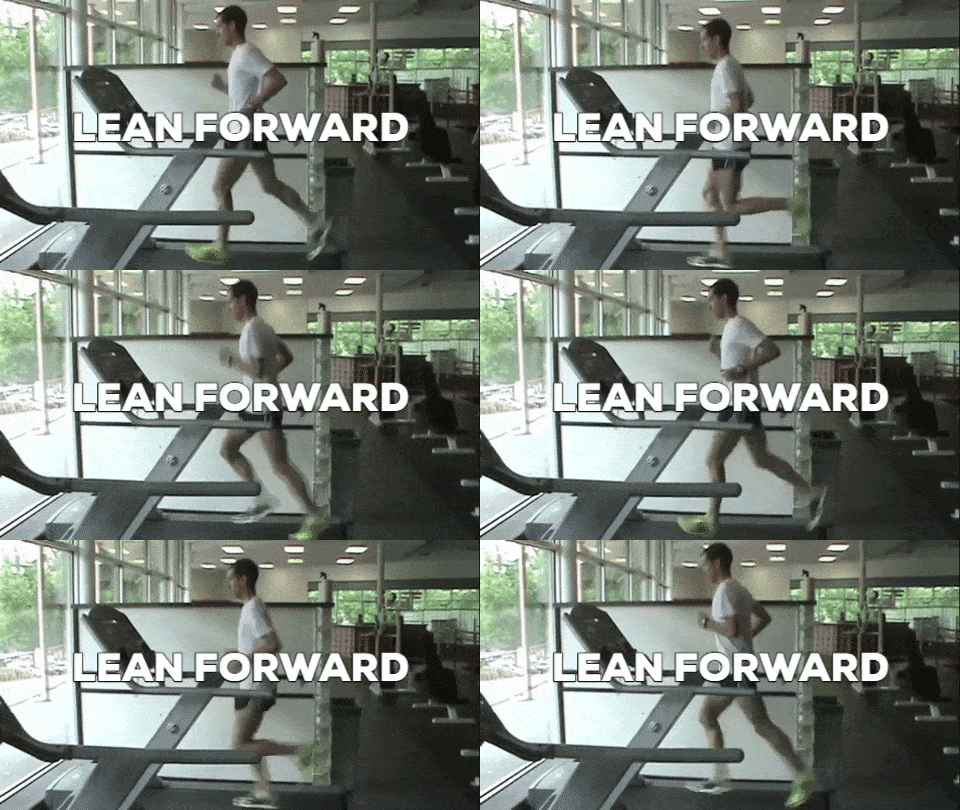
1) LEAN FROM YOUR ANKLES
Lean from your ankles, and keep a straight line from your ankle, through your butt, and up to your head. If you’re standing still with this slight forward lean, you should feel like you’re about to fall forward.
Just don’t actually fall forward.
When you start running, gravity will help keep you progressing forward. A proper lean from the ankles keeps your body in alignment and loads your muscles properly and efficiently.
2) INCREASE YOUR CADENCE
Cadence is your stride rate, or the number of steps you take per minute. It will probably seem weird at first, but you’re putting less stress on your legs with shorter foot strikes.
Your cadence should be at least 170-190 steps per minute when you’re running at an easy, conversational pace. It will probably increase once you start running faster—that’s normal.
“Steve, what the hell do I do with “170-190 steps per minute?”
Great question. Go to Spotify and look for 170-190BPM playlists, like these which I found here:
Not on Spotify? Cool. (But like, why?) To get a cadence, try running to Outkast’s “Hey Ya” and time your strides to match the beat. That’s the cadence you’re looking for:
Research has shown[4] that increasing your cadence and taking more steps (around 180 per minute) provides many of the same benefits of barefoot running:
Less impact shock that goes up your legs.
Improved running economy (or your efficiency, which means you’ll run faster with less effort!).
Reduced chance of injury.
You’ll feel like you’re taking way more steps than normal – that means you probably had poor form before and now you’re fixing it!
If your legs get to the point where they’re going this fast, let me know:
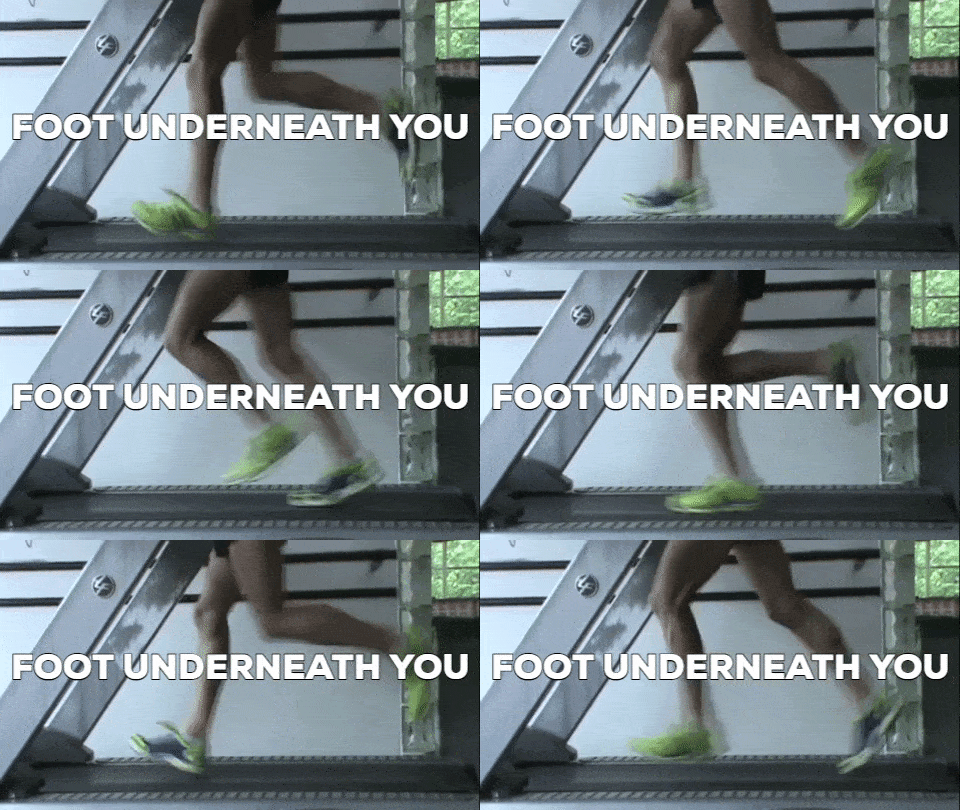
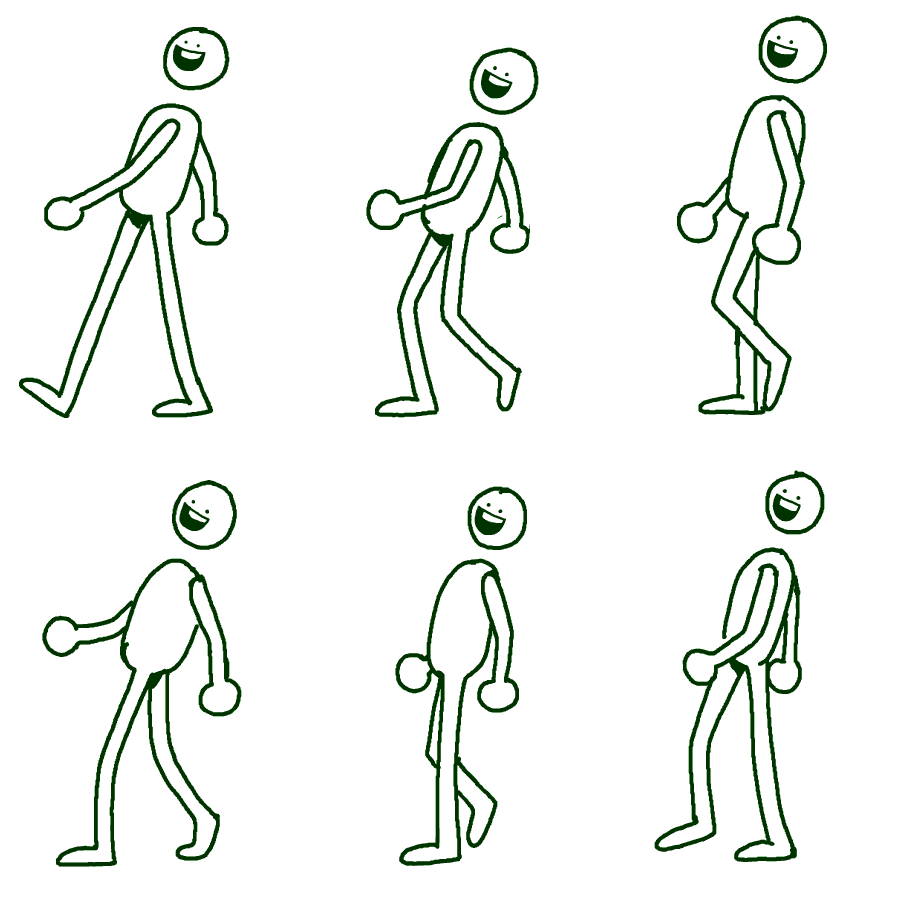
3) FOOT STRIKE AT THE RIGHT TIME
When your foot comes down and makes contact with the ground, it should be underneath your body, not in front of it.
Combined with a quick cadence and a slight forward lean from your ankles, you’ll be distributing impact shock evenly—and efficiently.
This aspect of running form is often skipped over by beginning runners.
Instead of focusing on where the foot is landing in relation to the rest of the body, they focus too much on running on their forefoot. If you don’t land in the right place first, a midfoot or forefoot strike will only do more damage.
As you’re running, a good mental cue is to think that you’re just “putting your foot down” in a straight line underneath your body.
There’s no reaching or stretching your leg out in front of you.
Practicing this mental cue will have your leg touching down almost exactly underneath your center of mass, distributing your weight evenly and safely.
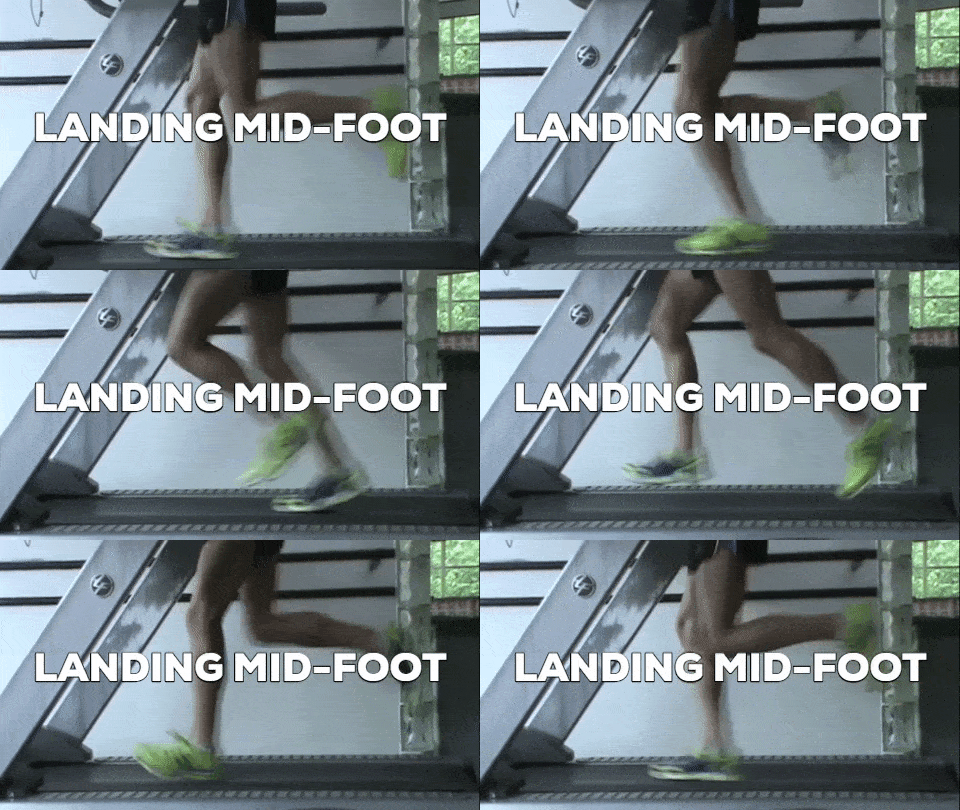
4) LAND ON YOUR MIDFOOT
While not as important as landing underneath your center of mass, becoming a mid-foot striker has a host of benefits.
It can help you avoid a lot of injuries by absorbing impact shock and preventing a severe heel striking running stride.
Heel-striking can’t be entirely blamed for injuries and labeled “bad.”
Even elite athletes heel strike when they run races! It’s not entirely bad— especially if you’re putting weight down on your foot just after you heel strike, instead of directly on the heel.[5]
What you should focus on is having a higher cadence, landing underneath your body, and not aggressively heel striking.
Try to land with your foot flat on the ground, instead of with your toes angled upwards.[6]
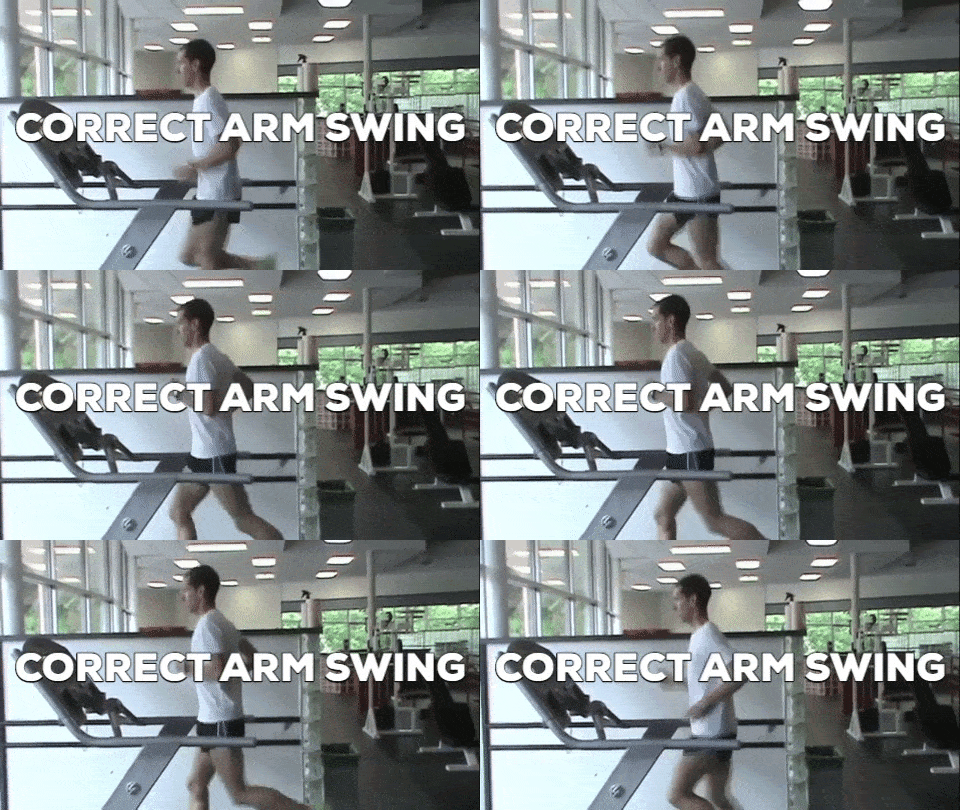
5) SYMMETRICAL ARM SWINGS
Nobody wants to look at you running if you’re flailing your arms wildly all over the place like Elaine dancing from Seinfeld.
An ideal arm swing has your arm bent at about 90 degrees and a front-to-back swing (not side-to-side).
Imagine a pretend line that goes down your mid-line or center of your body. When you run, your hands should not cross over this imaginary line.
Cup your hands loosely together (no clenched fists!) and if you want to use your arms for momentum, pump your elbows, not your hands.
Once you incorporate these changes into your running form, you’ll feel a lot more comfortable and your injury risk is going to plummet.
For extra credit, learn to run softly and quietly.
Foot stomping isn’t allowed and gets increasingly more difficult as you approach 180 steps per minute.
A few other things you want to keep in mind:
Keep a tall back, chest up. No slouching.
Look 30-50 meters in front of you – not head down looking at your toes.
Both are easy cues to keep an athletic posture and good running form.
Go back through and read this section a few more times. We know it’s a LOT to think about while running, but it is incredibly important.
If you get a chance, have somebody film you running, and then watch your tape back to see how you’re doing.
I should note that we provide form checks to our coaching clients.Through our awesome app, you can record a video of your running form or exercise technique and send it right to your coach! That way you can know your running and training safely and correctly!
How to Run Properly Stage 4: Walk Before You Run
Starting a running practice can be daunting.
That’s why I actually recommend walking first. I mentioned earlier that walking can help build the foundation of a great running practice.
Once you’re comfortable moving a little bit, an ideal way to actually start running is to alternate between a brisk walk and a jog. This can help you build up some strength so you can run at a more constant pace.
Try the following five steps to start your running practice:
Get comfortable walking for 20 minutes. That’s it. Stroll around your neighborhood a few times a week, until this is a cake-walk.[7]
Bump it up to 30 minutes. After 20 minutes is no problem, take it to the next level for a 30-minute walk. Once you can handle this fine, we can start picking up the pace.
Start run/walking. Walk as you have been for 10 minutes. Then, pick up the pace for a light jog for a minute (or 30 seconds if this is too tough). Give yourself a couple more minutes of walking (or longer) before you start jogging again. Do this for about 10 minutes, then walk normally for the last 10 minutes. You’ll still come in at 30 minutes for your exercise.
Now, run for longer. Once you’re comfortable holding a one-minute jog, let’s take it up a notch. We’ll still have you warm up for 10 minutes of walking, but when you jog, try going for a minute and a half. If this seems easy, go for 2 minutes! Alternate to a slower walk whenever you need to catch your breath.
Before you know it, you will be a runner. As you expand your jogging time, lower the amount of time you walk. At this point, you’re basically running with some short walking breaks. Which is fine! This is how people start to run and many continue to alternate between walking and jogging forever. Even if you get to the point of running races, there’s nothing wrong with taking some walking breaks. You do you.
Alright, we’ve talked about technique, plus some tips for getting up and running.[8]
However, I know you’re gonna ask, so let’s talk about what kicks you should rock.
Which Shoes Are Best for Running?
There are four components to look for in any shoe.
If the shoe doesn’t meet these four criteria, then your foot is going to be compromised.
A good shoe for running has:
Minimal “heel drop:” a lower heel-toe height difference.
A wide toe box that allows your foot to spread as it lands on the ground with each step.
A pliable bottom that allows your toes to bend to a full ninety degrees of flexion as you step.
Something to attach it to your ankle area.
Let’s look at each in a bit more detail:
1. Minimal heel-toe height difference (aka “drop”). When your shoe raises your heel higher than your forefoot (aka “heel lift”), your ankle and lower leg are being positioned in a slightly shortened position for the duration that you’re wearing the shoes.
When your leg muscles are thrown into a slightly unnatural position, it means the mobility of your ankle will suffer… and this will limit all sorts of things including your running gait.[9]
This doesn’t just mean high heels either…although running in heels is ridiculous.
This includes most regular shoes that have a bulky heel and lower toe. In many shoes, you’ll see this difference between heel and forefoot referred to as a “drop,” so “zero-drop” shoes are shoes where heel and forefoot are at the same height.
Check to see what your current shoes weigh, and each time you buy a new pair of shoes, work your way towards more and more minimal shoes – down to 10 oz or so (which would qualify them as “minimalist shoe” in our book).
Our advice would be to not go too far below 7-8 ounces.
The big question: “Should I be doing barefoot running?” – Occasionally, and with proper form, SURE. But don’t just put on a pair of Vibram 5 Finger toe shoes and go run a 5k on concrete tomorrow. That’s a recipe for disaster.
2. A wide toe box that allows your foot to spread as it lands on the ground with each step. With each step you take, your foot actually spreads wider upon landing. This is impossible for your foot to do when it’s in a shoe that is too narrow.
If the toe box is not at least as wide as your foot when you’re standing on your foot, while it’s bearing your weight, that’s a problem for your foot. Know that as your foot becomes more ‘natural’ it’s possible it will it may widen further, as the muscles and bones reposition themselves.
Feet crammed into a shoe is like putting a leash on Sonic the Hedgehog: they want to be free!
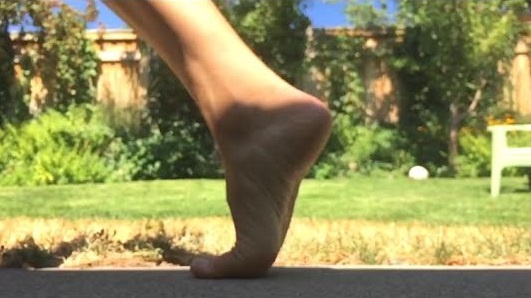
3. A pliable bottom that allows your toes to bend fully as you step. Your great toe is meant to flex to ninety degrees as you move through the gait cycle. See below:
If your shoe does not allow this due to a hard sole, your feet won’t be able to move as well, and the soft tissues of your foot will get weaker from not being used fully.
PLUS, when you aren’t flexing your big toe regularly, your body will start to lose the ability to use that joint fully. This can lead to all sorts of problems. Doh!
4. It’s strapped to your foot. If the shoe isn’t strapped around your ankle, your toes are going to grab at the shoe to keep it on with every step you take. This makes some of your foot bones push down and some of your foot bones lift up.
That shift means you change the amount of forces on each bone. Over time, this can lead to stress fractures and tissue injuries.
Check out the video below from movement specialist Kelly Starrett:
For each point above, this isn’t an “all or nothing” scenario. Similar to your nutrition, do the best you can when you can, and work your way into running with a minimalist shoe.
If you want to learn more about proper footwear, make sure you check out “A Nerd’s Guide to Healthy Feet,” written by Kate Galliett of FitForRealLife.com.
Where Can I Go for a Run? What’s the Best Surface to Run On?
For the most part, it doesn’t really matter what surface you run on if your form is good and you’re resting enough to recover between your workouts.
But each surface does affect your body in different ways, so you should know the pros and cons of each one.
#1) Asphalt (road)
People have been running on the roads since they were first paved over 100 years ago. Most people run exclusively on the roads since they’re the most common surface that’s available for running.
There’s nothing inherently wrong with road running. It’s stable and has a relatively predictable surface so you probably won’t twist an ankle.[10]
As long as you’re avoiding cars and running AGAINST the flow of traffic (so you can see approaching cars) you’ll be safe.
The danger of roads comes when you run on the same side of the road all the time.
The problem lies with the road’s slope.
For drainage reasons, every road has a slight slope toward the curb. If you’re always running against the flow of traffic your left leg is going to be slightly lower than your right. The solution is to switch sides of the road, but only if traffic conditions allow.
#2)Concrete (most sidewalks)
Most sidewalks are made of concrete, not asphalt, and are actually a lot harder than the road itself. This isn’t necessarily a drawback, but you will be experiencing more impact forces on concrete than the road. If you do a lot of running on the sidewalk, make sure your form is as good as it can be![11]
#3) Grass (fields)
Unless the grass is very hard-packed and smooth, I don’t recommend running on it for a long period of time. Grass is very soft so you won’t be sending jarring impact forces up through your legs like concrete, but the uneven surface is going to break up your stride and you could tweak your ankle or a muscle in your foot.
Some grass is great to run on, though. The harder and smoother it is, the better it is for running…like a golf course.[12]
#4) Dirt or crushed gravel trails
Smooth dirt or crushed gravel (very fine— not big chunks of gravel you find in some driveways!) are some of the best running surfaces. Like the hard grass surface of a golf course, dirt and crushed gravel trails offer the same impact-dissipating qualities while still retaining firm footing. It’s the best of both worlds.
You’ll find these types of trails at larger parks with walking paths or in national/state parks with well-maintained trails.
#5) Single-track trails
Think sharp turns, rocks, roots, stream crossings, hills, and anything else Mother Nature can throw at you. In a word: FUN.
These trails are usually narrow and filled with obstacles. The hills, direction changes, and irregular surfaces will force you to use a lot of stabilizing muscles in your lower legs. This could be good for building strength.
#6) Track
Found at most local high schools and colleges, a 400-meter outdoor track provides a great training place for workouts.[13] But that’s what they’re for: workouts. Not every day running!
The surface is forgiving like hard-packed dirt or a very firm golf course. But while the surface is great, the turns are what makes a track not ideal for everyday training. By doing all of your running on a track, you’re constantly turning left and setting yourself up for muscle imbalances.
You’re better off running somewhere where the turns are varied so you expose yourself to different stresses instead of the same thing over and over again. That’s how overuse injuries happen. Tracks are for faster workouts, not easy distance runs.
WHAT SURFACE SHOULD YOU RUN ON?
Your training would ideally be a combination of all of the surfaces that are available to you. Exposing your body to as much variety as possible will give you a better chance at preventing injury since you’re not doing the same thing over and over again.
The few types of running surfaces that lend themselves to more frequent training are:
Smooth dirt trails
Crushed gravel paths
Hard-packed grass (like a golf fairway).
The footing is sure and the surface isn’t too soft or firm.
Limit your running on concrete and technical trails because of the injury risk.Most sidewalks are made from concrete and are incredibly hard. Throw a tennis ball on one to see for yourself—it’ll shoot right up into the air because of the returned energy. Those same forces are being returned into your legs when you run on them.
Technical trails present a different challenge: roots, streams, rocks, and uneven terrain.
Run sparingly!
A good strategy to use when deciding where to run is to figure out how your body feels.
If you’re sore or have a tender muscle, run on a softer surface. A dirt trail or well-manicured field will help you recover better than the roads.
But if you’re doing a workout, you want to avoid technical trails or concrete sidewalks. Pick the track, a clear dirt trail, or a road without a severe camber.
Will Running Help Me Lose Weight? (Make Sure You Like Running!)
When people tell me they’re going to start a running routine, I always ask: “Great! Do you enjoy running?”
If the answer is “No, not really” then I’d say, “Interesting. Then….why running?”
Most peoplethinkrunning = weight loss.If you’re brand new to health and fitness, and you’re trying to lose weight, you’re most likely overwhelmed at what you should start with and how you should train.
So let’s answer the question “will running help me lose weight?”
Maybe!
Runningwill help you lose weight if you do two things:
Runningwon’t help you lose weight if you do two things:
You run consistently.
You don’t fix your diet.
As sexy as it is to think that just going for a run will help you lose weight, the data doesn’t back it up. Time Magazine rightly pointed this out years ago, and got yelled at for telling the truth, that exercise alone won’t make you lose weight.[2]
This is a common mistake:not fixing your nutrition if you’re running for weight loss!
If this were a movie, nutrition would be Tom Cruise inMission: Impossibleand exercise is that funny sidekick who helps Tom. Let’s be real here, Tom is doing all of the heavy lifting to make that movie what it is.
While exercise is important for health, it doesn’t have to be running. It can come from activities you DO enjoy:
“I don’t love it, but I need to complete it for a fitness test.”
“I’m running a 5k for charity/work and want to do well.”
“Not yet, but I think I could…”
“I like how I feel AFTER a run.”
…then we can continue the conversation!
The perfect place to continue the conversation?
Our new app! We have an adventure that takes all the information in this guide and provides it with actionable steps (hehe) for you to get up and running. No more “am I doing it right?” just follow the app and know you’re training correctly.
You can sign-up for a free trial right here:
How Do I Start Running? (Next Steps)
Once you get comfortable running around your neighborhood or park, you can start thinking about taking it to the next level.
Have you ever thought about running a race? They can be a lot of fun!
Here’s a clip from a race years ago where I dressed up like a Caveman with 20 of my friends and raised thousands of dollars for kids with cancer to go to summer camp!
If you want to learn how to get started, make sure you check out our article “Couch to 5K.” We cover the popular program and give our take on running your first race.
Just make sure you don’t make these 5k mistakes:
If you want even more guidance on long-distance running, I’ll point you again to my buddy Jason Fitzgerald’s wonderful site Strength Running. I reach out to Jason whenever I need advice on proper running (including the tips found in this post).
Alright, I think you’re ready to lace up and head out the door!
Want a little more help getting going? A slight nudge to get you out of the door?
Here are my top recommendations for next steps:
#1) We have a bunch of NF Coaching clients that love to get outside and run!If you want step-by-step guidance on how to lose weight, eat better, and learn to run properly, check out our killer 1-on-1 coaching program:
#2) If you need a trigger to “get up and run” check out NF Journey. Our fun habit-building app helps you exercise more frequently, eat healthier, and level up your life (literally).
Try your free trial right here:
#3) Join the Rebellion!We need good people like you in our community, the Nerd Fitness Rebellion.
Sign up in the box below to enlist and get theNerd Fitness Starter Kit,including the 15 fitness mistakes you don’t want to make and our guide to the most effective diet and why it works
Get Your FREE Nerd Fitness Resource Kit
15 Fitness traps you should avoid
Comprehensive beginner's guide to Paleo diet
BONUS: How to level up your life and be the hero of your own story
Now, your turn!
Are you an avid runner?
Do you have any tips for Rebels just lacing up?
Or are you like me, and only run when something is chasing you?
Let us know in the comments!
-Steve
PS: Don’t forget to check out the rest of our running content!
You can read the review if you want to science out about running strides.
This is called a “proprioceptive heel strike” and is done just to get a sense of where the ground is.
When your toes are angled up, this is called “dorsiflexion” – nerd alert!)
Giggle.
I really do crack myself up while doing this.
Gait means the locomotion of limbs, more or less. Check out this Wikipedia article for more, which also has a sweet gif of an elephant in it.
Just watch out for potholes.
Heel-striking is going to bite you in the ass if you’re smashing your heels against one of the hardest surfaces you can run on.
I’mnot recommending you sneak onto a golf course to run… but if you do, you’ll experience my favorite running surface. Many high school cross country meets are held on golf courses for this reason: they’re soft enough to be easy on your joints and muscles, but hard enough to give you enough spring to let you do some fast running.
Since they’re perfectly measured at 400 meters to a lap, you can run intervals precisely and get a lot of great data on how fast you’re running. You can use that information to predict how fast you’ll race in your 5K. Run by your local track and take note of the markings on each turn. Get familiar with the starting line, 200m mark (on the opposite side, at the next turn), and how to run a mile there. Note that a mile on a track is not 4 laps! You need to find the mile marker line, which is about 9 meters behind the starting line. It should gradually curve closer to the starting line as you reach the outside lanes.
As you might know from our “How to lose weight” guide, the key to sustainable weight loss is getting ourselves to consume fewer calories in a way that doesn’t make us miserable.
Because our brains and bodies are complicated emotional disasters, there are some tips and tricks we can implement to protect us from…ourselves.
4 Strategies for Portion Control:
Use smaller plates. Folks will often eat what’s placed in front of them, so using smaller dinnerware has been shown to help people eat less.[1]
Drink a glass of water before your meal. If you chug a glass of water 30 minutes before you plan on eating, the H20 will take up some room in your stomach. This might help you eat less.[2]
Take it slow. It can take about 20 minutes for your body to come around to the fact that it’s full, so slowing down your meals can help you eat less.[3]
Use a food journal. Recording everything you eat and drink is a great way to become aware of portions, which can help you control them.[4] In fact, one of the first missions we have Nerd Fitness Prime members complete is creating a food journal.
All of these methods will work to some extent, and they’re good to keep in mind and also practice.
However, nothing will get more consistent results than actually learning the number of calories in the food you eat (Portion Control Tip #5)!
Study[4] after study[5] after study[6] shows that our bodies obey the laws of thermodynamics and that in order to lose weight, we need to burn more calories than we consume regularly.
When youconsume more calories than you burn, your body tends to store those extra calories as fat (weight gain).
When youburn more calories than you consume, your body will pull from fat stores for energy (weight loss).
However, as we point out in ourCalories In, Calories Outguide, determining your exact “calories in” can be a real pain. Not only that, but many people with certain personality traits can become neurotic about tracking every single calorie. They worry if they go 1 calorie over their daily allotment.
So, what’s a nerd to do?
Unless you’re going to weigh out all your food (something I’ve done before) and be militant about tracking, is it possible to “track” your food with a high level of accuracy without having it take over your life?
The answer: yes, by getting darn good at estimating!
Portion Sizes: How to Portion Control (The Best Method)
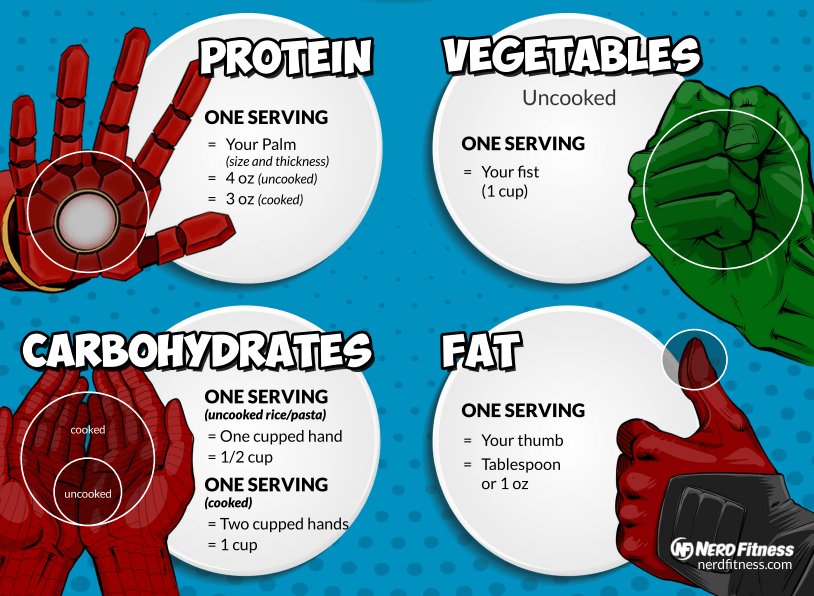
You already carry with you the best method for portion control.
Your hands!
Even if you have robot hands.
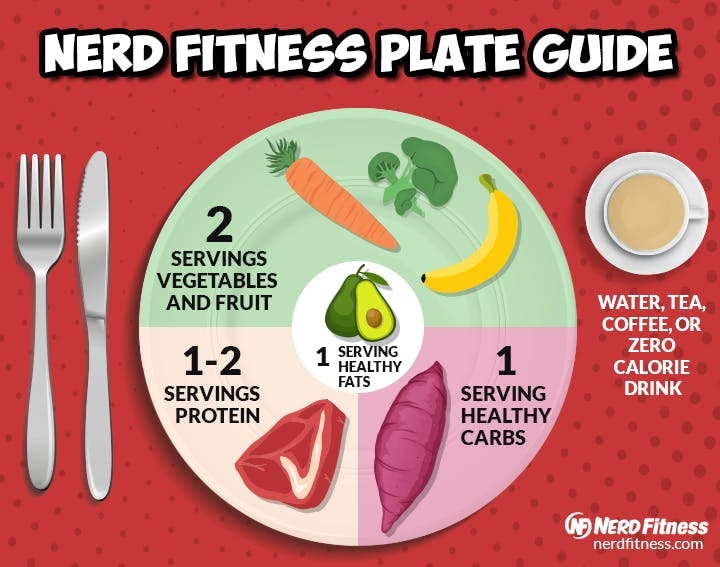
We’re going to use them to build a healthy plate, as shown above.
However, using your hands as a tool for portion control provides a “good enough” strategy that can help your food intake:
As you can see, we’re going to focus our portion control strategy on:
Protein
Vegetables (technically carbs, but important enough to deserve their own category)
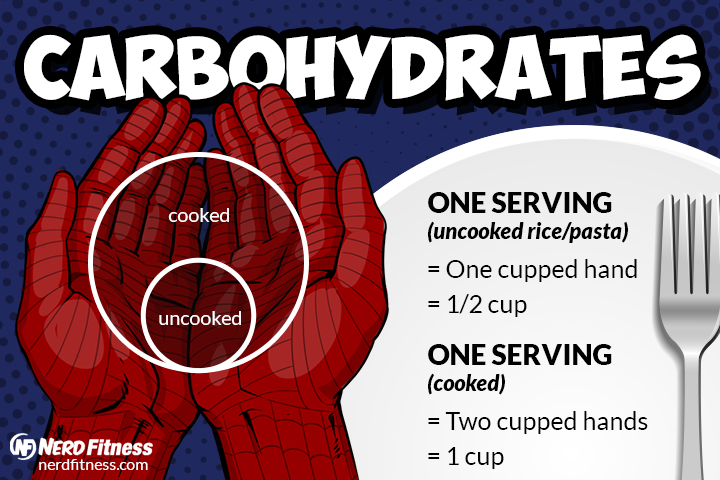
Carbohydrates (think starches and fruit)
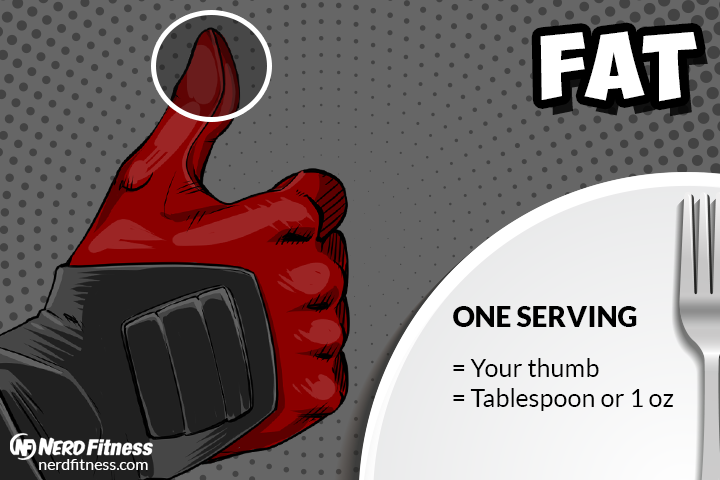
Fat
Each macronutrient will correspond to an area of your hand, to give you a sense of what a proper portion size should be.
We’ve learned that using your hand as a guide is the most helpful strategy for portion control:
You might not always have access to small plates.
You might forget to drink water before each meal.
You might have a short lunch break without the luxury of eating slowly.
You might grow tired of logging all your food intake.
However, having an intuitive sense of what foods should be eaten in what portions will help you level up your healthy eating.
When in doubt, match the food in front of you to your hand and carry on.
Let’s break this down a little by talking about protein and veggies.
What is the Correct Portion Size Part 1: Protein and Vegetables
The above video is taken from Nerd Fitness Prime, as part of our NF Kitchen series.
In it, Coach Lauren and Justin discuss the two most important parts of every meal:
Protein
Vegetables
Here’s something that might seem counterintuitive: our #1 recommendation for portion control isn’t about limiting food. Instead, make sure you get a proper serving of protein and vegetables every time you sit down to eat.
In other words, when you begin your healthy eating journey, don’t even worry about nixing any specific food. Just make sure you are leaving plenty of room for protein and vegetables.
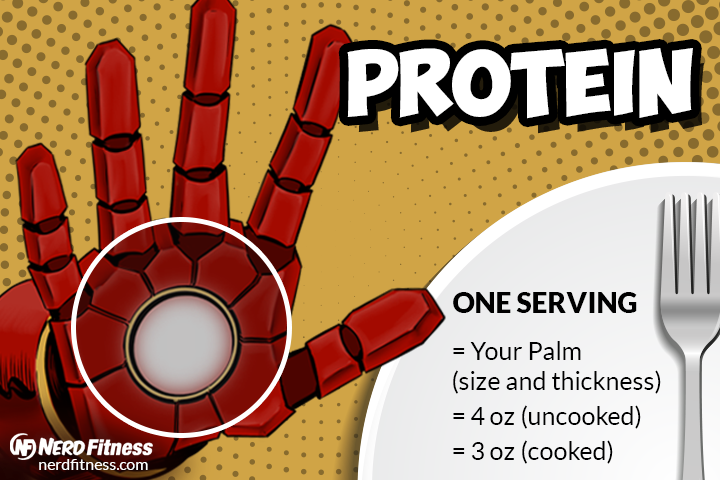
A serving of protein is about the size and thickness of your palm:
Protein can come from any number of sources, including:
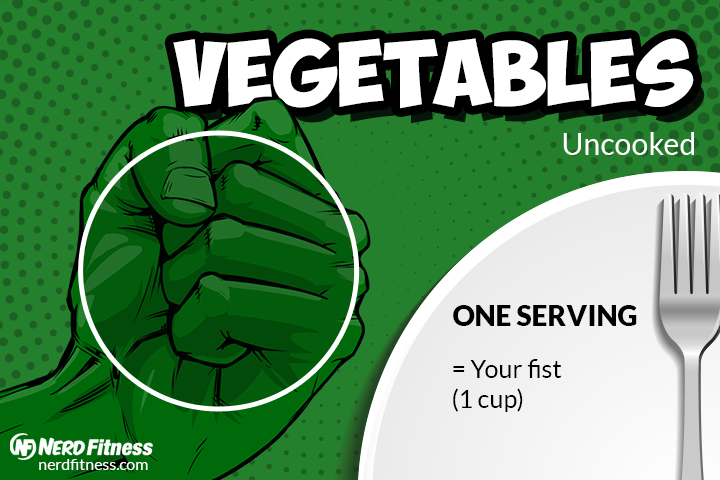
A serving of veggies is about the size of your fist:
Here’s a quick, non-complete list of veggies that can fill half your plate:
Broccoli
Broccolini
Cauliflower
Spinach
Kale
Spaghetti squash
Brussels sprouts
Zucchini
Cucumber
Carrots
Onion
Asparagus
When it comes to learning portion control, start by making sure you eat enough protein and vegetables.
How much?
As we discuss in our protein guide, when building a plate aim for the following amount of protein:
Dudes: 1-2 servings (6-8 oz or about 170-228 g): two palms
Dudettes: 1 serving (3-4 oz or about 85-114 g): 1 palm.
For vegetables, in practice you can probably eat as much as you can stomach (the fiber will likely slow you down), but aim for about 2 fist fulls at most meals, or about half your plate.[9]
Here’s why you should prioritize protein and vegetables if you’re struggling with portion control:
Protein. Eating enough protein will assist your health as you age.[10]Plenty of protein will also help you retain and grow muscle.[11] Plus, prioritizing protein will help you stay full and satiated between meals.[12]
Vegetables. Veggies are both high in nutrients and low in calories, which makes them ideal for a healthy plate. Plus, the fiber will not only help your health, it’ll also keep your indoor plumbing in proper order.[13]
In the video that kicks off this section, Coach Justin makes a great point: aim for a little better than you are today.
Meaning if you don’t really plan your meals at all, start by having ONE meal include a good protein source and some veggies.
You also want to make sure you’re including healthy fat in your diet too.
Fat is actually the most calorically dense macronutrient, so comparatively it’ll take up less room on your hand.
Here is a serving of fat, roughly the size of your thumb!
Healthy fat can be found in foods like:
Avocado
Almonds
Walnuts
Macadamia nuts
Olive oil
Almond butter
Peanut butter
The reason people call it “healthy” is because the fat is unsaturated, although science has recently come around on saturated fat too in the correct amounts.[14]
When it comes to portion control, we need to pay close attention to carbohydrates and fats, because this is where people have the tendency to overeat.
However, that doesn’t mean we want to completely ditch both food groups either.
Here’s why you need to eat these two macronutrients:
Carbohydrates. Did you know fiber is a type of carbohydrate? Yep. As we mentioned earlier, you need plenty of fiber for good health.[15] Carbs are also a great source of quick energy, especially fruit.[16]
Fats. Some nutrients like Vitamin A are fat-soluble, meaning they are best absorbed alongside some fat.[17]Fat will also help you feel full, which can help with overall portion control for the day.[18] While a little goes a long way, you wouldn’t want a “zero fat” diet.[19]
An area of concern when attempting to portion control is dining out.
It seems like restaurants serve you twice the amount of food that you need.
Here’s what Coach Justin does in the situation: ask for a to-go box as soon as you place your order.
Yeah, it’s a little weird, but as soon as you get your food, place half of it in the container.
Boom! An extra meal for later.
Another thing to consider:restaurants want you to leave feeling full.
They often do this by piling on the carbs. Think extra bread, lots of rice, plenty of pasta, etc.
So it might make sense to split these portions in two, and you’re set for lunch the next day.
Also, if you get hungry after eating only half your meal, no problem. Just eat the other half. Even if you’re still at the restaurant.
The point is to consciously think about how much you’re eating.A break halfway through can be used as a decision tree:
Should I keep eating?
This question alone can help with portion control.
One last thing: we know eating out at restaurants is often a family or friend-bonding experience, so we’d prefer you ENJOY the night. Food is more than just calories.
Just plan for it! If you eat a really large dinner for a celebration, eat slightly smaller portions for the next day or so and your body will be right back on track.
How to Portion Control for Weight Loss (Next Steps)
In the video above, Coach Lauren and Justin walk you through eating a Nerd Fitness Healthy Plate IRL (In Real Life).
It’s all well and good to build a healthy plate at home, but…
What if you’re at a restaurant?
What if you need to order a sandwich?
How about pizza?
Here are some tips from the Coaches for portion control IRL:
#1) How to Portion Control a Sandwich
The trick here is to pack in as many vegetables as you can. Yeah, you’re probably not going to get two fist fulls in, but you can squeeze in a lot of spinach, onion, sauerkraut, and tomato (yeah, it’s technically a fruit, whatevs) on your sandwich.
Your carbs can be some type of whole-grain bread (you can do an open-face sandwich if you want to limit this).
Your protein can come from some turkey.
Your fat can be a little avocado.
Boom.
You now have a turkey sandwich that matches our healthy plate strategy.
#2)How to Portion ControlChili or Soup
This can be a little tougher when everything is mixed together.
If you’re making it yourself, perhaps you measure out your hand portions as you cook.
Put a palm-size portion of ground beef in.
Your vegetables can be onion, garlic, and tomatoes (again a fruit, but who cares).
Your carbs can be pinto and/or kidney beans.
Your fat can be a little bit of cheese sprinkled on top.
Sure, maybe you’re doing less than two fistfuls of vegetables, and more than a cupped hand of carbs (beans).
It doesn’t matter. Again, the point is you’re putting a little thought into proper portions.
If you’re eating out and ordering soup or chili, maybe just think of the end product in mind:
“After portioning everything out, it should be about two fistfuls of food. So that’s what I’ll eat. Everything else I’ll take home.”
#3) How to Portion Control Pizza
This is a little trickier because pizza is mostly bread (carbs).
But Coach Justin has a solution for this.
First, he eats something he’s proud of, like a salad.
Then he portions out his pizza, which if he uses his hand strategy, would be about two slices:
Is it perfect?
Nope.
Does it help Coach Justin reach his goals and allow him to still enjoy life?
Yep!
So experiment a little by creating some rough guidelines, see how you feel, and course-correct as you go.
Remember, any step you take on leveling up your nutrition is great.
If you don’t know where to start, I actually recommend you begin by not worrying about what to take OFF your plate, but instead what to add!
Make sure every meal you eat has a healthy protein source and a vegetable. Once you have that dialed in, THEN you can worry about portion controlling your carbs and fat.
If you need help along the way, we got you.
Here are three ways to continue your journey with Nerd Fitness.
#1) Our Online Coaching program: a coaching program for busy people to help them make better food choices, stay accountable, and get healthier, permanently.
As I said before, we teach portion control to our clients who struggle with overeating, so we’ll provide a non-judgmental expert to help you reach your goals.
You can schedule a free call with our team so we can get to know you and see if our coaching program is right for you:
#2) If you want an exact blueprint for leveling up your nutrition, check out Nerd Fitness Journey! Our fun habit-building app helps you exercise more frequently, eat healthier, and level up your life (literally).
If you follow our Nutrition missions, you’ll learn to portion control while earning XP! Sah-weeeet.
Try your free trial right here:
#3) Join the Rebellion!We need good people like you in our community, the Nerd Fitness Rebellion.
Sign up in the box below to enlist and get ourRebel Starter Kit, which includes all of our “work out at home” guides, the Nerd Fitness Diet Cheat Sheet, and much more!
Get your Nerd Fitness Starter Kit
The 15 mistakes you don’t want to make.
Full guide to the most effective diet and why it works.
Complete and track your first workout today, no gym required.
Alright, I want to hear from you:
Do you have any tips or tricks for portion control?
Do you use the hand strategy that we covered today?
What’s your biggest challenge with portion sizes?
Let us know in the comments!
-Steve
PS:If you’re just starting your weight loss journey, make sure you check out: